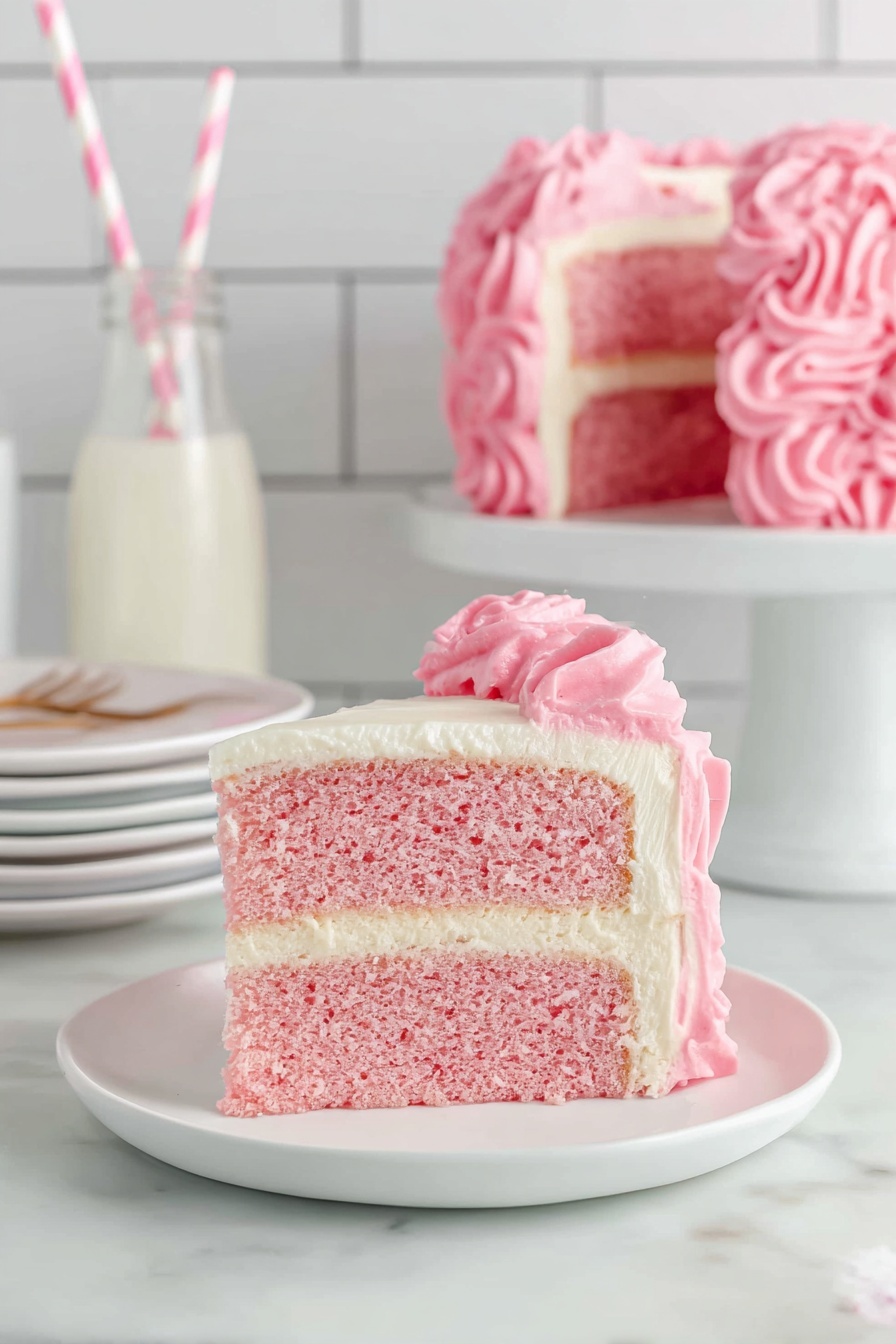
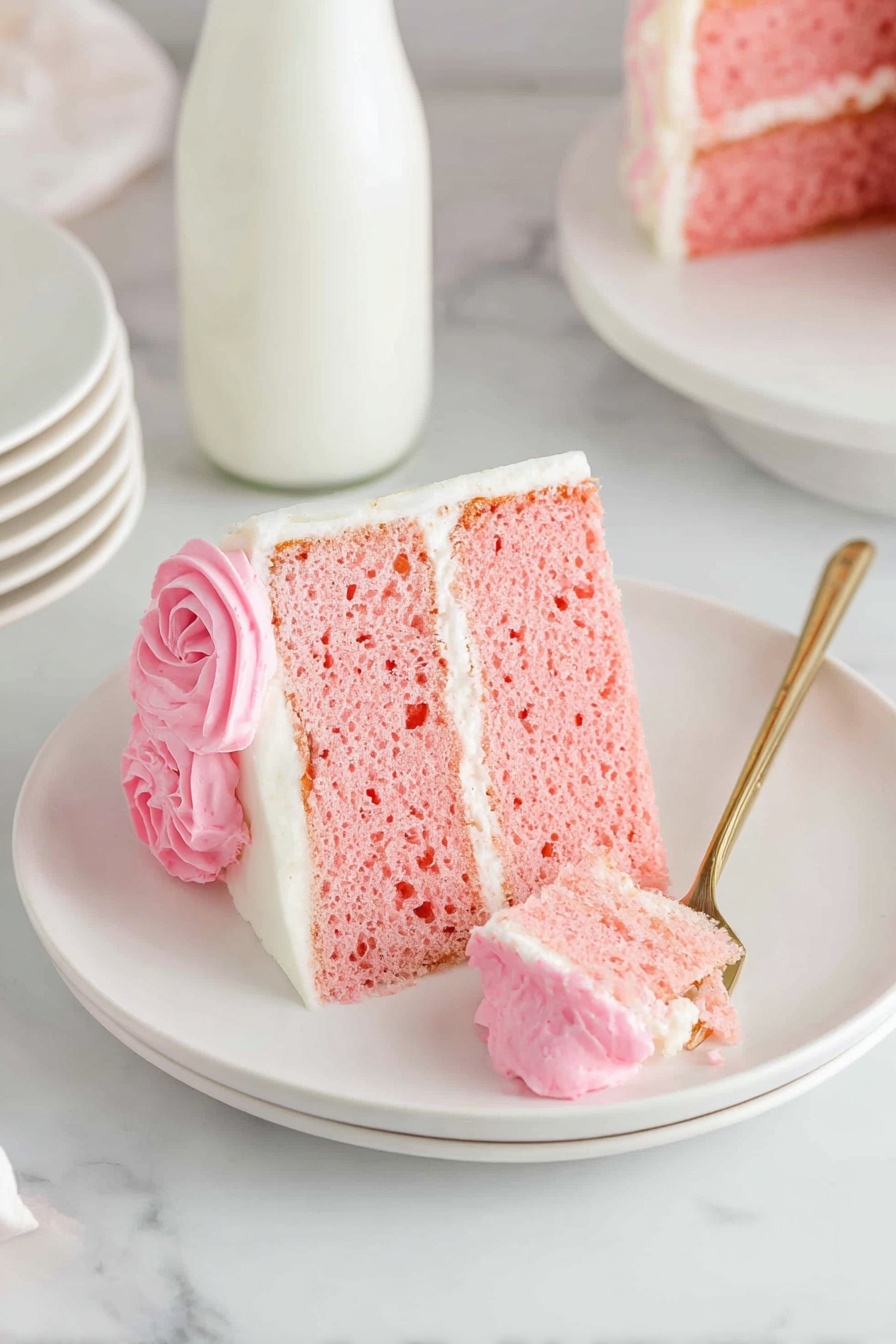
If you’ve ever been a fan of that classic red velvet cake but wanted something a little more playful and charming, you’re going to absolutely adore my Pink Velvet Cake with Cream Cheese Frosting Recipe. I love how this cake ends up with a beautiful soft pink hue that’s perfect for birthdays, baby showers, or just because you deserve a treat. It’s got that tender crumb and that luscious cream cheese frosting that pairs so perfectly, you’ll find yourself sneaking slices when you think no one’s watching. Stick with me here—I’ve packed all the tips and tricks you need to nail this show-stopper every time!
Why You’ll Love This Recipe
- Perfectly Moist and Tender: Thanks to buttermilk and oil, this cake stays soft and never dries out.
- Vibrant Pink Color: Using gel food coloring lets you control exactly how pink you want it.
- Cream Cheese Frosting Bliss: The frosting is smooth, tangy, and not too sweet — just how I like it.
- Great for Special Occasions: It looks stunning, tastes irresistible, and always impresses guests.

Ingredients You’ll Need
The ingredients for this Pink Velvet Cake with Cream Cheese Frosting Recipe are straightforward and pantry-friendly, but each plays an essential role in texture, flavor, and appearance. Plus, I’ve got little shopping tips to help you pick the best versions.
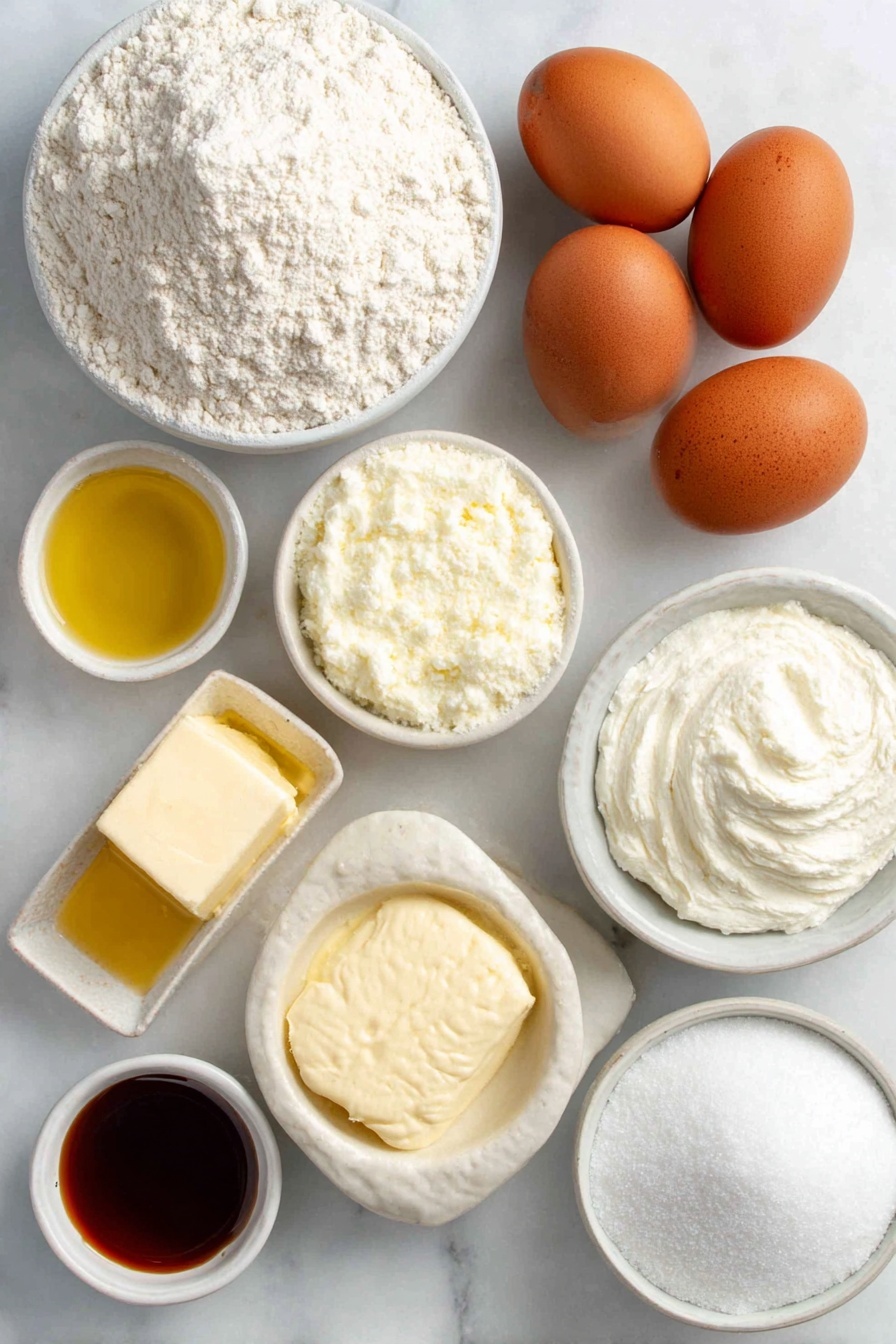
- All-purpose flour: Provides structure; use fresh flour for best cake rise and texture.
- Granulated sugar: Sweetens the cake evenly without overpowering the flavors.
- Baking soda & baking powder: Work together to give the cake a light, airy crumb.
- Kosher salt: Balances sweetness and enhances flavors; always measure carefully.
- Buttermilk: Tenderizes the cake and adds tanginess; if you don’t have it, mix 1 tbsp lemon juice with milk and let sit 5 mins.
- Eggs: Bind everything and give structure; I always use room temperature for better mixing.
- Vegetable oil: Keeps the cake moist without adding flavor.
- White vinegar: Reacts with baking soda to create lift and tender crumb.
- Pure vanilla extract: Adds warm background flavor that ties everything together.
- Pink gel food coloring: The key to that beautiful pink shade without messing up the batter consistency.
- Cream cheese (for frosting): Make sure it’s room temperature and good quality for the smoothest, creamiest frosting.
- Unsalted butter: Slightly melted to mix easily for frosting; avoid salted to control seasoning.
- Powdered sugar: Sweetens the frosting with a silky texture.
Variations
I love putting my own spin on this Pink Velvet Cake with Cream Cheese Frosting Recipe depending on the occasion or what’s in my pantry. Feel free to tweak it — that’s part of the fun! If you like experimenting, here are a few versions I’ve played around with and swear by.
- Gluten-Free Version: Using a gluten-free flour blend substitutes easily, just add a bit of xanthan gum for structure; I tried this for a friend’s party and it worked beautifully without compromising texture.
- Less Sweet Frosting: I sometimes cut powdered sugar in half and add a splash of lemon juice for a tangier frosting that’s less sweet but still delicious.
- Berry Twist: Mixing fresh pureed raspberries into the frosting boosts flavor and gives an extra pop of pink, which my family absolutely loves during summer.
- Mini Cakelets: Divide batter into cupcake liners for bite-sized treats — perfect for lunchboxes or party favors.
How to Make Pink Velvet Cake with Cream Cheese Frosting Recipe
Step 1: Prep Your Pans and Gather Ingredients
Before you do anything, preheat your oven to 350°F (175°C). Spray two 8-inch round cake pans well with nonstick spray, then line the bottoms with parchment paper rounds. This little step always guarantees that your cakes will pop right out without sticking. Measure out all your ingredients too — having everything ready saves you from scrambling mid-bake.
Step 2: Mix Dry Ingredients
In a big mixing bowl, whisk together your flour, sugar, baking soda, baking powder, and salt. This ensures even distribution of your leavening agents and salt so your cake rises just right and tastes balanced.
Step 3: Combine Wet Ingredients with Color
Using a stand mixer fitted with a paddle attachment, beat buttermilk, eggs, vegetable oil, vinegar, vanilla, and pink gel food coloring on low speed until just combined. I usually start with about 1 teaspoon of gel coloring and add more as needed to get that perfect pink—it’s easy to overdo this, so add gradually! The key here is to mix just enough to combine so the batter stays light and fluffy.
Step 4: Bring Dry and Wet Together Gently
Pour your wet mixture into the dry ingredients and beat on low speed just until you don’t see flour streaks. Resist the urge to overmix — this can make the cake dense or tough. Once combined, scrape down the sides with a spatula and give a quick fold to ensure everything is evenly mixed.
Step 5: Bake and Cool
Divide the batter evenly between your prepared pans—about 687 grams per pan if you’re weighing it like I do—to ensure that layers bake evenly and come out the same size. Bake for 33-35 minutes or until a toothpick poked in the center comes out clean. Let the cakes cool in the pans for 15 minutes, then remove and cool completely on wire racks. Pro tip: Once cooled, wrap them tightly in plastic wrap and refrigerate for 2 hours to help firm the crumb before frosting — this step is a game changer for a clean frosting job.
Step 6: Make the Cream Cheese Frosting
While the cakes chill, beat the room temperature cream cheese, slightly melted butter, and vanilla extract on high speed until silky smooth, about 2 minutes. Slowly add powdered sugar and beat for another couple minutes until fluffy. This frosting isn’t too sweet or heavy, which balances the cake perfectly.
Step 7: Assemble and Decorate
Trim the dome tops off each cake layer so they’re flat—those trimmed bits make a great snack! Start by placing a bit of frosting on your cake board to secure your first layer (cut side up). Spread a generous layer of frosting, then carefully add the second layer with the bottom facing up. Next comes the crumb coat: a thin layer of frosting covering the entire cake. Don’t stress if you see the cake peeking through—that’s why it’s called a crumb coat. Freeze the cake for 10 minutes to firm this layer up.
Divide the rest of your frosting into three bowls and tint one light pink, another dark pink, and leave the last one white. Pipe these colors around your cake in sections, starting with dark pink at the base, light pink in the middle, and white on top. Gently smooth with a cake scraper to create a lovely ombré effect without losing the pretty colors. Use the combined leftover frosting to pipe decorative circles on top, then pop the cake back in the freezer for 10 minutes to set everything.
Pro Tips for Making Pink Velvet Cake with Cream Cheese Frosting Recipe
- Don’t Skip Chilling Your Cake: Wrapping and chilling the cake layers makes frosting smoother and less crumbly when spreading.
- Go Slow with Gel Coloring: I learned the hard way that too much coloring can tinge the batter flavor—add it a little at a time!
- Use a Serrated Knife for Trimming: This helps you get perfect flat layers without tearing the crumb.
- Crumb Coat before Final Frosting: This prevents stray crumbs from ruining your final smooth finish—worth the extra step every time.
How to Serve Pink Velvet Cake with Cream Cheese Frosting Recipe
Garnishes
I like topping this cake with a few simple yet elegant touches — fresh berries like raspberries or sliced strawberries bring a natural sweetness and beautiful contrast to the pink frosting. Sometimes I sprinkle edible glitter or pearl sprinkles to make it extra festive, especially for birthdays.
Side Dishes
This cake pairs wonderfully with a light cup of tea or coffee, but if I’m serving it as part of a larger celebration, fresh fruit salad or a berry compote on the side complements the flavors beautifully without overpowering the sweetness.
Creative Ways to Present
For my sister’s baby shower, I turned this Pink Velvet Cake with Cream Cheese Frosting Recipe into a tiered cake, using dowels for support. On other occasions, I like using pretty cake stands or placing edible flowers delicately on top. You can even pipe rosettes around the edges with the leftover colored frosting for an extra whimsical touch.
Make Ahead and Storage
Storing Leftovers
I usually keep leftover cake in an airtight cake carrier or container in the fridge, where it stays moist and fresh for up to 3 days. Just be sure to bring it to room temperature before serving for the best flavor and texture.
Freezing
I’ve successfully frozen this cake layers wrapped tightly in plastic wrap and then foil for up to 3 months. When you’re ready to enjoy, thaw overnight in the refrigerator and then frost as usual. This is a huge time saver if you want to prep ahead for a party.
Reheating
The cake is best enjoyed chilled or at room temp, but if you like a slightly warmed slice, pop a piece into the microwave for 10-15 seconds. Just be careful not to overheat as it can dry out or melt the frosting.
FAQs
-
Can I substitute the buttermilk in this Pink Velvet Cake with Cream Cheese Frosting Recipe?
Yes! If you don’t have buttermilk, you can make a simple substitute by adding 1 tablespoon of lemon juice or white vinegar to 1½ cups of milk, letting it sit for 5 minutes until it thickens slightly. This will provide the acidity that helps the cake rise and tenderize.
-
How can I get the perfect pink color without using too much food coloring?
Use gel food coloring instead of liquid because it’s more concentrated and won’t affect your batter’s consistency. Start with small amounts, like ½ teaspoon, and gradually add more until you reach your desired shade.
-
Is it important to chill the cake layers before frosting?
Absolutely! Chilling the cake layers for at least 2 hours firms them up, making them easier to frost and helping prevent crumbs mixing into the frosting. It also leads to a cleaner, more professional finish.
-
Can I make the frosting ahead of time?
You can prepare the cream cheese frosting a day ahead and store it tightly covered in the fridge. Give it a quick whip with a mixer before using to bring back its fluffy texture.
Final Thoughts
Making this Pink Velvet Cake with Cream Cheese Frosting Recipe has become one of my go-to ways to celebrate life’s little moments. It’s charming and approachable but feels so special when you slice into those tender pink layers topped with silky smooth cream cheese frosting. If you want a cake that’s as delightful to look at as it is to eat, I can’t recommend this enough—trust me, you’re going to want this recipe in your baking arsenal!
Print
Pink Velvet Cake with Cream Cheese Frosting Recipe
- Prep Time: 1 hour 10 minutes
- Cook Time: 35 minutes
- Total Time: 4 hours 5 minutes
- Yield: 12 servings
- Category: Dessert
- Method: Baking
- Cuisine: American
Description
This Pink Velvet Cake is a delightful twist on the classic red velvet, featuring a soft and moist cake with a beautiful pink hue. Paired with a smooth and tangy cream cheese frosting, this cake is perfect for celebrations or any time you want a deliciously elegant dessert. The layers are carefully baked and chilled to ensure perfect texture and easy frosting application, resulting in a stunning cake that looks as good as it tastes.
Ingredients
For the Cake:
- 2½ cups all-purpose flour (350 grams)
- 2 cups granulated sugar (400 grams)
- 1 teaspoon baking soda (6 grams)
- 1 teaspoon baking powder (4 grams)
- ½ teaspoon kosher salt
- 1½ cups buttermilk, room temperature (341 grams)
- 3 large eggs, room temperature (150 grams)
- ½ cup vegetable oil (100 grams)
- 1 tablespoon white vinegar (14 grams)
- 2 teaspoons pure vanilla extract (8 grams)
- Pink gel food coloring (to desired shade)
For the Cream Cheese Frosting:
- 8 ounces cream cheese, room temperature (227 grams)
- ¾ cup unsalted butter, slightly melted (170 grams / 1½ sticks)
- 1 tablespoon pure vanilla extract (12 grams)
- 5 cups powdered sugar (600 grams)
Instructions
- Prepare Cake Pans: Preheat the oven to 350°F (175°C). Spray two 8-inch round cake pans with nonstick spray and line the bottom with parchment paper. Set aside.
- Mix Dry Ingredients: In a large bowl, combine the all-purpose flour, granulated sugar, baking soda, baking powder, and kosher salt. Stir well and set aside.
- Mix Wet Ingredients: In the bowl of a stand mixer fitted with the paddle attachment, beat together the buttermilk, eggs, vegetable oil, white vinegar, vanilla extract, and pink gel food coloring on low speed until just combined. Add more gel coloring until the desired shade of pink is reached.
- Combine Wet and Dry: Pour the wet mixture into the dry ingredients and beat on low speed until just combined. Scrape the sides of the bowl with a spatula to ensure even mixing, but do not overmix to maintain cake tenderness.
- Divide Batter and Bake: Evenly divide the batter between the two prepared cake pans (about 687 grams each). Bake for 33-35 minutes or until a toothpick inserted in the center comes out clean.
- Cool Cakes: Remove the cakes from the oven and let them cool in their pans for 15 minutes. Then, carefully remove the cakes from the pans and place them on wire racks to cool completely.
- Chill Cakes: Once cooled to room temperature, wrap each cake layer individually in food-safe plastic wrap and refrigerate for at least 2 hours. This step firms the cake to make frosting application easier without crumbling.
- Make Frosting: While cakes chill, prepare the frosting by beating cream cheese, softened butter, and vanilla extract on high speed with a whisk attachment until smooth, about 2 minutes. Gradually add powdered sugar and beat an additional 2 minutes until fluffy and smooth.
- Trim Cake Layers: After chilling, use a serrated knife to level the tops of the cake layers by cutting off any domes so that each layer has a flat surface. The domed tops can be saved for snacking.
- Assemble Cake Base: Spread about 2 tablespoons of frosting on the center of a cake board or plate to secure the first layer. Place the first cake layer cut side up on the frosting.
- Layer Frosting: Generously spread frosting over the first layer, then carefully place the second cake layer on top, bottom side up.
- Apply Crumb Coat: Spread a thin layer of frosting over the entire cake to catch crumbs. It does not need to be perfect; crumbs showing through are okay. Use a cake scraper to smooth lightly.
- Chill Crumb Coat: Place the frosted cake in the freezer for 10 minutes to set the crumb coat.
- Color Frosting for Decoration: Divide remaining frosting into three equal parts. Tint one light pink, one darker pink, and leave one portion white. Transfer each color into separate tipless piping bags.
- Pipe Colored Frosting: Starting at the bottom of the cake, pipe the darkest pink frosting around the bottom third. Pipe light pink frosting around the middle third of the cake. Use white frosting for the top third and the top surface.
- Smooth Frosting: Use the cake scraper gently to smooth the sides and top without removing too much frosting. Collect extra frosting into a bowl.
- Create Frosting Circles: Combine all leftover frosting in one bowl, tint it any pink shade desired, and using a large round tip (e.g., Wilton 1A), pipe circles around the top of the cake.
- Final Chill: Place the decorated cake back in the freezer for about 10 minutes to firm up the frosting details, then remove and serve.
Notes
- Store the pink velvet cake in an airtight container in the refrigerator for up to 3 days.
- For longer storage, wrap well and freeze the cake for up to 3 months.
- Use room temperature ingredients for better mixing and texture.
- Be careful not to overmix the batter to keep the cake tender.
- Chilling the cake layers before frosting helps prevent crumbling when applying frosting.
Nutrition
- Serving Size: 1 slice (1/12th of cake)
- Calories: 420 kcal
- Sugar: 35 g
- Sodium: 220 mg
- Fat: 20 g
- Saturated Fat: 8 g
- Unsaturated Fat: 11 g
- Trans Fat: 0 g
- Carbohydrates: 55 g
- Fiber: 1 g
- Protein: 5 g
- Cholesterol: 65 mg


