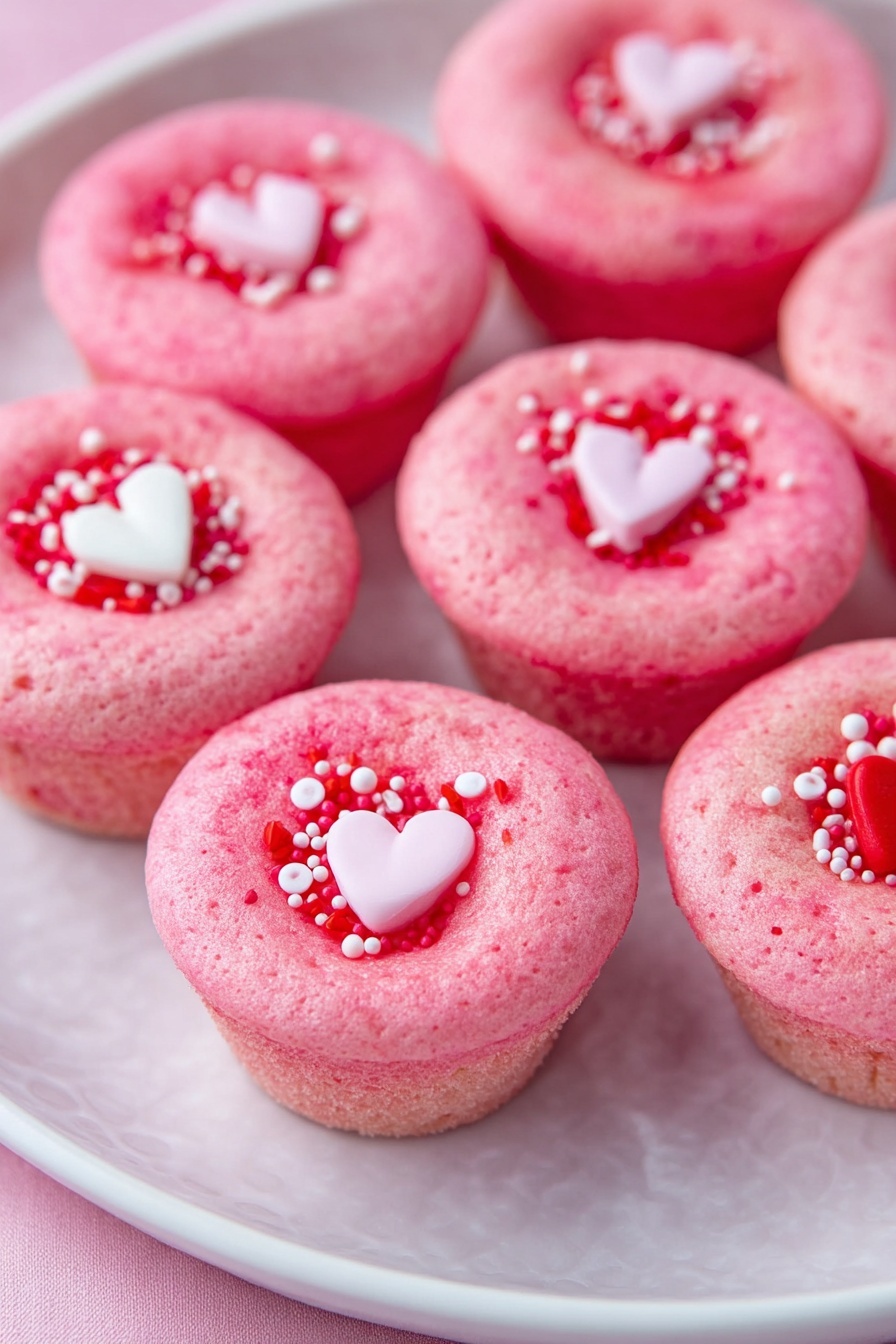
If you’re looking for a sweet, adorable treat to celebrate the season of love, I’ve got just the thing! This Valentine’s Day Hershey’s Cookie Cups Recipe is hands down one of my go-to desserts when I want something festive but fuss-free. Imagine bite-sized sugar cookie cups hugging a melty Hershey’s hug in the center—guaranteed to impress anyone lucky enough to try one. Stick with me, and I’ll walk you through every step so you end up with perfectly tender, chocolaty delights that’ll have your friends and family asking for seconds.
Why You’ll Love This Recipe
- Easy & Quick: You’ll appreciate how this recipe comes together in under 35 minutes—perfect for last-minute Valentine’s Day plans.
- Fun & Festive: The pop of pink or red food coloring makes these cookie cups perfect little love bites that are as cute as they are delicious.
- Melty Chocolate Center: I adore how the Hershey’s hugs soften to gooey perfection right in the middle of the sugar cookie.
- Great for Sharing: These treats are bite-sized and easily portable, making them a sweet gift or party favorite.

Ingredients You’ll Need
This recipe relies on simple ingredients that you probably already have on hand, plus a few festive extras. I love using a pre-made sugar cookie mix because it saves me time and still tastes fantastic—and the melted butter and egg help bind everything perfectly. The pink or red food coloring is more than just for color; it makes these cookie cups feel special and on-theme for Valentine’s Day.
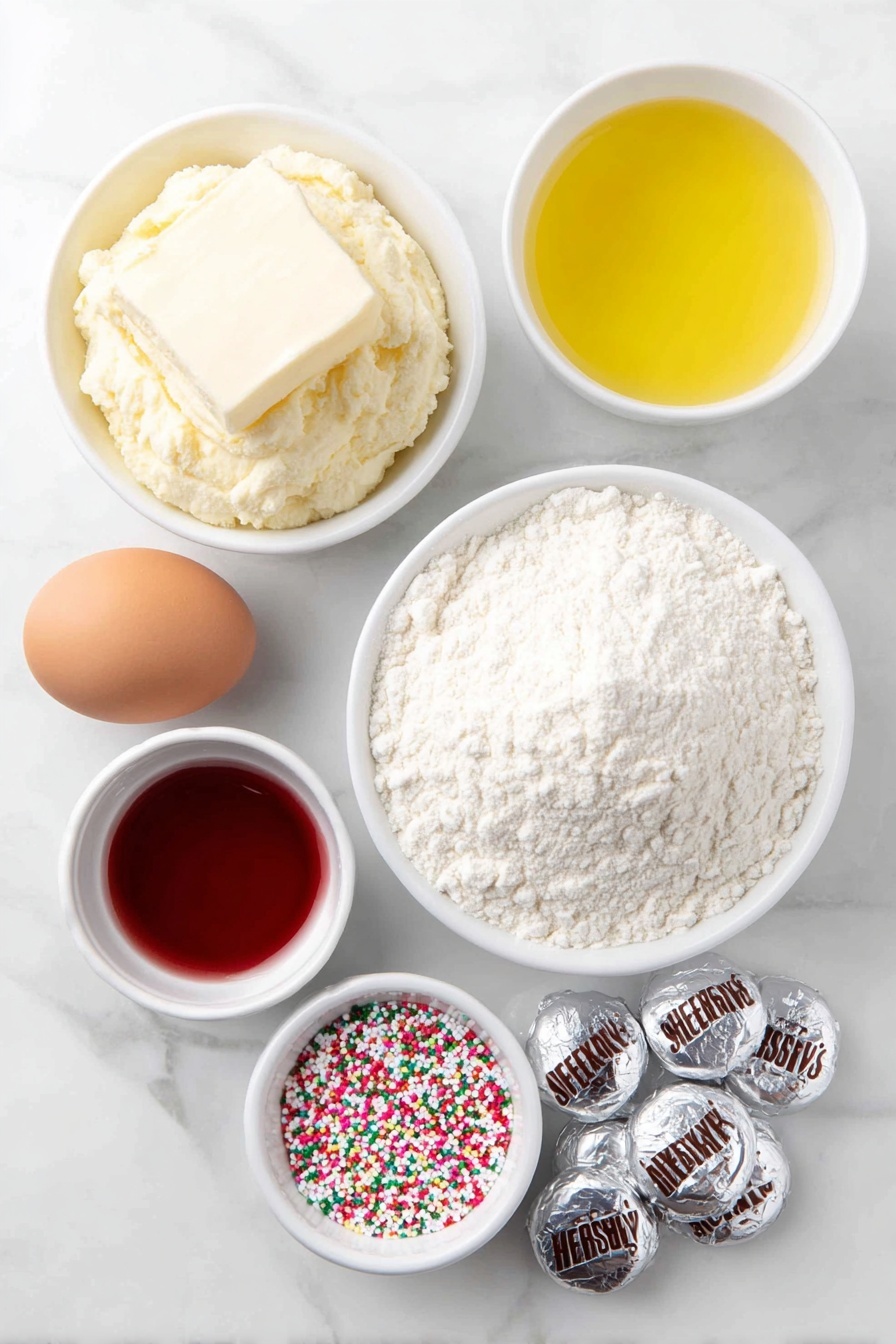
- Sugar cookie mix: Choose a quality mix for best results—this is the base for your cookie cup structure.
- Salted butter: Melted butter adds richness and helps the dough become wonderfully tender.
- All-purpose flour: A little extra flour ensures the dough holds up well around the candy center.
- Large egg: Brings the dough together and adds a nice crumb texture.
- Pink or red food coloring: Because this is Valentine’s Day, right? Feel free to adjust the shade to get just the right look.
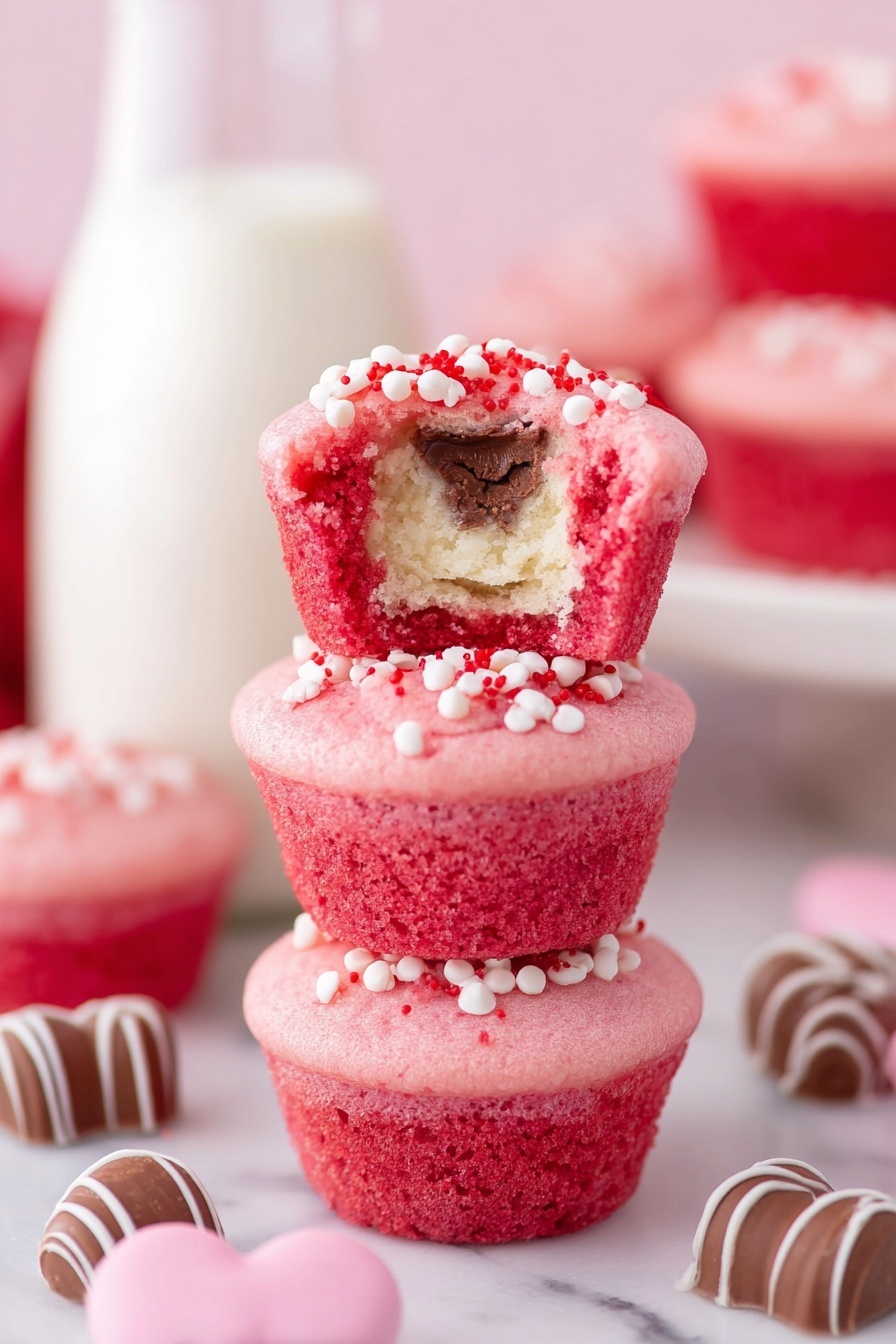
- Hershey’s hugs (unwrapped): The star of the show—milk chocolate with white chocolate stripes, they melt so beautifully inside the cookie cups.
- Decorative sprinkles (optional): For that extra festive pop and texture on top.
Variations
I love that this Valentine’s Day Hershey’s Cookie Cups Recipe is totally customizable. Over the years, I’ve tried swapping the candy or fiddling with colors, and you can make it your own too! Don’t hesitate to experiment to fit your style or dietary needs—this recipe is forgiving and delicious every time.
- Swap the chocolate: Instead of Hershey’s hugs, try mini peanut butter cups or white chocolate chips for a new twist—I found my family particularly loved the peanut butter version!
- Use natural food coloring: If you prefer natural ingredients, beet juice or raspberry powder can add color without artificial dyes.
- Gluten-free option: Use a gluten-free sugar cookie mix and GF flour blend to make this treat safe for gluten-sensitive friends without sacrificing flavor.
- Sprinkles & toppings: Feel free to sprinkle crushed candy canes or edible glitter for extra sparkle and seasonal fun.
How to Make Valentine’s Day Hershey’s Cookie Cups Recipe
Step 1: Prep your pan and ingredients
First things first—spray a mini cupcake pan generously with cooking spray to prevent sticking. Preheat your oven to 350°F (175°C). This little step is crucial because these cookie cups will bake evenly on a non-stick surface, and you want them to pop out beautifully once they’re cooked.
Step 2: Mix your cookie dough
In a large bowl, combine the sugar cookie mix, melted butter, flour, the egg, and your pink or red food coloring. I usually start with a few drops of coloring and add more until I get a sweet rosy hue. Beat everything until just combined—don’t overmix or your cookies might get tough.
Step 3: Shape and fill each cookie cup
Grab about a tablespoon of dough and flatten it in your palm to roughly the size of your hand. Place one unwrapped Hershey’s hug right in the middle, then carefully wrap the dough around it, sealing it like a little dough ball with a hidden chocolate surprise inside. Place each dough ball upright into the prepared muffin pan. Keep going until you run out of dough—about enough to fill 24-26 cavities.
Step 4: Bake and decorate
Slide your pan into the oven and bake for 10 to 12 minutes. You want the outside to look set but not overly browned—the inside is where the magic happens with that gooey Hershey’s hug. When they’re out, sprinkle some decorative sprinkles on top while they’re still warm for that perfect pop of color and fun.
Step 5: Cool and enjoy
Let your cookie cups cool in the pan for about 15 minutes before gently removing and serving. The chocolate will be melty but not lava-hot, so you and your guests can enjoy that delightful combo of soft cookie and warm chocolate center. I promise, once you try one, you’ll be hooked!
Pro Tips for Making Valentine’s Day Hershey’s Cookie Cups Recipe
- Use room temperature eggs: They blend more easily into the dough, giving a smoother texture to your cookie cups.
- Don’t overbake: I learned that baking beyond 12 minutes makes the cookies tough, so stay vigilant to keep them soft and tender.
- Seal the dough well: Wrapping the cookie dough tightly around the Hershey’s hugs prevents chocolate from leaking during baking.
- Let cookies cool in pan: It helps them set properly so they don’t crumble when you remove them.
How to Serve Valentine’s Day Hershey’s Cookie Cups Recipe
Garnishes
I like topping these with a sprinkle of festive red and white nonpareils or tiny heart-shaped sprinkles right after baking—it melts right into the tops and adds just the right bit of crunch and color. For a slightly grown-up twist, a dusting of powdered sugar or a drizzle of melted white chocolate works beautifully.
Side Dishes
These little cookie cups pair wonderfully with a hot cup of coffee or a rich, creamy hot cocoa. If you’re serving at a party, a scoop of vanilla ice cream alongside makes for a dreamy dessert duo. For a refreshing balance, I often serve fresh berries or even a few slices of citrus fruit.
Creative Ways to Present
For Valentine’s Day, I like to arrange these cookie cups in pretty little paper cupcake liners and place them all on a tiered dessert stand—it turns them into a sweet centerpiece. Gift-wise, a cute box tied with a ribbon turns them into an instant homemade present. Simple yet stunning!
Make Ahead and Storage
Storing Leftovers
Once cooled, I store leftover cookie cups in an airtight container at room temperature. They stay delicious and fresh for up to two weeks, so you can make them ahead of time without stress. Just keep them away from heat or humidity to maintain their soft texture.
Freezing
I’ve frozen these before without any issues! Just wrap each cookie cup individually in plastic wrap or foil, then arrange in a freezer-safe container or bag. They last well for 5-6 months, perfect if you want to prep early and pull treats out for another occasion.
Reheating
To reheat, I pop them in a 300°F oven for 5-7 minutes, enough to soften the chocolate center again without drying out the cookie. You can also microwave one for about 10-15 seconds if you’re in a hurry, but watch closely so it doesn’t get too hot or lose texture.
FAQs
-
Can I make the dough from scratch instead of using a mix?
Absolutely! If you prefer homemade dough, a simple sugar cookie dough recipe will work just as well. Just be sure it’s firm enough to hold its shape around the chocolate, and adjust the flour as needed to keep the dough from getting too sticky.
-
What if I don’t have a mini cupcake pan?
You can try using a standard muffin tin, but keep in mind the cookie cups will be larger and may need a bit more baking time. Alternatively, form the dough around the candy and bake on a parchment-lined cookie sheet, though the shape won’t be as uniform.
-
Can I use other types of candy for the filling?
Definitely! Hershey’s hugs are ideal because they melt nicely, but mini peanut butter cups, chocolate chips, or even caramel bites can make fun fillings. Just make sure the candy has a similar size to fit well inside the dough.
-
How do I avoid the chocolate leaking during baking?
Make sure to seal the cookie dough completely around the chocolate, pressing the seams closed tightly. Also, place the dough balls upright in the pan so the chocolate stays centered and melts evenly inside.
Final Thoughts
This Valentine’s Day Hershey’s Cookie Cups Recipe has become one of my favorite holiday treats because it blends nostalgia and creativity with super simple steps. Whether you’re baking for family, friends, or just treating yourself, these cookie cups deliver that cozy homemade feel with a little extra love baked right in. I know you’ll enjoy making and sharing them just as much as I do—so grab your mini cupcake pan and get baking. Happy Valentine’s Day!
Print
Valentine’s Day Hershey’s Cookie Cups Recipe
- Prep Time: 25 minutes
- Cook Time: 10-12 minutes
- Total Time: 35-37 minutes
- Yield: 25 cookie cups
- Category: Dessert
- Method: Baking
- Cuisine: American
Description
These Valentine’s Day Cookie Cups are a delightful treat featuring soft sugar cookie dough wrapped around a sweet Hershey’s Hug center, baked to perfection in mini cupcake pans. They’re perfect for gifting or enjoying at home, with optional sprinkles adding a festive touch.
Ingredients
Cookie Dough
- 17.5 ounce package sugar cookie mix
- ½ cup (1 stick) salted butter, melted
- 3 tbsp all-purpose flour
- 1 large egg, room temperature
- Pink/red food coloring, to desired shade
Filling and Topping
- 24-26 Hershey’s Hugs, unwrapped
- Decorative sprinkles, optional topping
Instructions
- Preheat and Prepare Pan: Spray a mini cupcake pan with cooking spray and preheat your oven to 350 degrees Fahrenheit to ensure even baking.
- Make the Dough: In a large bowl, beat together the sugar cookie mix, melted butter, all-purpose flour, egg, and pink/red food coloring until just combined. Adjust the food coloring to achieve your desired intensity.
- Flatten Dough Portions: Take about 1 tablespoon of dough and use your hand or a rolling pin to flatten it to roughly the size of your palm.
- Add Hershey’s Hug Center: Place one unwrapped Hershey’s Hug in the center of the flattened dough. Wrap the dough carefully around the candy, shaping it into a ball to enclose the chocolate.
- Place in Pan: Set each filled dough ball upright into the prepared mini cupcake pan cavities, repeating until all dough is used.
- Bake: Bake the cookie cups in the oven for 10-12 minutes or until the dough edges appear set and lightly golden.
- Add Sprinkles: Immediately after removing the cookie cups from the oven, top them with decorative sprinkles if desired for an extra festive look.
- Cool: Let the cookie cups cool in the pan for about 15 minutes before serving to set their shape and prevent burning.
Notes
- Storage: Store cookie cups in an airtight container at room temperature for up to two weeks.
- Freezing: Wrap each cookie cup individually and place in a freezer-safe container or bag. Freeze for up to 5-6 months.
- Serving Tip: These cookie cups are best enjoyed fresh but hold their flavor well when stored.
- Food Coloring: Adjust the amount of food coloring to achieve your preferred pink/red hue without overpowering the dough texture.
Nutrition
- Serving Size: 1 cookie cup
- Calories: 150
- Sugar: 12g
- Sodium: 90mg
- Fat: 7g
- Saturated Fat: 4g
- Unsaturated Fat: 2.5g
- Trans Fat: 0g
- Carbohydrates: 21g
- Fiber: 0.5g
- Protein: 1.5g
- Cholesterol: 25mg


