
If you’re craving a flavorful, juicy chicken dinner that’s both easy and impressive, then you absolutely have to try this Baked Teriyaki Chicken Recipe. I love this because it’s a weeknight game changer—simple ingredients come together to create something sticky, sweet, and perfectly balanced. Plus, once you master this, you’ll find yourself dreaming up excuses to make it again and again!
Why You’ll Love This Recipe
- Effortless Flavor: The homemade teriyaki sauce simmers up quickly, packing your chicken with a perfect sweet and salty punch every time.
- Juicy and Tender: Baking the chicken covered keeps it moist while the sauce caramelizes beautifully when uncovered.
- Versatile and Customizable: This recipe easily adapts to what you have in your pantry and your personal tastes.
- Family Favorite: My family goes crazy whenever I make this—not just because it’s delicious but because it’s quick enough for busy nights.

Ingredients You’ll Need
These ingredients work in harmony to create that classic teriyaki flavor that’s both sweet and savory, without being overpowering. When shopping, I like to pick a good quality soy sauce and fresh garlic for the best taste.

- Chicken breasts: I prefer using large, boneless chicken breasts to keep things easy and protein-packed.
- Olive oil: Adds a touch of richness and helps the chicken brown just right.
- Salt and pepper: Simple seasoning that enhances every bite.
- Soy sauce (low-sodium): The base of the sauce; low-sodium is key to controlling saltiness.
- Brown sugar: Gives the teriyaki sauce that signature sweet depth.
- Honey: Adds a gentle floral sweetness and helps with that sticky glaze.
- Rice wine vinegar: Brings brightness and balances the sweetness.
- Ground ginger: A warm spice note that keeps the flavor authentic.
- Garlic (minced): Fresh garlic packs a punch and elevates the sauce.
- Sesame oil (optional): Provides a lovely toasted flavor that I love adding when I have it.
- Water: For thinning and simmering the sauce.
- Cornstarch: Mixed with water to thicken the sauce into that perfect glaze.
- Sesame seeds: For garnish to add a little crunch and nutty aroma.
Variations
This baked teriyaki chicken is a base that I love to play around with depending on my mood or what’s in season. Don’t hesitate to personalize it—you’ll enjoy how versatile this recipe truly is.
- Add spice: When I’m feeling adventurous, I add a dash of chili flakes or sriracha to the sauce for a sweet-heat combo that wakes up my taste buds.
- Use chicken thighs: If you prefer darker meat, swap breasts for thighs—they stay extra juicy and soak up the sauce wonderfully.
- Vegetarian twist: Try the sauce over baked tofu or roasted mushrooms for a delicious plant-based option.
- Garnishes and extras: Toss in green onions, crushed peanuts, or even a sprinkle of chopped fresh cilantro for extra layers of flavor.
How to Make Baked Teriyaki Chicken Recipe
Step 1: Prepare the sauce base
Start by whisking together the soy sauce, brown sugar, honey, rice wine vinegar, ground ginger, minced garlic, sesame oil (if you’re using it), and water in a medium saucepan. Bring it to a simmer over medium heat, then lower the heat and let it bubble gently for 3 to 4 minutes. I discovered this trick to build flavor before thickening, and trust me, it makes all the difference.
Step 2: Thicken your teriyaki glaze
Mix your cornstarch with cold water to make a smooth slurry, then slowly whisk it into your simmering sauce. Keep stirring until it thickens—about 2 to 3 minutes. I like to keep the heat low to avoid lumps. This step gives you that glossy, velvety texture that clings beautifully to the chicken.
Step 3: Season and coat the chicken
Pat your chicken breasts dry with paper towels—this helps the sauce stick better and the chicken brown nicely. Place them in a sprayed baking dish, drizzle with olive oil, and sprinkle both sides with salt and pepper. Pour half of your teriyaki sauce over the chicken, then use a fork or tongs to flip each piece a few times until thoroughly coated. The result? Flavor-packed chicken that’s ready for baking.
Step 4: Bake with care
Cover the baking dish with foil—this keeps the chicken juicy—and bake at 400°F for 20 minutes. Then remove the foil and bake for an additional 5 to 15 minutes until the internal temperature hits 160°F. I use a digital meat thermometer and find it’s the only way to guarantee perfect doneness without drying out the meat.
Step 5: Rest and serve like a pro
Once out of the oven, let your chicken rest 5 minutes—that’s the secret to juicy results. Slice it up, spoon on the remaining teriyaki sauce, and sprinkle with toasted sesame seeds or green onions if you like. This little finish sends it over the top every time.
Pro Tips for Making Baked Teriyaki Chicken Recipe
- Pat Dry Before Saucing: I always pat the chicken dry to help the sauce adhere better and get a nice color while baking.
- Use a Meat Thermometer: Overcooked chicken is dry and sad—checking for 160°F ensures juiciness and safety.
- Reserve Half the Sauce: Pouring sauce halfway through guarantees your chicken gets that perfect glaze without burning the sugars.
- Don’t Skip Resting: Letting the chicken rest locks in those juices and makes slicing cleaner and easier.
How to Serve Baked Teriyaki Chicken Recipe

Garnishes
I’m a big fan of sprinkling toasted sesame seeds and thinly sliced green onions on top—they add crunch and a pop of freshness that contrasts beautifully with the sweet glaze. Sometimes, if it’s a special night, I add a few red chili flakes for a tiny kick.
Side Dishes
My go-to sides are steamed jasmine rice or fluffy quinoa—both soak up that teriyaki sauce perfectly. For veggies, I love sautéed garlic bok choy or steamed broccoli tossed with a splash of sesame oil. These keep the meal light, fresh, and balanced.
Creative Ways to Present
For something fun, I like to slice the chicken and fan it over rice bowls, then drizzle extra sauce and scatter some crispy fried shallots on top. It’s a crowd-pleaser and perfect for casual dinner parties or a comforting solo meal. You can even serve it on lettuce wraps for a lighter bite.
Make Ahead and Storage
Storing Leftovers
I usually store leftover baked teriyaki chicken in an airtight container in the fridge—it stays great for up to 4 days. Just make sure to spoon any extra sauce over the chicken before sealing; it keeps it from drying out and keeps the flavors vibrant.
Freezing
This recipe freezes well, which is a lifesaver for busy weeks. I freeze individual portions in freezer-safe containers with a bit of sauce, then thaw overnight in the fridge before reheating. The key is to avoid overcooking when reheating to keep that tenderness.
Reheating
When reheating, I prefer using the oven or toaster oven at a moderate temperature to warm the chicken evenly without drying it out. A quick microwave zap works in a pinch—just cover the dish with a damp paper towel to trap moisture.
FAQs
-
Can I use chicken thighs for this Baked Teriyaki Chicken Recipe?
Absolutely! Chicken thighs work wonderfully because they stay juicy and absorb the sauce really well. Just adjust the baking time slightly—thighs typically take a few minutes longer to cook through compared to breasts.
-
Is it necessary to thicken the teriyaki sauce with cornstarch?
Not necessarily. The cornstarch thickens the sauce into a sticky glaze that clings to the chicken perfectly, but if you prefer a thinner sauce or want to skip that step, you can omit it and still have a flavorful dish.
- How do I know when the chicken is perfectly cooked?
The best way is to use a digital meat thermometer—aim for an internal temperature of 160°F to ensure it’s safe and juicy. Without a thermometer, cut into the thickest part; the juices should run clear and the meat should be opaque all the way through.
-
Can I make the teriyaki sauce ahead of time?
Definitely! You can prepare the sauce up to two weeks in advance and keep it refrigerated in a sealed container. It actually tastes even better after the flavors have melded overnight.
Final Thoughts
This Baked Teriyaki Chicken Recipe has become one of my absolute go-to meals—I love how it strikes the perfect balance between sweet and savory, it’s quick enough for a busy night, and it impresses guests without any stress. Once you try it, I’m pretty sure you’ll agree it’s a keeper, too. So grab your ingredients, preheat your oven, and let this become a staple in your kitchen like it is in mine!
Print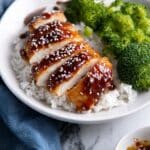
Baked Teriyaki Chicken Recipe
- Prep Time: 5 minutes
- Cook Time: 25 minutes
- Total Time: 30 minutes
- Yield: 4 servings
- Category: Main Course
- Method: Baking
- Cuisine: Japanese
- Diet: Low Fat
Description
This Baked Teriyaki Chicken recipe features tender chicken breasts coated in a rich, homemade teriyaki sauce made from soy sauce, brown sugar, honey, and aromatic spices. Baked to perfection and garnished with sesame seeds, this dish is quick, flavorful, and perfect for an easy weeknight dinner.
Ingredients
For the Teriyaki Chicken:
- 4 large chicken breasts
- 1 tablespoon olive oil
- Salt and pepper, to season
- 1 cup homemade teriyaki sauce (or your favorite store-bought version), plus more for serving
- Sesame seeds, to garnish
For the Homemade Teriyaki Sauce:
- 1 cup low-sodium soy sauce
- ¾ cup brown sugar
- 2 tablespoons honey
- 3 tablespoons rice wine vinegar
- ½ teaspoon ground ginger
- ½ clove garlic, minced
- 1 tablespoon sesame oil (optional)
- ¾ cup water, divided
- 3 tablespoons cornstarch mixed with 4 tablespoons cold water
Instructions
- Preheat and prepare dish: Preheat the oven to 400°F (200°C) and spray a large 11 x 8-inch baking dish with non-stick cooking spray to prevent sticking.
- Make the sauce base: In a medium saucepan, whisk together soy sauce, brown sugar, honey, rice wine vinegar, ground ginger, minced garlic, sesame oil (if using), and ¾ cup water over medium heat. Bring the mixture to a simmer, then reduce heat to low and simmer for 3-4 minutes to blend the flavors.
- Thicken the sauce: Whisk together cornstarch and cold water to make a slurry, then slowly add it to the simmering sauce while whisking constantly. Cook for 2-3 minutes until the sauce thickens, then remove from heat.
- Prepare the chicken: Pat the chicken breasts dry with paper towels and place them in a single layer in the prepared baking dish. Drizzle with olive oil and season both sides with salt and pepper. Pour half of the teriyaki sauce (about 1 cup) over the chicken. Use a fork or tongs to turn the chicken several times, coating it fully with the sauce.
- Bake the chicken: Cover the dish with foil to tent it and bake for 20 minutes. Then remove the foil and bake an additional 5 to 15 minutes, or until the internal temperature of the chicken reaches 160°F (71°C) when checked with a meat thermometer.
- Rest and serve: Allow the chicken to rest for 5 minutes before slicing. Serve with the remaining teriyaki sauce drizzled on top and garnish with sesame seeds and sliced green onions if desired.
Notes
- If you prefer a thinner sauce, you can omit the cornstarch used for thickening.
- Store leftover teriyaki sauce in a sealed container in the refrigerator for up to 2 weeks.
- Leftover baked chicken can be kept refrigerated for up to 4 days.
- This dish pairs well with rice, quinoa, cauliflower rice, and vegetables like garlic bok choy or steamed broccoli.
Nutrition
- Serving Size: 1 chicken breast with sauce (approx. 200g)
- Calories: 350 kcal
- Sugar: 15 g
- Sodium: 700 mg
- Fat: 8 g
- Saturated Fat: 1.5 g
- Unsaturated Fat: 6 g
- Trans Fat: 0 g
- Carbohydrates: 28 g
- Fiber: 0.5 g
- Protein: 35 g
- Cholesterol: 85 mg


