
If you’re anything like me and love the nostalgic flavors of banana pudding but crave it in a cool, creamy dessert form, then you’re going to adore this No-Churn Banana Pudding Ice Cream Recipe. It’s one of those recipes that feels fancy but is actually super easy to whip up at home — no ice cream maker required! I’m excited to share all the tips and tricks I’ve picked up to help you create this dreamy treat that blends ripe bananas, vanilla, and those iconic Nilla Wafers into one delightful scoop.
Why You’ll Love This Recipe
- No Ice Cream Maker Needed: It’s perfect for anyone who wants rich, creamy ice cream without extra gadgets.
- Authentic Banana Pudding Flavor: The combination of bananas and Nilla Wafers hits all those dreamy nostalgic notes.
- Simple Ingredients: You likely already have most of what you need ready to go.
- Customizable Texture: Mix cookie crumbs to your liking for either crunch or smoothness.

Ingredients You’ll Need
Each ingredient here contributes to the luscious texture and classic flavor that make this No-Churn Banana Pudding Ice Cream Recipe so irresistible. Using ripe bananas and good-quality vanilla really makes all the difference, and trust me, cream cheese adds that velvety richness that you’ll notice right away.

- Bananas: Use ripe ones with lots of brown spots for maximum sweetness and flavor.
- Nilla Wafers: These iconic cookies bring the perfect crunch and authentic banana pudding vibe.
- Sweetened Condensed Milk: Adds creaminess and sweetness without overpowering the banana flavor.
- Cream Cheese: Softened to room temp to blend smoothly, it creates that luscious texture you’ll love.
- Vanilla Extract/Bean Paste/Bourbon: I prefer vanilla bean paste for the specks and aroma, but bourbon adds a lovely warmth if you want a subtle twist.
- Fine Sea Salt: Just a pinch to balance sweetness and deepen flavor.
- Ground Nutmeg: A hint adds cozy warmth without stealing the show.
- Heavy Cream: Whipped until fluffy to give the ice cream body and airy texture.
Variations
I love how this No-Churn Banana Pudding Ice Cream Recipe is a great base for experimenting! You can tweak it depending on what you have, your dietary needs, or even the season. Don’t hesitate to make it your own.
- Dairy-Free Version: I once swapped heavy cream for canned coconut cream and used coconut condensed milk for a tropical twist—I was pleasantly surprised by how creamy it turned out.
- Extra Crunch: Adding chopped pecans or walnuts gives a lovely contrast if you like some nutty texture.
- Chocolate Swirl: Drizzle melted chocolate over the layers before freezing for a touch of decadence.
- Spiced Up: A dash of cinnamon or cardamom can create a cozy autumnal feel that’s perfect for cooler months.
How to Make No-Churn Banana Pudding Ice Cream Recipe
Step 1: Prep Your Bananas and Cookies
Start by mashing one of your bananas. I like a chunky puree because it adds texture, but if you prefer it smoother, just mash it well with a fork. Slice the other banana and then cut half of those slices into half moons—this gives you pretty layers and little bursts of fresh banana throughout your ice cream. Next, crush your Nilla Wafers into rough crumbs. I found that a mix of crumb sizes works best—larger pieces at the bottom layer for texture, smaller crumbs for sprinkling on top. Use a rolling pin or the back of a spoon for this; no need for perfect crumbs.
Step 2: Make the Ice Cream Base
Using a mixer fitted with the paddle attachment (or a handheld mixer), beat together your sweetened condensed milk, softened cream cheese, mashed banana, vanilla, salt, and nutmeg. This step takes about four minutes, and it’s super important to get rid of any cream cheese lumps so your ice cream is silky smooth. I learned this the hard way when my ice cream had little cream cheese chunks—not my favorite texture, so be patient here!
Step 3: Whip the Cream and Fold
Switch to the whisk attachment and beat your heavy cream until it’s thick and fluffy—think soft peaks around six minutes. Gently fold the condensed milk mixture into the whipped cream, being careful not to deflate it. This folding keeps the ice cream light, so your final dessert will be creamy but still airy. I always scrape from the bottom up with a spatula here to get an even mix.
Step 4: Layer Your Ice Cream
Grab your freezer-safe container and start by spreading half of the cookie crumbs on the bottom, then layer with the circular banana slices. This creates that classic banana pudding backdrop inside your ice cream. Now spoon and spread about half of your ice cream mixture over the bananas. Top with the banana half moons and the remaining cookie crumbs, then gently swirl everything together with your spoon—don’t over-mix, or you’ll lose those pretty bits!
Step 5: Freeze Until Set
Cover your container tightly and pop it in the freezer. After about four hours, you’ll have soft-serve style ice cream, but for firmer scoops (which I prefer), let it freeze at least six hours or overnight. When I first made this, I was so eager I grabbed it too early—the texture was lovely but didn’t scoop well. Patience pays off here!
Pro Tips for Making No-Churn Banana Pudding Ice Cream Recipe
- Batch Your Cookie Crumbs: Mix crumb sizes to balance scoopability with classic texture – bigger chunks stay crispier at the bottom.
- Don’t Skip Softening Your Cream Cheese: It ensures a lump-free base and smoother ice cream, which makes all the difference for texture.
- Gently Fold to Keep It Airy: Overmixing will deflate your whipped cream—take your time folding and keep it light.
- Freeze Time is Key: Give it at least six hours—shortcuts mean softer consistency and messier scoops.
How to Serve No-Churn Banana Pudding Ice Cream Recipe

Garnishes
I often top my scoops with extra crushed Nilla Wafers for crunch and a few thin banana slices for a fresh pop of fruit. Sometimes, I drizzle a little caramel sauce over the top—totally indulgent but so worth it! If you want a festive touch, sprinkle a pinch of cinnamon or nutmeg to echo the flavors inside.
Side Dishes
This ice cream shines as a standalone dessert, but I love pairing it with a warm slice of pecan pie or a honey-drizzled pound cake. It’s also a winner alongside fresh berries or a simple bowl of sliced peaches for a fresh and fruity contrast.
Creative Ways to Present
For a party, try serving scoops in martini glasses with a wafer perched on the rim—it always gets compliments! Another fun idea is layering the ice cream with more cookie crumbs and banana slices in a clear trifle bowl for a visually stunning dessert everyone will want to dig into.
Make Ahead and Storage
Storing Leftovers
Store any leftovers in an airtight container to prevent freezer burn and keep flavors fresh. I like to press a piece of parchment paper or plastic wrap directly onto the surface before sealing the lid to minimize ice crystals. This ice cream stays delicious for up to six months, but I find it’s best within the first month for that creamy texture.
Freezing
This recipe freezes like a dream thanks to the sweetened condensed milk and cream cheese base. Just make sure to cover it tightly and avoid frequent thaw and refreeze to keep texture at its best. When I’ve frozen it longer, it gets icier, so try to enjoy it within the first few weeks if you can.
Reheating
Since this is ice cream, reheating isn’t really an option, but if it’s too hard from the freezer, just let it sit at room temp for 5-10 minutes before scooping. This slight thaw makes it easier to scoop without melting too quickly. I usually have my bowls ready by the time I scoop to catch that perfect texture.
FAQs
-
Can I use frozen bananas for this No-Churn Banana Pudding Ice Cream Recipe?
Absolutely! Frozen bananas work great and are actually easier to mash into a smooth puree. Just thaw them slightly before mixing so you don’t end up with icy lumps.
-
What’s the best way to soften cream cheese quickly?
I usually microwave cream cheese for about 10 seconds (in short bursts) or leave it out at room temperature for about 30 minutes before starting. The key is to make sure it’s soft enough to blend smoothly without melting.
-
Can I substitute the heavy cream for something lighter?
You can try using half-and-half or full-fat coconut milk, but keep in mind that the texture may be less creamy and more icy. Heavy cream really gives this ice cream its signature richness.
-
How long does the No-Churn Banana Pudding Ice Cream Recipe stay fresh?
It’s best enjoyed within one month stored in the freezer for optimal creamy texture. Beyond that, it can last up to six months but may develop more ice crystals.
-
Can I add other mix-ins to this ice cream?
Definitely! Chopped nuts, chocolate chips, or swirls of caramel or fudge all sound amazing. Just fold them in gently at the end before freezing.
Final Thoughts
I absolutely love how this No-Churn Banana Pudding Ice Cream Recipe brings together the best of two dessert worlds with zero fuss. Whenever I make it, friend or family can’t stop raving about the creamy banana flavor combined with those nostalgic Nilla Wafer bits. It’s a fun, no-stress treat that feels homemade and special—all while using ingredients you probably already have. I’m confident you’re going to fall in love with this recipe just like I have. So go ahead, grab those bananas and cookies, and let’s make some magic happen in your kitchen!
Print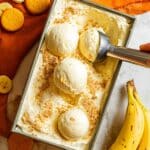
No-Churn Banana Pudding Ice Cream Recipe
- Prep Time: 15 minutes
- Cook Time: 0 minutes
- Total Time: 6 hours 15 minutes
- Yield: 8 servings
- Category: Dessert
- Method: No-Cook
- Cuisine: American
- Diet: Vegetarian
Description
This No-Churn Banana Pudding Ice Cream combines the creamy richness of traditional banana pudding with the convenience of no-churn ice cream. Featuring ripe bananas, crushed Nilla Wafers, sweetened condensed milk, and cream cheese, it’s whipped into a fluffy frozen dessert perfect for warm weather or any time you crave a nostalgic treat with a modern twist.
Ingredients
Fruit
- 2 bananas (one mashed, one sliced and half sliced into half moons)
Cookies
- 10 Nilla Wafers, crushed into rough crumbs
Ice Cream Base
- 14 ounces sweetened condensed milk
- 4 ounces cream cheese, softened to room temperature
- 2 teaspoons vanilla extract or vanilla bean paste or bourbon
- ½ teaspoon fine sea salt
- ¼ teaspoon ground nutmeg
Dairy
- 2 cups heavy cream
Instructions
- Prep the Ingredients: Use a fork to mash one banana until it reaches a baby food or chunky puree consistency. Slice the second banana and cut half of those slices into half moons. Crush the Nilla Wafers using a kitchen spoon or rolling pin until you have rough cookie crumbs.
- Make the Ice Cream Base: In a stand mixer fitted with the paddle attachment or using a hand mixer, beat the sweetened condensed milk, softened cream cheese, mashed banana, vanilla extract, sea salt, and nutmeg together until smooth and free of cream cheese chunks, about four minutes.
- Whip the Cream: Switch to the whisk attachment on the stand mixer or continue with the hand mixer to beat the heavy cream until thickened and fluffy, approximately six minutes. Gently fold the condensed milk mixture into the whipped cream carefully to maintain its airy texture.
- Assemble the Ice Cream Layers: Line the bottom of a freezer-safe container with half of the cookie crumbs, then layer the circular banana slices on top.
- Add Ice Cream and Toppings: Spoon and spread the ice cream mixture evenly over the banana and cookie layer. Add the banana half moons and the remaining cookie crumbs, gently swirling them into the ice cream to distribute the textures slightly without mixing fully.
- Freeze to Set: Cover the container and transfer it to the freezer. Chill for at least six hours to allow the ice cream to firm up. Four hours yields a soft-serve texture, six hours produces firm scoops, and overnight or eight hours ensures a fully frozen dessert.
Notes
- Preparation: Adjust the size of the crushed cookies to preference; smaller pieces create an easier scoop, while larger crumbs maintain a traditional banana pudding texture. A mix of both sizes is ideal, reserving the larger pieces for the bottom layer.
- Storage: Store the ice cream in the freezer for up to six months. Over time, texture may become icier, especially after one month, but it remains delicious.
Nutrition
- Serving Size: 1/8 of recipe (about 1/2 cup)
- Calories: 320
- Sugar: 30g
- Sodium: 120mg
- Fat: 18g
- Saturated Fat: 11g
- Unsaturated Fat: 6g
- Trans Fat: 0g
- Carbohydrates: 38g
- Fiber: 2g
- Protein: 4g
- Cholesterol: 60mg


