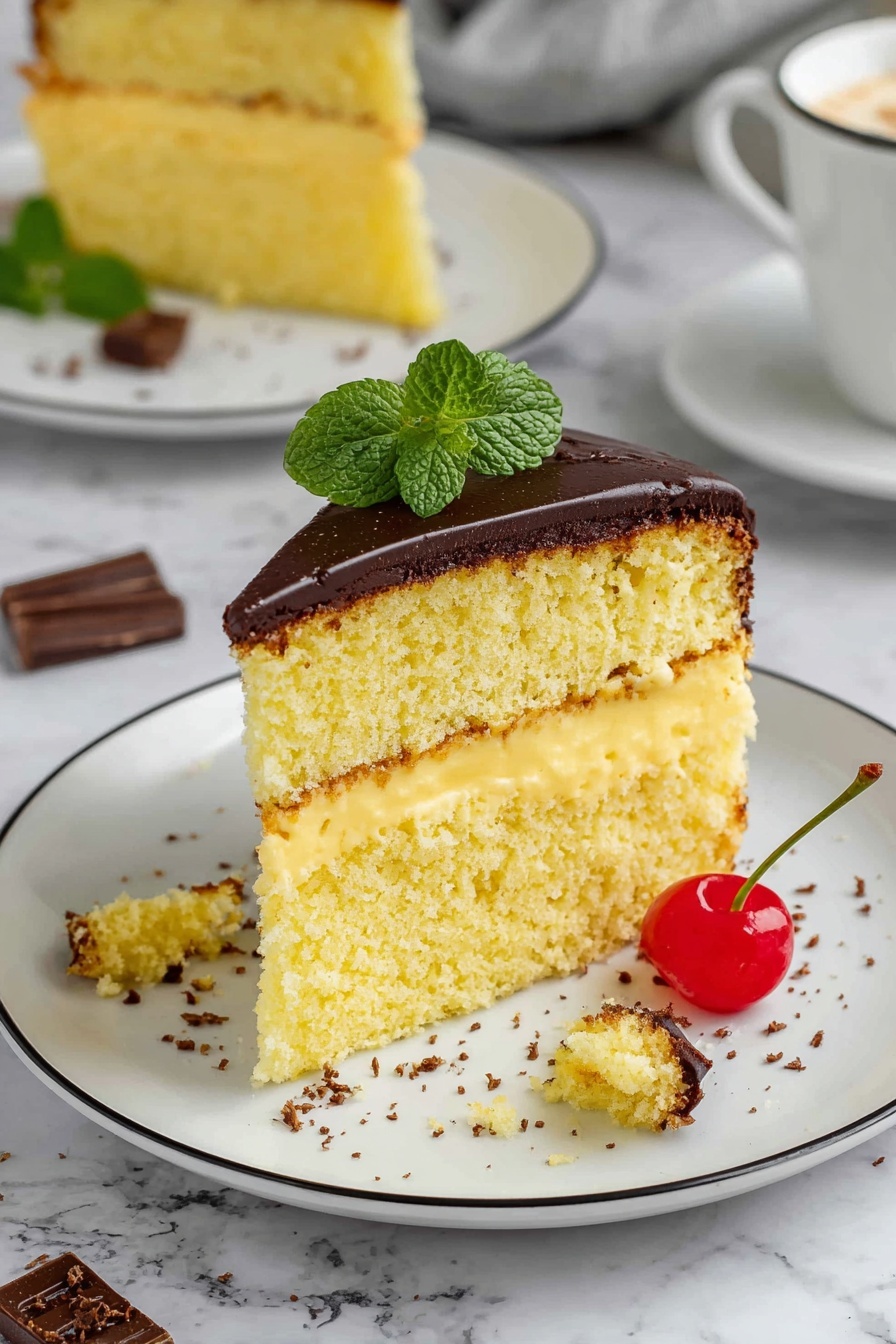
If you’ve ever wanted to create a classic dessert that’s both elegant and downright delicious, then this Boston Cream Pie with Chocolate Glaze Recipe is exactly what you need in your life. I absolutely love how this cake pulls off the perfect balance of fluffy vanilla cake, creamy custard filling, and that glossy chocolate glaze on top—it’s like a party on your taste buds. Stick with me, and I’ll walk you through everything so you can nail this fan-freaking-tastic dessert every time!
Why You’ll Love This Recipe
- Timeless Classic: This recipe honors the traditional Boston Cream Pie flavor that won’t disappoint your crowd.
- Simple Ingredients: You likely have most of these in your pantry already, making it easy to whip up anytime.
- Impressive Presentation: The glossy chocolate glaze makes this dessert look as stunning as it tastes.
- Custard Perfection: Homemade pastry cream is much easier than you think, and it’s so worth the effort.

Ingredients You’ll Need
Each part of this Boston Cream Pie with Chocolate Glaze Recipe is crafted with simple but high-quality ingredients that blend perfectly together—whether it’s the soft cake layers or the silky custard. Picking fresh eggs and good chocolate can really elevate your final result.
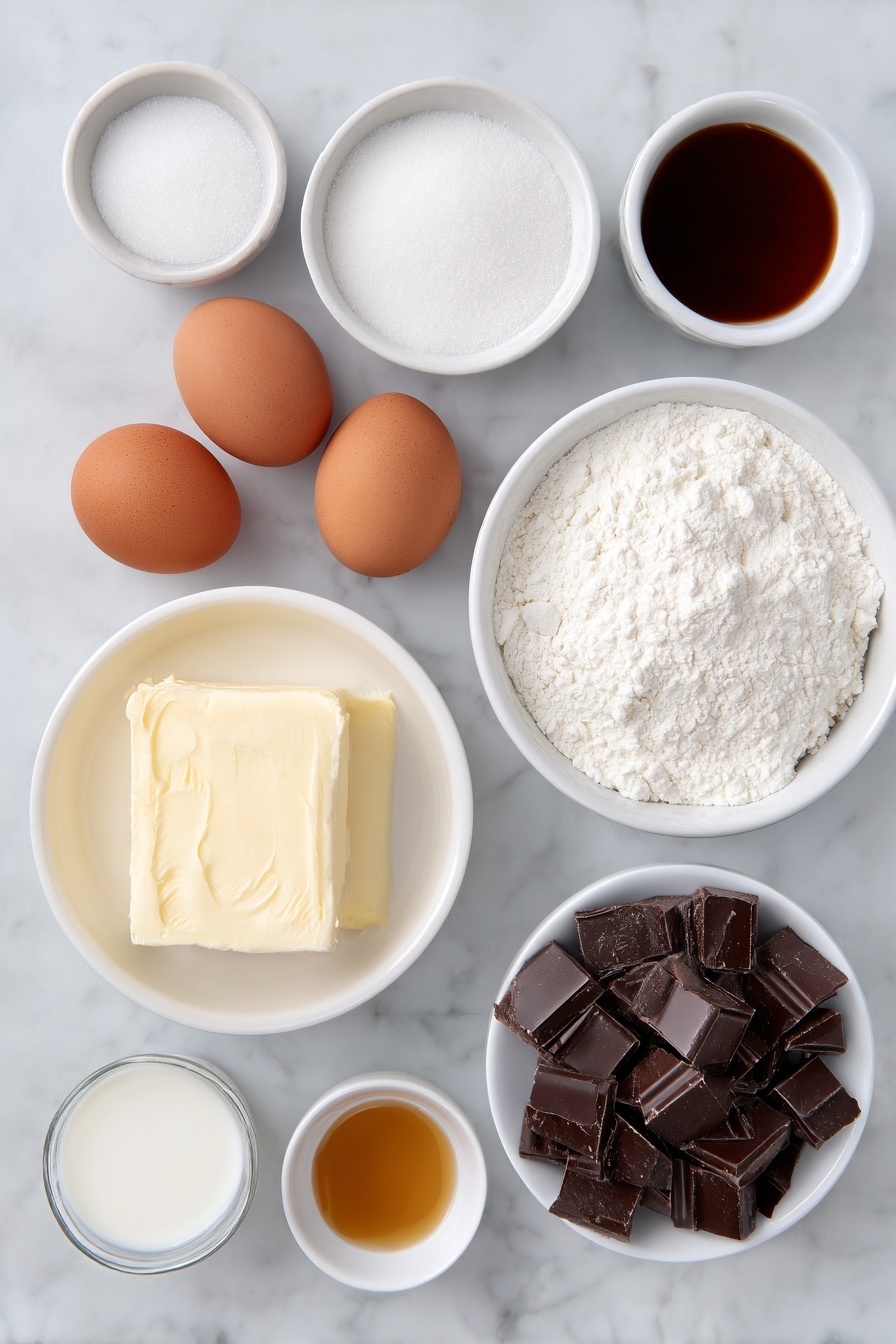
- All-purpose flour: Provides structure while keeping the cake tender—make sure it’s fresh for best rise.
- Baking powder: This lightens the cake, giving it that beautiful fluffy texture.
- Unsalted butter: Softened butter helps create that tender crumb and richer flavor.
- Granulated sugar: Sweetens both cake and custard evenly without overpowering.
- Eggs: Large eggs bring moisture and stability—room temperature is best for mixing.
- Vanilla extract: Adds warm depth—use pure extract if you can, it really shines here.
- Whole milk: Enriches the cake and custard; it’s the secret to smooth, creamy filling.
- Cornstarch: Essential for thickening the custard just right without lumps.
- Heavy cream: Creates a rich and shiny chocolate glaze, balancing sweetness.
- Semi-sweet chocolate: Choose good-quality chocolate for the glaze; it melts beautifully and tastes amazing.
- Corn syrup: Helps keep the glaze smooth and glossy—this little trick makes all the difference.
Variations
One of the joys of making Boston Cream Pie with Chocolate Glaze Recipe is that you can customize it to fit your vibe or dietary needs without losing that iconic taste. Here’s how I like to play around with it and some ideas for you.
- Gluten-Free Version: I swapped all-purpose flour with a 1:1 gluten-free baking blend once, and it worked beautifully with just a slight texture difference.
- Flavor Boost: Adding a teaspoon of espresso powder to the chocolate glaze really wakes up the chocolate flavor—perfect if you love mocha vibes.
- Dairy-Free Twist: Using coconut milk and dairy-free butter substitutes keeps it creamy without the dairy—though I recommend a chocolate that’s dairy-free too.
- Mini Boston Cream Pies: Making this in cupcake tins with a dollop of custard inside and a drizzle of glaze on top is great for parties and portion control!
How to Make Boston Cream Pie with Chocolate Glaze Recipe
Step 1: Baking the Perfect Vanilla Cake Layers
Start by preheating your oven to 350°F (175°C) and greasing two 9-inch round pans—greasing and lightly flouring them really helps the cakes release cleanly. I like to whisk dry ingredients together in one bowl to avoid pockets of baking powder or salt. When creaming the butter and sugar, beat until the mixture is fluffy and pale; this takes about 3-5 minutes and is key for a tender cake. Alternate adding your dry mix and milk to keep the batter smooth but avoid overmixing, which can make the cake tough. Bake for 25-30 minutes and test with a toothpick to make sure it comes out clean. Let them cool in their pans for 10 minutes before turning onto wire racks; patience here means your cake won’t crumble when assembling.
Step 2: Crafting the Silky Custard Filling
While your cakes cool, it’s time to make that luscious custard! Heat milk, sugar, and a pinch of salt in a saucepan until it just begins to simmer—don’t let it boil hard to avoid scorching. Meanwhile, whisk yolks and cornstarch until smooth. Here’s a trick I learned: temper your egg yolks by slowly adding some hot milk into them while whisking vigorously to prevent scrambling. Pour the tempered yolks back into the saucepan and cook on medium, stirring constantly until the custard thickens and bubbles—a sign it’s ready. Set a piece of plastic wrap right on the surface of the custard to stop a skin from forming and chill it completely before using.
Step 3: Making the Glossy Chocolate Glaze
This glaze is a showstopper! Heat the heavy cream just until it simmers—600 to 700 heaters can scorch the cream, so watch it closely. Pour the hot cream over chopped semi-sweet chocolate and corn syrup; let it sit for a few minutes to melt, then stir until silky smooth. Using corn syrup is my secret weapon here—it prevents the glaze from getting grainy and keeps that irresistible shine.
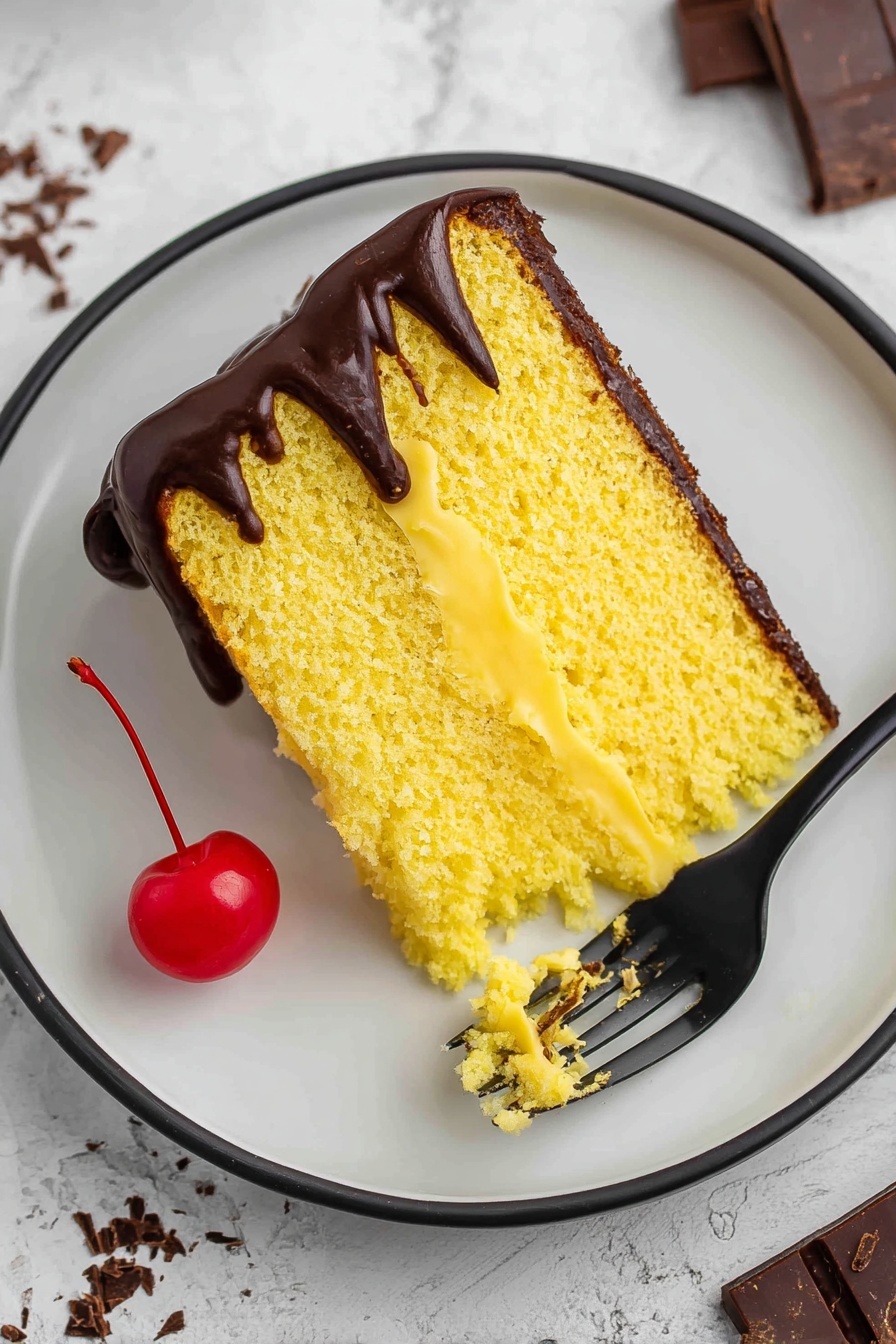
Step 4: Assembling Your Boston Cream Pie
Place one of your cake layers on a serving plate and spread the chilled custard evenly on top. Don’t be shy—generous amounts of custard are what make this special. Top with the second cake layer and pour the chocolate glaze over, letting it drip down the sides naturally for that classic look. Refrigerate for at least an hour so the glaze sets and the custard firms up beautifully before slicing. Pro tip: use a sharp knife dipped in hot water for clean slices!
Pro Tips for Making Boston Cream Pie with Chocolate Glaze Recipe
- Even Cake Layers: To make sure your layers bake evenly, I always rotate pans halfway through baking.
- Prevent Custard Skin: Cover custard with plastic wrap right on the surface as soon as it cools to avoid that annoying skin.
- Glossy Glaze Fix: If your glaze looks dull or thick, gently rewarm it in short bursts while stirring.
- Sharp Slicing: Dip your knife in hot water between cuts to keep the slices neat and clean.
How to Serve Boston Cream Pie with Chocolate Glaze Recipe
Garnishes
I like to keep things classic with just a light dusting of powdered sugar or a few fresh berries around the plate—it adds a touch of color without overpowering that chocolate shine. Sometimes, a few toasted almonds on top brighten up the texture and add a little crunch, which my family especially likes.
Side Dishes
This dessert pairs beautifully with a simple cup of coffee or a bold black tea that cuts through the richness. If you want to rhyme with breakfast or brunch, a bowl of fresh fruit or some lightly whipped cream goes surprisingly well.
Creative Ways to Present
One favorite of mine for celebrations is layering individual Boston Cream Pie cups—little glasses filled with cake cubes, custard, and topped with chocolate glaze. It’s a fun twist that’s easier to share at parties and looks adorable on a dessert table!
Make Ahead and Storage
Storing Leftovers
Because of the custard, this cake needs to be refrigerated. I wrap the cake tightly with plastic wrap or store it in an airtight container to keep it moist and prevent it from absorbing other fridge smells. It stays fresh and tasty for up to 3 days, but trust me—it rarely lasts that long!
Freezing
I’ve frozen Boston Cream Pie once or twice—with mixed results. The custard texture changed a bit after thawing, becoming less silky. If you want to freeze it, I recommend freezing cake layers separately and fresh assembling with custard and glaze when ready.
Reheating
Since it’s a chilled dessert, I don’t recommend reheating it. For leftover slices, letting them sit at room temperature for about 15 minutes before serving brings out the best flavor and texture without causing custard melting.
FAQs
-
Can I use instant pudding instead of making custard from scratch?
While instant pudding is a quicker shortcut, homemade custard adds a richer, fresher flavor and a smoother texture. If you’re short on time, instant vanilla pudding works, but I highly recommend trying the real custard at least once—you’ll notice the difference!
-
What type of chocolate is best for the glaze?
Semi-sweet chocolate is ideal because it balances sweetness with a rich chocolate flavor. Use good-quality chocolate bars or chips; avoid candy melts or chocolate with additives that could alter flavor or texture.
-
How do I prevent the custard from curdling or scrambling?
The key is to cook the custard slowly while stirring constantly and to temper the egg yolks by slowly adding hot milk before combining. Using medium heat and patience helps avoid overheating which causes curdling.
-
Can I make this cake a day ahead?
Absolutely! I often make the cake layers and custard a day before and assemble just before serving to save time. The flavors meld nicely overnight in the fridge.
Final Thoughts
This Boston Cream Pie with Chocolate Glaze Recipe holds a special place in my heart because it’s one of those desserts that feels fancy but is totally doable at home. Whether you’re baking for a holiday, a birthday, or just because, it brings smiles and ‘wow’ moments every time. I can’t wait for you to try it—you’ll enjoy every bite as much as I do!
Print
Boston Cream Pie with Chocolate Glaze Recipe
- Prep Time: 30 minutes
- Cook Time: 30 minutes
- Total Time: 2 hours 45 minutes
- Yield: 8 servings
- Category: Dessert
- Method: Baking
- Cuisine: American
Description
This classic Boston Cream Pie recipe features two layers of soft, tender vanilla cake filled with a rich, creamy custard and topped with a glossy chocolate glaze. Perfectly balanced in flavors and textures, this dessert is a timeless favorite that impresses at any gathering.
Ingredients
For The Cake:
- 1¾ cups all-purpose flour
- 2 teaspoons baking powder
- ¼ teaspoon salt
- ½ cup unsalted butter (softened)
- 1 cup granulated sugar
- 3 large eggs
- 1½ teaspoons vanilla extract
- ¾ cup whole milk
For the Custard Filling:
- 2 cups whole milk
- ½ cup granulated sugar
- 2 tablespoons cornstarch
- 2 large egg yolks
- 1 teaspoon vanilla extract
For the Chocolate Glaze:
- ½ cup heavy cream
- 4 ounces semi-sweet chocolate (chopped)
- 2 tablespoons corn syrup
Instructions
- Prepare the Cake Batter: Preheat your oven to 350°F (175°C). Grease and flour two 9-inch round cake pans to prevent sticking. In a medium bowl, whisk together the all-purpose flour, baking powder, and salt to combine the dry ingredients evenly. In a separate large bowl, beat the softened unsalted butter and granulated sugar until the mixture becomes light and fluffy, creating a light texture for the cake. Add eggs one at a time, beating well after each addition to incorporate air. Stir in the vanilla extract for flavor. Alternately add the dry ingredients and whole milk to the butter mixture, starting and ending with the dry ingredients. Mix until just combined to keep the cake tender.
- Bake the Cake Layers: Divide the prepared batter evenly between your two cake pans. Place the pans in the preheated oven and bake for 25-30 minutes, or until a toothpick inserted into the center comes out clean, indicating the cakes are fully baked. Allow cakes to cool in their pans for 10 minutes before turning them out onto wire racks to cool completely, ensuring they don’t become soggy.
- Make the Custard Filling: In a medium saucepan over medium heat, combine the whole milk, granulated sugar, and a pinch of salt. Bring this mixture to a simmer. In a separate bowl, whisk the cornstarch and egg yolks together until smooth. Temper the yolks by slowly pouring some of the hot milk mixture into the yolks while whisking constantly to prevent curdling. Return the yolk mixture to the saucepan and cook over medium heat, stirring constantly, until the custard thickens and comes to a boil. Remove from heat and stir in the vanilla extract for flavor. Transfer the custard to a bowl, cover the surface tightly with plastic wrap to prevent a skin from forming, and chill in the refrigerator until set.
- Prepare the Chocolate Glaze: In a small saucepan, heat the heavy cream just until it begins to simmer. Remove from heat and add the chopped semi-sweet chocolate and corn syrup. Let the mixture sit for a few minutes to allow the chocolate to melt, then stir until smooth and glossy.
- Assemble the Boston Cream Pie: Place one cake layer on a serving plate. Spread the chilled custard filling evenly over the top. Carefully place the second cake layer on top of the custard. Pour the chocolate glaze over the entire cake, allowing some of it to drip down the sides for an elegant finish. Chill the assembled cake in the refrigerator for at least 1 hour to allow the glaze to set and the custard to firm up.
- Serve: Once the cake has chilled and set, slice it and serve chilled for the best texture and flavor experience.
Notes
- Avoid overmixing the cake batter to keep the cake tender.
- Tempering the egg yolks is crucial to prevent them from scrambling when combined with the hot milk.
- Cover the custard with plastic wrap directly on its surface to prevent a skin from forming as it cools.
- The cake is best served chilled but can be removed from the refrigerator 10 minutes before serving to soften slightly.
- Use high-quality semi-sweet chocolate for a richer glaze flavor.
Nutrition
- Serving Size: 1 slice (1/8 of cake)
- Calories: 430
- Sugar: 38g
- Sodium: 160mg
- Fat: 22g
- Saturated Fat: 13g
- Unsaturated Fat: 7g
- Trans Fat: 0.5g
- Carbohydrates: 51g
- Fiber: 2g
- Protein: 6g
- Cholesterol: 125mg


