
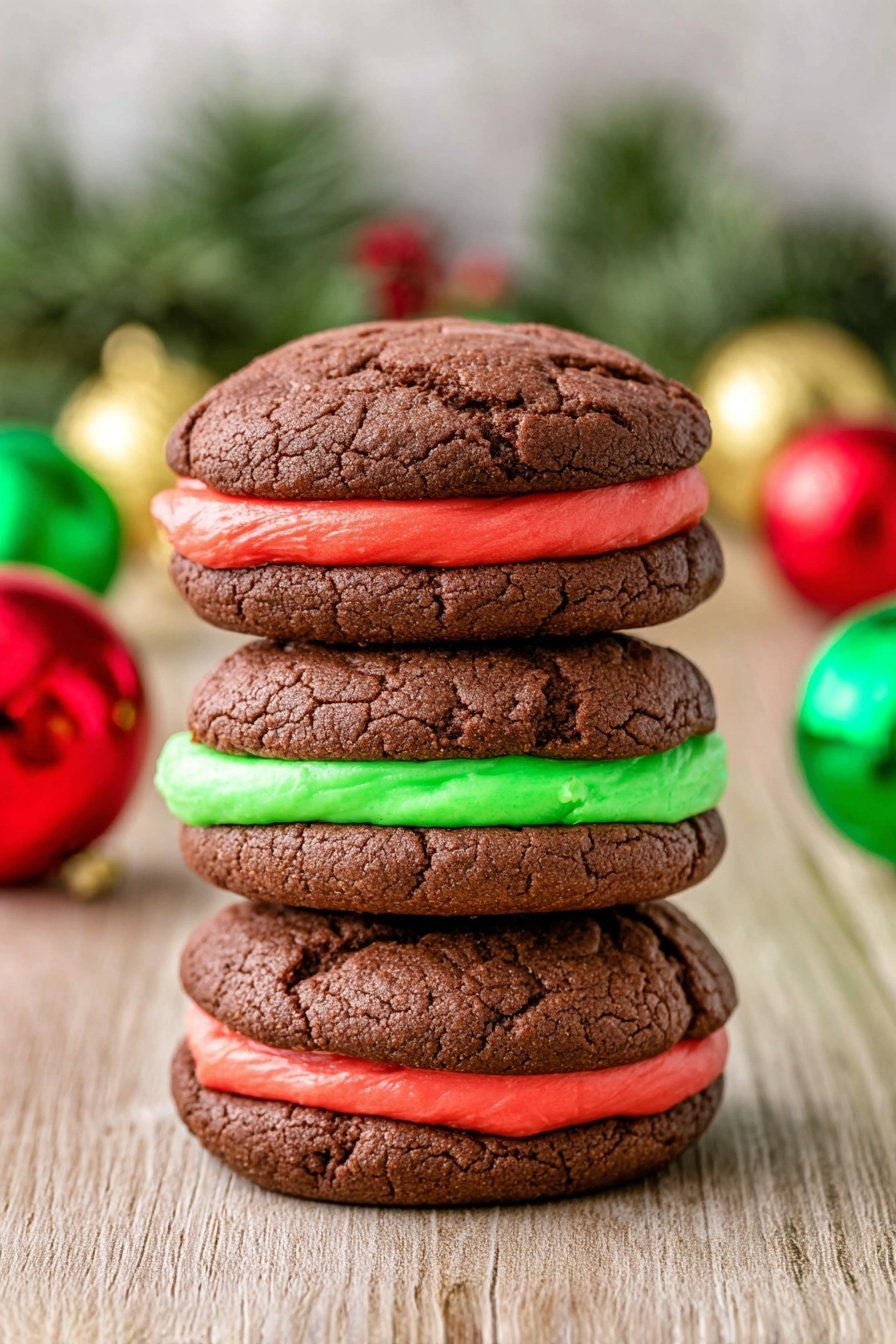
Hey there! If you’re looking for a delightful festive treat, I just have to share this absolutely fan-freaking-tastic Christmas Whoopie Pies with Marshmallow Filling Recipe. These fluffy, chocolatey cakes sandwich a dreamy, fluffy marshmallow cream that just screams holiday joy. Whether you’re gifting these or indulging on a cozy evening, they’re guaranteed to make everyone smile—and believe me, once you try them, you’ll want to make them a Christmas tradition!
Why You’ll Love This Recipe
- Effortlessly Delicious: You only need a cake mix and a few simple ingredients for a festive treat that tastes homemade.
- Marshmallow Magic: The creamy marshmallow filling makes these whoopie pies irresistibly soft and sweet.
- Perfect for Gifting: These charmingly festive cookies dressed in red and green are easy to make in batches and share.
- Kid-Friendly Fun: Decorating the filling with holiday colors is a fun activity for the family to enjoy together.

Ingredients You’ll Need
These ingredients work together to keep things simple but festive. Using a devil’s food cake mix gives you rich chocolate flavor and the marshmallow fluff adds that perfect light sweetness. Plus, a touch of cream cheese brings creaminess and tang for balance. All simple pantry staples that come together beautifully!

- Devil’s food cake mix: Look for a good-quality cake mix; it forms the moist, chocolatey base perfect for whoopie pies.
- Large eggs: These help bind your batter perfectly and add richness.
- Oil: I use neutral oil like vegetable or canola for moist cookies without overpowering flavor.
- Cream cheese: Make sure it’s softened to room temperature so it blends into the marshmallow filling smoothly.
- Marshmallow fluff: This is the secret star in the filling—delightfully light and sweet.
- Vanilla extract: Adds warmth and depth to the filling flavor.
- Salt: Just a pinch balances the sweetness wonderfully.
- Red and green gel food color: These make the filling festive and fun without messing with the texture.
Variations
I love how flexible this Christmas Whoopie Pies with Marshmallow Filling Recipe is—you can easily make it your own by switching up flavors or colors to match your holiday theme. Here are a couple of my favorite tweaks:
- Spiced Up: One year, I stirred in a teaspoon of pumpkin pie spice into the batter for an autumnal twist and it was a hit at Thanksgiving too.
- Adult Version: Adding a little peppermint extract instead of vanilla in the filling makes these extra Christmas-y and perfect with a cup of hot cocoa.
- Nut-Free Option: This recipe naturally is nut-free, so it’s great for holiday parties where allergies can be a concern.
- Vegan-Friendly: I haven’t tried this yet, but swapping eggs for flax eggs and using dairy-free cream cheese and marshmallow fluff could work—let me know if you try!
How to Make Christmas Whoopie Pies with Marshmallow Filling Recipe
Step 1: Prep Your Workspace and Dough
Start by preheating your oven to 350°F and lining two cookie sheets with parchment paper. This ensures the whoopie pies bake evenly and don’t stick. Then mix your cake mix, eggs, and oil in a large bowl until well combined. The batter will be quite thick—that’s normal! I like to use a sturdy wooden spoon or spatula for this part.
Step 2: Form and Bake the Cookies
Scoop the dough by tablespoonfuls and roll each into a ball. Place them on your cookie sheets with about 1.5 inches between each so they have room to spread. Use the palm of your hand or the bottom of a glass (lightly sprayed with non-stick spray) to gently flatten each ball. Bake for 8 to 10 minutes until edges are set. This step makes the outer part crisp while keeping the centers soft—trust me, it’s the key!
Step 3: Cool Completely Before Filling
Let the whoopie pies cool on the cookie sheets for about 5 minutes, then transfer them to a wire rack to cool completely. I can’t stress this enough—if the cookies are warm when you add the filling, it will melt and get messy.
Step 4: Make the Marshmallow Filling
In a mixer bowl, beat the softened cream cheese, marshmallow fluff, vanilla, and salt together until smooth and fluffy. This filling is seriously addictive—I often sneak a spoonful! For a festive touch, split your filling in half and add red food coloring to one half and green to the other, mixing until the colors are vibrant and even.
Step 5: Assemble Your Christmas Whoopie Pies
Transfer each colored filling to separate piping bags for neat application. Pipe the red filling onto the bottom of six cookies, then top with another cookie to make sandwiches. Repeat with the green filling and the remaining cookies. You’ll end up with perfectly festive whoopie pies ready to dazzle your holiday dessert table!
Pro Tips for Making Christmas Whoopie Pies with Marshmallow Filling Recipe
- Don’t Skip the Chill: Always let your cookies cool completely before filling—both for texture and to prevent the filling from melting.
- Use Gel Food Coloring: Liquid food coloring can thin your filling; gel maintains creamy texture and vibrant colors perfectly.
- Perfect Piping Bags: If you don’t have piping bags, a zip-top bag with a small corner snipped works like a charm for filling application.
- Flattening Fun: Spraying your glass with non-stick spray before flattening the dough stops it from sticking—saving you time and mess.
How to Serve Christmas Whoopie Pies with Marshmallow Filling Recipe
Garnishes
I love sprinkling a little festive spark on top—think crushed peppermint candies or a dusting of powdered sugar. It adds that extra holiday magic and some crunch to contrast the soft cookies. Fresh holly sprigs around the serving tray also make these look irresistible at parties!
Side Dishes
Pair your whoopie pies with warm drinks like hot chocolate, coffee, or spiced cider. I find them perfect with a simple bowl of mixed nuts or fresh fruit to balance out the sweetness and keep the festive vibe comfortable and cozy.
Creative Ways to Present
For a holiday party, I love arranging these whoopie pies on a tiered dessert stand decorated with pine branches and little fairy lights. Wrapping each in colorful cellophane and tying with a ribbon also turns them into adorable edible gifts. These little touches make them feel even more special!
Make Ahead and Storage
Storing Leftovers
Store your whoopie pies in an airtight container in the fridge—this keeps the filling nice and fresh while preserving the soft texture of the cookies. I’ve found they stay perfect for up to 5 days, making them a great make-ahead option for holiday gatherings.
Freezing
If you want to freeze them, I recommend assembling the pies without filling, freezing the cookies in a single layer, and then thawing and filling them fresh. This keeps the cookies from getting soggy. Alternatively, you can freeze the assembled pies for up to two weeks wrapped tightly in plastic wrap, but I prefer filling fresh if possible.
Reheating
Since these are soft cookies with marshmallow filling, you don’t really want to heat them—which could melt the filling. If you like your whoopie pies a bit room temp, just take them out of the fridge 20-30 minutes before serving. They’ll be perfect and gooey without any melt disaster.
FAQs
-
Can I use homemade cake batter instead of cake mix for this Christmas Whoopie Pies with Marshmallow Filling Recipe?
Absolutely! While the cake mix makes this recipe quicker and foolproof, you can definitely use a homemade chocolate cake batter. Just make sure it’s thick enough to scoop and hold its shape when flattened, or you might need to adjust baking times slightly.
-
How do I prevent my marshmallow filling from becoming runny?
Keep your cream cheese at room temperature but not warm, and use gel-based food coloring if adding colors. Also, avoid letting the filling sit out too long before assembling. If the filling feels too loose, chilling it for a bit before piping helps firm it up.
-
Can I make these Christmas Whoopie Pies gluten-free?
Yes! Swap the cake mix for a gluten-free devil’s food cake mix and ensure your other ingredients like the marshmallow fluff are gluten-free too. The texture might be slightly different, but still delicious!
-
Is there a way to make these dairy-free?
You can try using dairy-free cream cheese alternatives and marshmallow fluff that’s vegan/dairy-free. I haven’t personally tested this, but many have successfully adapted whoopie pie recipes with those swaps.
Final Thoughts
I genuinely adore this Christmas Whoopie Pies with Marshmallow Filling Recipe because it combines the magic of holidays with the joy of baking made simple. I’ve shared these at countless gatherings and each time, they disappear within minutes—plus, the bright red and green filling always turns heads! Whether you’re new to baking or a seasoned pro, this recipe will make your festive season extra special. So grab your ingredients, have fun in your kitchen, and get ready to wow your family and friends with this easy, delicious holiday treat!
Print
Christmas Whoopie Pies with Marshmallow Filling Recipe
- Prep Time: 12 minutes
- Cook Time: 8 minutes
- Total Time: 45 minutes
- Yield: 12 whoopie pies
- Category: Dessert
- Method: Baking
- Cuisine: American
Description
These Easy Christmas Whoopie Pies are a festive and delightful treat featuring soft, chocolatey cookie rounds filled with a creamy, fluffy marshmallow cream cheese filling. Perfect for holiday celebrations, they are simple to make with a box cake mix and can be decorated with red and green colored fillings for a cheerful Christmas touch.
Ingredients
Cookies:
- 1 15.25 oz box devil’s food cake mix
- 2 large eggs
- ⅓ cup oil
Marshmallow Filling:
- 8 oz cream cheese, room temperature
- 7 oz marshmallow fluff
- 1 teaspoon vanilla extract
- Pinch of salt
- Red gel food color
- Green gel food color
Instructions
- Preheat Oven: Preheat the oven to 350°F (175°C). Line two large cookie sheets with parchment paper and set aside for baking.
- Make Cookie Dough: In a large bowl, stir together the devil’s food cake mix, eggs, and oil until the mixture is well combined. The batter will be thick, which is normal for this recipe.
- Form Cookie Balls: Using a tablespoon, scoop out cookie dough and roll it into balls. Place the dough balls onto the prepared cookie sheets, spacing them about 1.5 inches apart to allow for spreading during baking.
- Flatten Dough Balls: Slightly flatten each dough ball using the palm of your hand or the bottom of a glass sprayed with non-stick spray, pressing gently to create cookie shapes.
- Bake Cookies: Bake the cookies in the preheated oven for 8 to 10 minutes, or until the edges are set but the centers remain soft. After baking, let the cookies cool on the sheets for 5 minutes, then transfer them to a wire rack to cool completely before filling.
- Prepare Marshmallow Filling: In the bowl of a stand mixer or with a hand mixer, beat together the softened cream cheese, marshmallow fluff, vanilla extract, and a pinch of salt until the mixture is smooth and creamy, with no lumps.
- Color the Filling: Divide the filling evenly into two separate bowls. Add 4-5 drops of red gel food coloring to one bowl and mix thoroughly until evenly colored with no streaks. Repeat the process in the second bowl using green gel food coloring.
- Pipe Filling onto Cookies: Spoon each colored filling into separate piping bags. Pipe the red filling onto the bottom of six completely cooled cookies. Repeat with the green filling on six more cookies. Then, sandwich each filled cookie with remaining plain cookies to complete the whoopie pies.
- Serve and Enjoy: Serve the festive whoopie pies immediately or store as instructed. These treats are perfect for holiday parties or as a delightful gift.
Notes
- Storage: Store whoopie pies in an airtight container in the refrigerator for up to 5 days to keep them fresh.
- Rolling Dough: If the dough becomes too sticky to handle, chilling it briefly can make rolling easier.
- Filling Variations: You can omit the food coloring for a classic white filling or experiment with other colors to match different occasions.
- Baking Time: Be careful not to overbake, as you want the cookies to remain soft and cakey.
Nutrition
- Serving Size: 1 whoopie pie
- Calories: 280
- Sugar: 22g
- Sodium: 260mg
- Fat: 14g
- Saturated Fat: 6g
- Unsaturated Fat: 6g
- Trans Fat: 0g
- Carbohydrates: 36g
- Fiber: 1g
- Protein: 3g
- Cholesterol: 30mg


