
If you’re craving a dessert that’s rich, festive, and downright irresistible, you absolutely need to try this Chocolate Peppermint Cheesecake Recipe. It’s one of those treats that makes the holidays feel extra special, but honestly, I’ve made it all year long because it’s just that good! The silky chocolate combined with that refreshing peppermint kick hits all the right notes. Stick around—I’m sharing all my tricks to make sure your cheesecake turns out perfectly smooth, creamy, and crowd-pleasing every single time.
Why You’ll Love This Recipe
- Decadent Flavor Combo: The blend of rich chocolate and refreshing peppermint is a total game-changer that’s surprisingly easy to pull off.
- Perfectly Creamy Texture: The velvety filling bakes just right every time, thanks to a careful water bath step I’ll explain below.
- Festive & Fun to Decorate: Crushed candy canes on top add that iconic holiday crunch and look stunning too.
- Make Ahead Friendly: You can prep it well in advance, which means less stress when you have guests over.

Ingredients You’ll Need
Choosing the right ingredients really brings this chocolate peppermint cheesecake to life. I recommend full-fat cream cheese for creaminess and real peppermint extract for an authentic minty punch—don’t settle for imitation here, it makes a difference!

- Oreo cookies: Using the whole cookie, including filling, adds sweetness and texture to the crust.
- Unsalted butter: Melted butter helps bind the crust while letting you control the salt level.
- Semisweet chocolate: Rich but not overly bitter—great balance for the filling and topping.
- Cream cheese: Full fat and softened, so your cheesecake is smooth without lumps.
- Granulated sugar: Provides sweetness but also helps create a creamy texture.
- Heavy cream: Adds silkiness to the filling and keeps it luscious.
- Unsweetened cocoa powder: For a deeper chocolate flavor in the batter.
- Eggs + egg yolk: The binding agents—make sure they’re room temperature to prevent cracking.
- Peppermint extract: The star of the show for that cooling mint flavor.
- Chocolate chips (for topping): Melts into a luscious ganache layer.
- Crushed candy canes: Add a festive crunch and pop of color as the final touch.
Variations
I love how versatile this Chocolate Peppermint Cheesecake Recipe is! Once you get comfy with the basics, it’s fun to tweak flavors or make it your own depending on the season or your dietary needs. Don’t be shy about experimenting—you might find a new favorite twist!
- Mint Chocolate Chunk: I stirred in chopped dark chocolate chunks for extra texture; my family loved the surprise little bites!
- Decaf Peppermint: For a caffeine-free version, swap semisweet chocolate with a good-quality carob or white chocolate and adjust peppermint to taste.
- Gluten-Free Crust: Swap Oreo cookies with gluten-free chocolate sandwich cookies—just make sure they crumble well for a sturdy crust.
- More Peppermint Punch: Add crushed candy canes into the filling for an all-over mint explosion that’s awesome if you’re a peppermint addict like me.
How to Make Chocolate Peppermint Cheesecake Recipe
Step 1: Prep Your Pan for Success
This step is a little secret I discovered that makes all the difference: creating a water bath for baking your cheesecake. Wrap your 9-inch springform pan tightly in three layers of heavy-duty aluminum foil to keep water out—you really want to avoid any leaks. This gentle steaming bath prevents cracks and gives that beautifully smooth texture. Don’t skip spritzing your pan with nonstick spray to help loosen the cheesecake later, too.
Step 2: Make the Oreo Crust
I like to pulse my Oreos in a food processor until fine, including the filling—it adds sweetness without extra sugar. Mix the crumbs with melted butter and press evenly into the bottom and halfway up the pan sides. Baking the crust for 10 minutes just brings out the cookie aroma and firms it up so it won’t crumble when you slice. Make sure it cools slightly before adding the filling!
Step 3: Melt the Chocolate
Using a microwave-safe bowl, melt chopped semisweet chocolate in 30-second bursts, stirring between each to prevent overheating. If you’re like me, you’ll want it perfectly melted and smooth to swirl into the filling without risk of lumps or burning. Let it cool a bit while you move on—it shouldn’t be warm enough to cook the eggs in the batter.
Step 4: Whip Up That Silky Filling
Here’s where the magic happens. Beat the softened cream cheese on medium speed until super smooth—taking your time here pays off and ensures zero lumps. Add sugar, heavy cream, and cocoa powder, scraping as you go to fully combine. Incorporate eggs and yolk one at a time, just until blended; overbeating can cause cracks later. Fold in peppermint extract and melted chocolate gently but thoroughly. Pour batter into your crust and tap the pan to release any air bubbles.
Step 5: Bake in a Water Bath
Place your cheesecake pan inside a large roasting pan, then pour boiling water halfway up the sides—the steam keeps the cheesecake from drying out. Bake at 325°F for 1 to 1 hour 15 minutes. You want the top just set but the center slightly wobbly—think Jell-O jiggle. Underbaking a bit here means a creamier final texture, so don’t panic if it feels soft.
Step 6: Cool Slowly to Prevent Cracks
Once out of the oven, turn it off and crack the door slightly for 45 minutes. This gentle cooling helps prevent those pesky cracks. Then move the cake to a wire rack until it reaches room temperature. Afterward, refrigerate for at least 4 hours—or ideally overnight—to let it fully set.
Step 7: Prepare the Chocolate Peppermint Topping
Heat heavy cream just until simmering and pour it over semisweet chocolate chips—let them soak for 3 minutes, then stir into a glossy ganache. Allow to cool slightly until it thickens just a bit, then pour over your chilled cheesecake. Sprinkle crushed candy canes generously on top for a festive, crunchy finish. This last touch is what always gets compliments!
Pro Tips for Making Chocolate Peppermint Cheesecake Recipe
- Room Temperature Ingredients: This is key — using room temp cream cheese and eggs ensures a smooth batter without lumps or cracks.
- Don’t Overbeat the Eggs: Beat eggs just until combined to avoid incorporating too much air and cracking during baking.
- Water Bath Wrapping: Triple wrapping the pan in foil prevents leaks and protects your cheesecake from water damage.
- Slow Cooling Trick: Leaving the oven door open slightly after baking reduces temperature shock and keeps the surface crack-free.
How to Serve Chocolate Peppermint Cheesecake Recipe

Garnishes
I usually stick with crushed candy canes on top because they add beautiful contrast and a delightful crunch that complements the creamy cheesecake perfectly. Sometimes, I add a few fresh mint leaves for a pop of green and an extra hint of freshness—makes for a lovely presentation when guests come over!
Side Dishes
Personally, I love serving this cheesecake with a simple fresh berry salad or whipped cream lightly dusted with cocoa powder. The bright berries balance out the richness and peppermint flavor, making every bite feel like a little celebration.
Creative Ways to Present
For holiday gatherings, I’ve layered slices in clear glass trifle bowls with crushed Oreos and dollops of whipped cream for a fun take on cheesecake parfaits. Another idea is to garnish individual slices with a drizzle of chocolate ganache and a mini candy cane hooked on the side—super charming and perfect for gift-giving!
Make Ahead and Storage
Storing Leftovers
Once your cheesecake is made, store leftovers tightly wrapped or in an airtight container in the refrigerator. I wrap mine with plastic wrap over the top and around the sides to keep it fresh for up to 5 days. This makes it a perfect make-ahead dessert for a weekend party or holiday buffet.
Freezing
I’ve frozen leftover cheesecake slices wrapped tightly in plastic wrap and then foil for up to 2 months. When thawing, I recommend moving them to the fridge overnight to keep texture intact. Frozen cheesecake sometimes loses a bit of that fresh, creamy mouthfeel, but this method keeps it tasty and convenient.
Reheating
I usually enjoy cheesecake chilled, but if you want it slightly softened, take it out of the refrigerator 15-20 minutes before serving. Avoid microwaving as it can ruin the texture or melt your ganache topping—patience here pays off every time!
FAQs
-
Can I use a different cookie for the crust?
Absolutely! While Oreo cookies give a perfect chocolatey crunch and sweetness, you can swap in another chocolate sandwich cookie or even chocolate graham crackers. Just make sure to finely grind them and adjust the butter amount if the texture seems dry or too crumbly.
-
What’s the best way to avoid cracks in cheesecake?
Using a water bath is the best technique I’ve found to prevent cracks. It creates a moist, gentle heat environment while baking. Also, don’t overbeat your eggs, and let the cheesecake cool slowly with the oven door cracked open after baking.
-
Can I substitute peppermint extract with fresh mint?
You can infuse the heavy cream with fresh mint leaves by gently heating the cream with the leaves and then straining before using, but this will give a subtler mint flavor compared to the concentrated peppermint extract. If you want a strong minty punch, stick with the extract.
-
Is there a way to make this cheesecake vegan?
Makes for a fun challenge! Vegan cream cheese alternatives and nondairy chocolate chips exist, and you can try coconut cream instead of heavy cream. Keep in mind, baking times and textures will vary quite a bit, so this recipe isn’t foolproof vegan right out of the gate—but it’s totally possible with some testing.
Final Thoughts
Making this Chocolate Peppermint Cheesecake Recipe has become a bit of a tradition in my kitchen, and honestly, it never fails to impress. It’s one of those desserts that feels fancy but is surprisingly easy to whip up once you know the steps. I hope you’ll enjoy making it as much as I do—it’s perfect for sharing, celebrating, or just treating yourself on a quiet night in. Give it a go, and I promise it’ll be your new holiday (or anytime!) favorite.
Print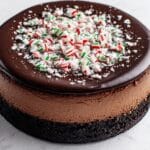
Chocolate Peppermint Cheesecake Recipe
- Prep Time: 30 minutes
- Cook Time: 1 hour 10 minutes
- Total Time: 6 hours 25 minutes
- Yield: 12 servings
- Category: Dessert
- Method: Baking
- Cuisine: American
Description
This decadent Chocolate Peppermint Cheesecake combines a rich, smooth chocolate cream cheese filling infused with refreshing peppermint extract, nestled on a crunchy Oreo cookie crust, and topped with a luscious chocolate ganache and crushed candy canes for a festive finish. Perfect for holiday celebrations or any time you crave a luxurious and refreshing dessert.
Ingredients
For the Crust:
- 24 Oreo cookies (278 grams), filling intact
- 4 tablespoons (57 grams) unsalted butter, melted
For the Filling:
- 8 ounces (227 grams) semisweet chocolate, chopped
- 24 ounces (680 grams) full fat cream cheese, completely softened to room temperature
- 1 cup (200 grams) granulated sugar
- 1/2 cup heavy cream, at room temperature
- 1/4 cup (21 grams) unsweetened cocoa powder
- 4 large eggs plus 1 egg yolk, at room temperature
- 1 teaspoon peppermint extract
For the Topping:
- 1 cup (170 grams) semisweet chocolate chips
- 1/2 cup heavy cream
- Crushed candy canes
Instructions
- Preheat Oven: Preheat your oven to 325°F (163°C). This temperature is ideal for slow baking the cheesecake evenly.
- Prepare Water Bath: Line a 9-inch springform pan with three layers of heavy-duty aluminum foil, folding the edges up around the pan to create a waterproof seal. Spray the pan with nonstick cooking spray to prevent sticking.
- Make the Crust: Pulse Oreo cookies in a food processor until finely ground (about 1 cup of crumbs). Add melted butter and pulse until moistened. Press the mixture evenly into the bottom and halfway up the sides of the prepared pan.
- Bake Crust: Bake the crust for 10 minutes until fragrant. Allow it to cool slightly, keeping the oven on to maintain temperature for the filling.
- Melt Chocolate: Microwave chopped semisweet chocolate in 30-second intervals, stirring after each until smooth and fully melted. Set aside to cool to room temperature.
- Prepare Filling: Beat the softened cream cheese on medium speed until smooth and lump-free. Add sugar, heavy cream, and cocoa powder, beating until fully combined. Add eggs and egg yolk one at a time, mixing until just smooth. Gently fold in peppermint extract and melted chocolate, taking care not to overmix.
- Assemble Cheesecake: Pour the filling into the cooled crust, tapping the pan against the counter to release air bubbles. Place the springform pan inside a larger roasting pan and pour boiling water into the roasting pan until it reaches halfway up the sides of the cheesecake pan.
- Bake Cheesecake: Bake at 325°F for 1 hour to 1 hour 15 minutes until the top is slightly dry but the center jiggles like Jell-O. It’s better to underbake slightly than overbake.
- Cool Gradually: Turn off oven, crack door open, and let cheesecake cool inside the oven for 45 minutes to prevent cracks.
- Cool Completely: Remove cheesecake from oven and water bath, transfer to a wire rack, and cool to room temperature.
- Chill: Refrigerate cheesecake for at least 4 hours until fully chilled and set.
- Prepare Topping: Heat heavy cream in a small saucepan just until simmering. Pour over chocolate chips in a heatproof bowl and let sit for 3 minutes. Stir until smooth and glossy. Cool slightly to thicken if needed.
- Finish Cheesecake: Pour the ganache evenly over the chilled cheesecake. Sprinkle generously with crushed candy canes for a festive, peppermint crunch.
- Serve and Store: Serve immediately or store covered in the refrigerator for up to 5 days to maintain freshness.
Notes
- You can also use an oven-safe roasting bag around your springform pan instead of heavy-duty foil to prevent leaks during the water bath. Secure the bag with foil around the base and sides as necessary.
- Use cream cheese that is completely softened to room temperature for a smooth, lump-free filling. Cold cream cheese can create lumps in the cheesecake batter.
- To avoid cracks, do not overbake the cheesecake; it should still wobble slightly in the center when done.
- The water bath technique helps provide moisture and even heat distribution to prevent cracking and overcooking the edges.
Nutrition
- Serving Size: 1 slice (1/12 of recipe)
- Calories: 460
- Sugar: 30g
- Sodium: 230mg
- Fat: 34g
- Saturated Fat: 20g
- Unsaturated Fat: 12g
- Trans Fat: 0g
- Carbohydrates: 36g
- Fiber: 2g
- Protein: 7g
- Cholesterol: 125mg


