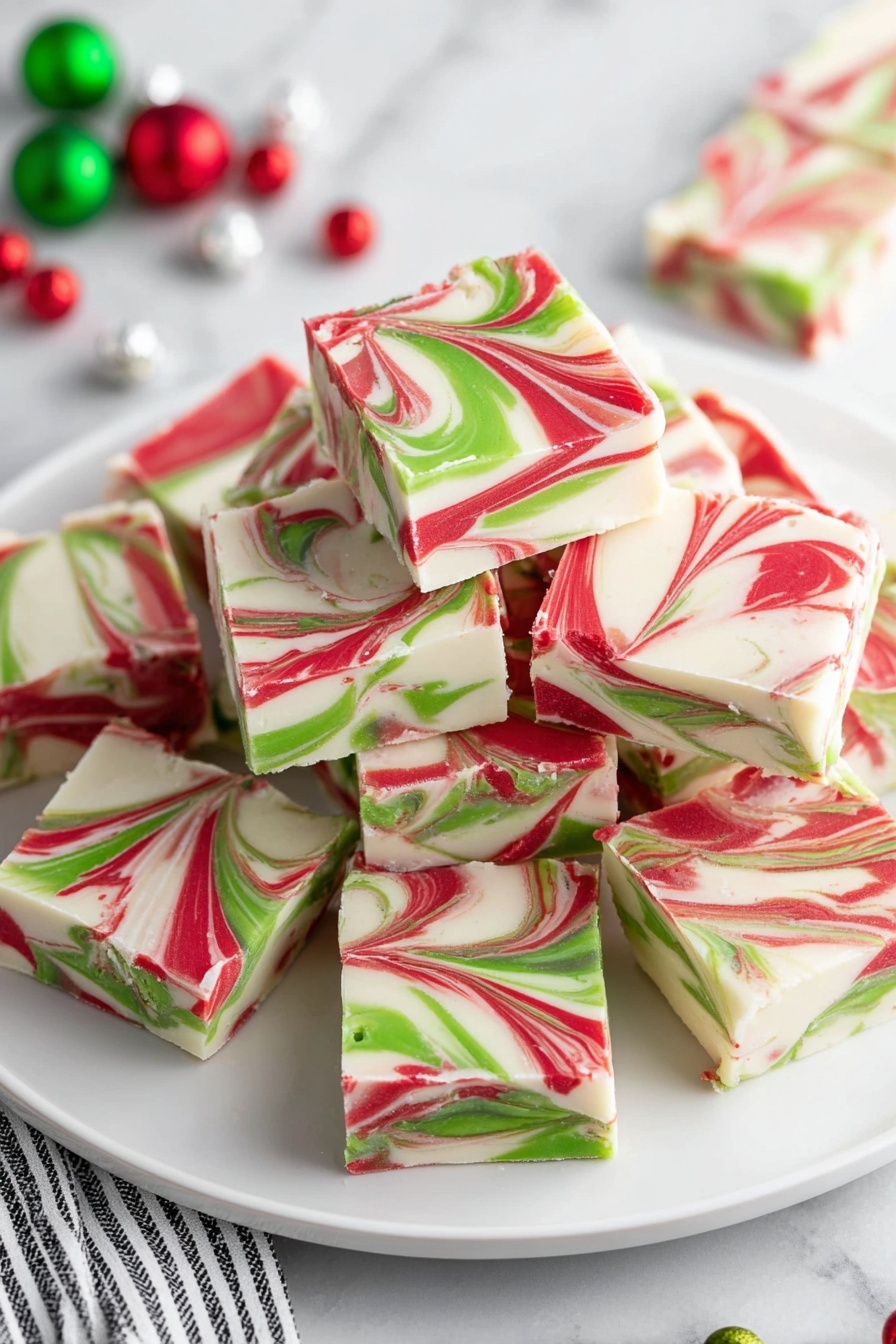
If you’re on the hunt for a festive treat that’s as delightful to look at as it is to eat, you’ve just found your new favorite. This Christmas Color White Chocolate Fudge Recipe is nothing short of magical—creamy, sweet, and swirled with vibrant reds and greens that’ll absolutely wow your holiday guests. I absolutely love how this fudge turns out with its smooth texture and that cheerful pop of color, making it perfect for gifting or serving at any Christmas party. Stick with me, and I’ll walk you through each step so your fudge comes out flawless every single time.
Why You’ll Love This Recipe
- Simple Ingredients: You only need a handful of pantry staples and food coloring—easy to find and quick to work with.
- No Baking Required: Melting and swirling is all it takes to get this luscious fudge ready for the holidays—zero oven time!
- Show-Stopping Presentation: The festive red and green swirls make it a standout centerpiece on any holiday dessert table.
- Crowd-Pleaser: I’ve made this for family gatherings and let me tell you, it disappears fast—everyone asks for the recipe!

Ingredients You’ll Need
The magic of this fudge lies in combining high-quality white chocolate with sweetened condensed milk and just the right touch of butter to keep it silky smooth. The gel food coloring is key here—it’s vibrant without watering down the fudge like liquid dyes can.

- White chocolate chips: I recommend Ghirardelli because they melt beautifully and have a rich, creamy flavor.
- Sweetened condensed milk: This adds the perfect sweetness and a luscious texture that just melts in your mouth.
- Unsalted butter: Using cold, cubed butter helps the fudge set nicely and adds a subtle richness.
- Red gel food coloring: Start with a quarter teaspoon and add more if you want a bolder red—it blends so well!
- Green gel food coloring: Same as red—gel colors give that gorgeous, saturated holiday green without affecting texture.
Variations
I love that this Christmas Color White Chocolate Fudge Recipe is so versatile—you can easily customize it based on what you have on hand or to suit your family’s tastes. Feel free to get creative with flavors and colors!
- Minty Twist: Add a teaspoon of peppermint extract to the melted fudge for a classic holiday flavor that my family adores.
- Nutty Delight: Toss in some chopped pecans or pistachios before setting for extra crunch and a sophisticated touch.
- Dairy-Free Version: Substitute the white chocolate chips with dairy-free white chocolate and use coconut cream in place of condensed milk. Just a heads-up—it changes the texture slightly, but it’s still yummy!
- Different Colors: Use blue and silver gel colors for a Hanukkah twist or pastel shades for a winter wonderland theme.
How to Make Christmas Color White Chocolate Fudge Recipe
Step 1: Prepare Your Pan
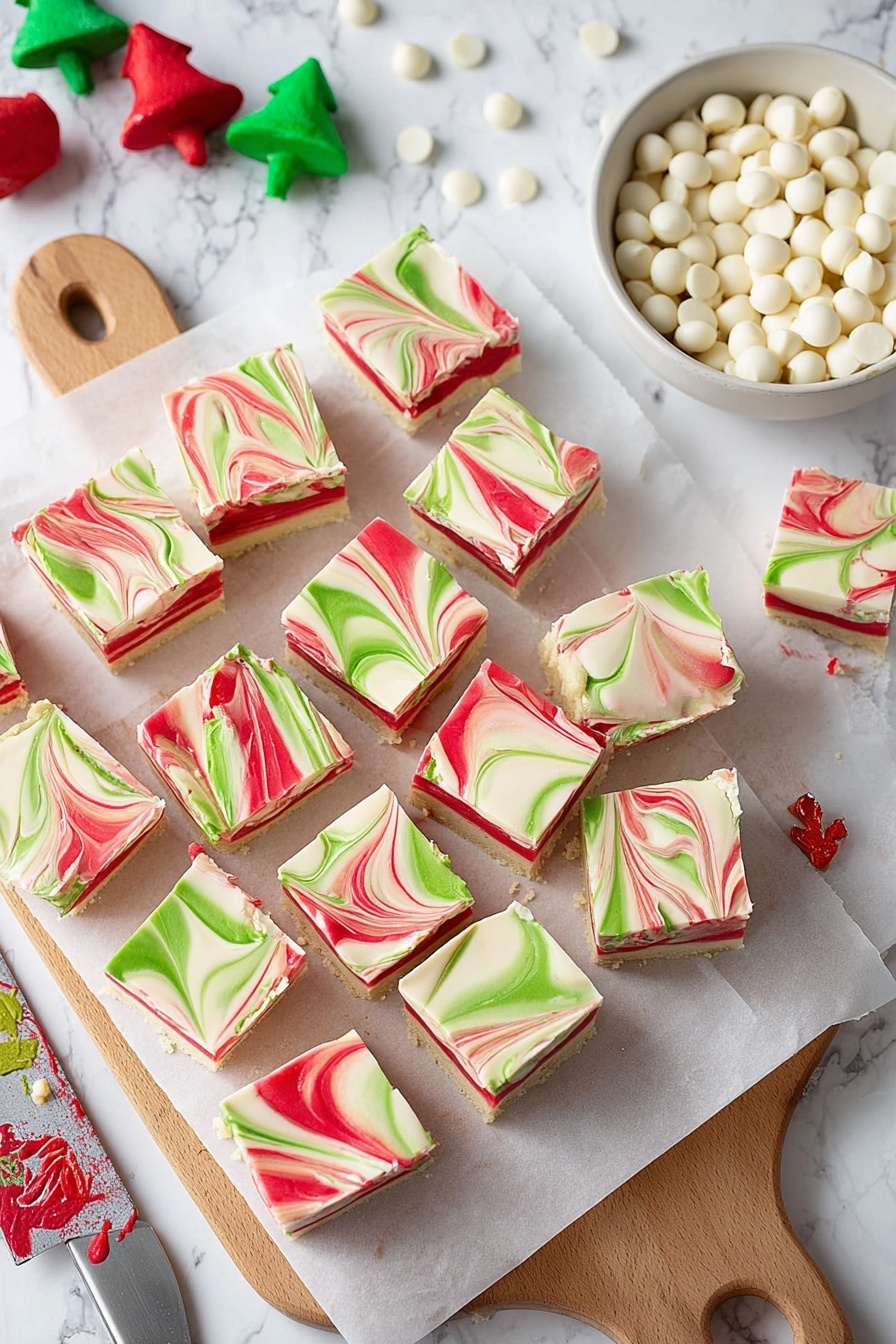
Line an 8×8-inch square baking pan with parchment paper, making sure the paper hangs over the sides. This is a game-changer because once the fudge sets, you can just lift it out easily to slice without any mess or crumbling.
Step 2: Melt the Chocolate with Cream and Butter
In a medium saucepan over medium-low heat, combine white chocolate chips, sweetened condensed milk, and cold cubes of unsalted butter. Stir constantly for 4-6 minutes until everything has melted and the mixture is perfectly smooth. Be patient here—it’s tempting to crank up the heat, but low and slow prevents burning and keeps the fudge silky.
Step 3: Divide and Color the Fudge
Pour about one-third of the melted mixture into a small bowl and stir in red gel food coloring. Start with ¼ teaspoon, then add more until you get the vibrant red you want. Repeat with another one-third of the fudge mixture and green gel food coloring. The remainder stays white. Make sure to stir each color well so you get no streaks—that means the color is perfectly incorporated.
Step 4: Dollop and Swirl
Add spoonfuls of white, red, and green fudge randomly into the prepared pan, layering rainbows all over the base. Grab a wooden skewer or butter knife and gently swirl the colors together—don’t overdo it; you want a beautiful marbled look, not mixed to one color.
Step 5: Smooth the Top and Chill
Press a small square of parchment paper gently over the top of the fudge while it’s still soft. This helps smooth out the surface without disturbing the swirls. Then, refrigerate for 2-3 hours until the fudge is firm and ready to slice.
Step 6: Slice and Serve
Once chilled, lift the fudge out of the pan using the parchment overhang. Place it on a cutting board and slice into 1×1 inch squares—64 pieces perfectly sized for sharing, gifting, and savoring. Trust me, they won’t last long!
Pro Tips for Making Christmas Color White Chocolate Fudge Recipe
- Use Quality White Chocolate: I learned the hard way with cheaper brands that don’t melt as smoothly—Ghirardelli or similar really makes a difference in texture and taste.
- Keep the Heat Low and Stir Often: White chocolate burns easily, so slow and steady wins the race here for that silky melt.
- Gel Food Coloring Is Your Friend: It doesn’t alter the fudge’s texture and gives vibrant colors without watering down your mixture.
- Don’t Over-Swirl: Swirling too much blends your colors completely—aim for pretty marbling instead of muddy shades.
How to Serve Christmas Color White Chocolate Fudge Recipe
Garnishes
I often sprinkle chopped crushed peppermint candies or festive holiday sprinkles on top before chilling—it adds texture, a hint of crunch, and a little sparkle that’s so fun for holiday gatherings.
Side Dishes
This fudge pairs wonderfully with a warm cup of mulled cider or hot cocoa, especially on cold winter evenings. For parties, it’s a sweet contrast alongside salty nuts or cheese plates.
Creative Ways to Present
One of my favorite presentation tricks is to arrange the fudge squares in a festive tin lined with a holiday-themed tea towel or wrapping in clear cellophane bags tied with red and green ribbons—instant charm for gifting or cookie exchanges.
Make Ahead and Storage
Storing Leftovers
I store leftovers in an airtight container in the refrigerator, and they stay delicious for up to a week. Just be sure to keep them covered well so they don’t pick up any fridge odors or dry out.
Freezing
If you want to make this fudge way ahead of time, freezing works beautifully. I wrap squares individually in parchment paper, place them in an airtight container, and freeze for up to two months. Thaw them slowly in the fridge overnight to keep their creamy texture intact.
Reheating
This fudge isn’t really meant to be reheated, but if the texture feels a bit firm after chilling, just let it sit at room temperature for 10-15 minutes before serving—softens right up without losing shape.
FAQs
-
Can I use regular food coloring instead of gel for this fudge?
You technically can, but I don’t recommend it. Liquid food coloring can thin the fudge mixture, affecting the texture and how well it sets. Gel food coloring is concentrated with minimal liquid, so it gives vibrant colors without compromising the fudge’s consistency.
-
Is it possible to make this fudge without sweetened condensed milk?
Sweetened condensed milk is key to the creamy sweetness here, so skipping it isn’t ideal. If you want to avoid canned milk, you could try making your own condensed milk substitute, but the texture might vary. I’d suggest sticking with it for the most reliable results.
-
How do I get smooth swirls without mixing the colors too much?
Use a gentle swirling technique: drag your skewer or butter knife lightly in loops or figure-eights, only a few times. The goal is to create pretty marbling, not blend all the colors into one. Less is definitely more here.
-
Can I make this fudge in different shapes?
Absolutely! While I usually use an 8×8 pan for neat squares, you could use silicone molds or candy molds to get fun holiday shapes. Just be sure to adjust the chilling time accordingly, as smaller shapes set faster.
Final Thoughts
This Christmas Color White Chocolate Fudge Recipe has become a staple in my holiday baking rotation because it’s foolproof, delicious, and such a joyful treat to share. I love how the festive colors brighten up my dessert table and how easy it is to make even on a busy holiday weekend. If you try it, I guarantee your family and friends will be asking for more—and you’ll feel like the ultimate holiday baking hero. So grab your ingredients, warm up your stove, and get ready to create some Christmas magic in fudge form!
Print
Christmas Color White Chocolate Fudge Recipe
- Prep Time: 15 minutes
- Cook Time: 6 minutes
- Total Time: 3 hours 21 minutes
- Yield: 64 pieces (1×1 inch each)
- Category: Dessert
- Method: Stovetop
- Cuisine: American
- Diet: Vegetarian
Description
This festive Christmas fudge recipe features a creamy white chocolate base swirled with vibrant red and green gel food coloring to create a beautiful holiday treat. Made with white chocolate chips, sweetened condensed milk, and butter, it’s easy to prepare on the stovetop and perfectly chilled to set into smooth, rich squares that are ideal for sharing during the holiday season.
Ingredients
Fudge Base
- 22 oz (2 11-oz. bags) white chocolate chips (Ghirardelli brand recommended)
- 14 oz can sweetened condensed milk
- 4 tablespoons unsalted butter, cold and cut into small cubes
Coloring
- ¼-½ teaspoon red gel food coloring (Americolor brand suggested; start with ¼ teaspoon and add as needed)
- ¼-½ teaspoon green gel food coloring (start with ¼ teaspoon and add as needed)
Instructions
- Prepare Pan: Line an 8×8 inch straight-sided baking pan with parchment paper, making sure the paper overhangs the sides to allow easy removal of fudge once set.
- Melt Ingredients: In a medium saucepan over medium-low heat, combine the white chocolate chips, sweetened condensed milk, and cold cubes of unsalted butter. Stir constantly for 4-6 minutes until the chocolate is completely melted and the mixture is smooth. Remove from heat.
- Add Red Coloring: Transfer one-third of the melted mixture to a small bowl. Add red gel food coloring starting with ¼ teaspoon, stirring until fully incorporated and the color is even without streaks.
- Add Green Coloring: In a second small bowl, combine another third of the chocolate mixture with green gel food coloring, starting with ¼ teaspoon, stirring until the color is uniform.
- Assemble Fudge Layers: Drop dollops of the white, red, and green fudge mixtures randomly into the prepared baking pan until all mixtures are used.
- Swirl Colors: Using a wooden skewer or butter knife, gently swirl the colors together on the top to create a decorative marbled pattern.
- Smooth Surface: Place a small piece of parchment paper over the fudge and gently press down to smooth the surface, taking care not to disturb the swirl pattern.
- Chill: Refrigerate the fudge for 2-3 hours or until it is fully set and firm.
- Slice and Serve: Lift the fudge from the pan using the parchment overhang, transfer to a cutting board, and slice into 64 pieces approximately 1×1 inch each. Serve chilled.
Notes
- Storage in Refrigerator: Store fudge in an airtight container in the fridge for up to 1 week.
- Storage in Freezer: Freeze fudge in an airtight container for up to 2 months. Thaw completely in the fridge before serving.
- Tip for Coloring: Start with minimal gel food coloring and add more gradually to achieve your desired shade.
- Fudge Thickness: Using an 8×8 pan yields thicker pieces. For thinner fudge, use a larger pan but expect fewer pieces.
Nutrition
- Serving Size: 1 piece (1×1 inch)
- Calories: 110
- Sugar: 15g
- Sodium: 30mg
- Fat: 5g
- Saturated Fat: 3.5g
- Unsaturated Fat: 1.0g
- Trans Fat: 0g
- Carbohydrates: 16g
- Fiber: 0.2g
- Protein: 1g
- Cholesterol: 10mg


