
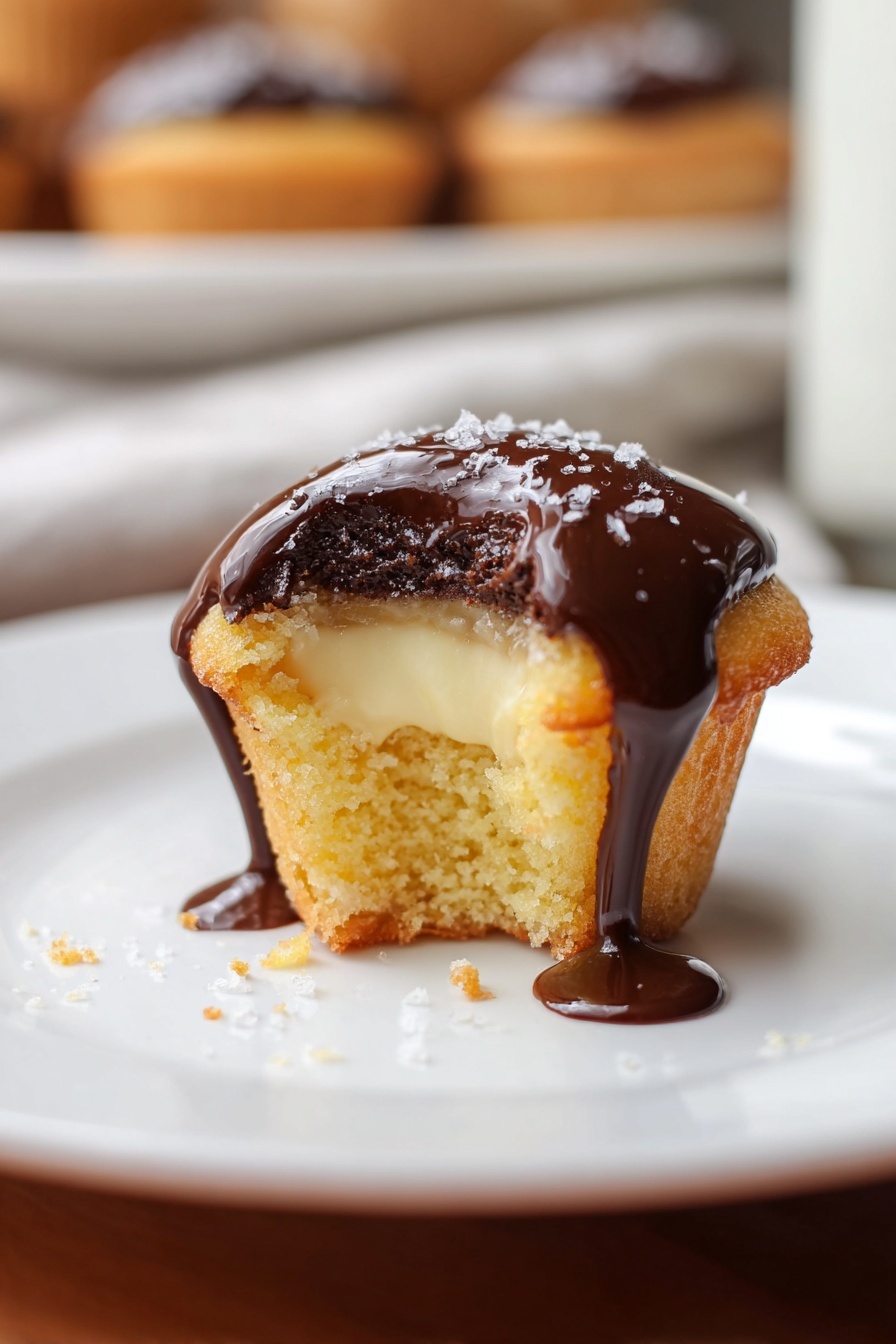
If you’re a fan of classic desserts with a fun twist, you’re going to *love* this Boston Cream Pie Cookie Cups Recipe. Imagine that perfect balance of fluffy yellow cake, creamy vanilla pudding, and rich chocolate ganache, all packed into cute, bite-sized cookie cups. I absolutely love how these little treats come together with such vibrant flavors and textures — and honestly, they’re way easier to make than you’d expect. Stick with me, and I’ll walk you through every step so you nail it just right!
Why You’ll Love This Recipe
- Delicious and Fun: It’s a lively twist on a classic Boston Cream Pie, baked into perfectly portable cookie cups.
- Super Easy Prep: Made with a cake mix and simple ingredients, you’ll save time without losing flavor.
- Kid-Friendly and Crowd-Pleasing: My family goes crazy for these at parties and after school snacks.
- Great for Meal Prep: You can make these a day ahead and store them in the fridge without any fuss.

Ingredients You’ll Need
This recipe relies on simple pantry staples that come together beautifully to recreate that iconic Boston Cream Pie experience in cookie form. Using a boxed cake mix keeps things quick and easy, while fresh ingredients like butter and eggs make sure your cookie cups have great texture and flavor.
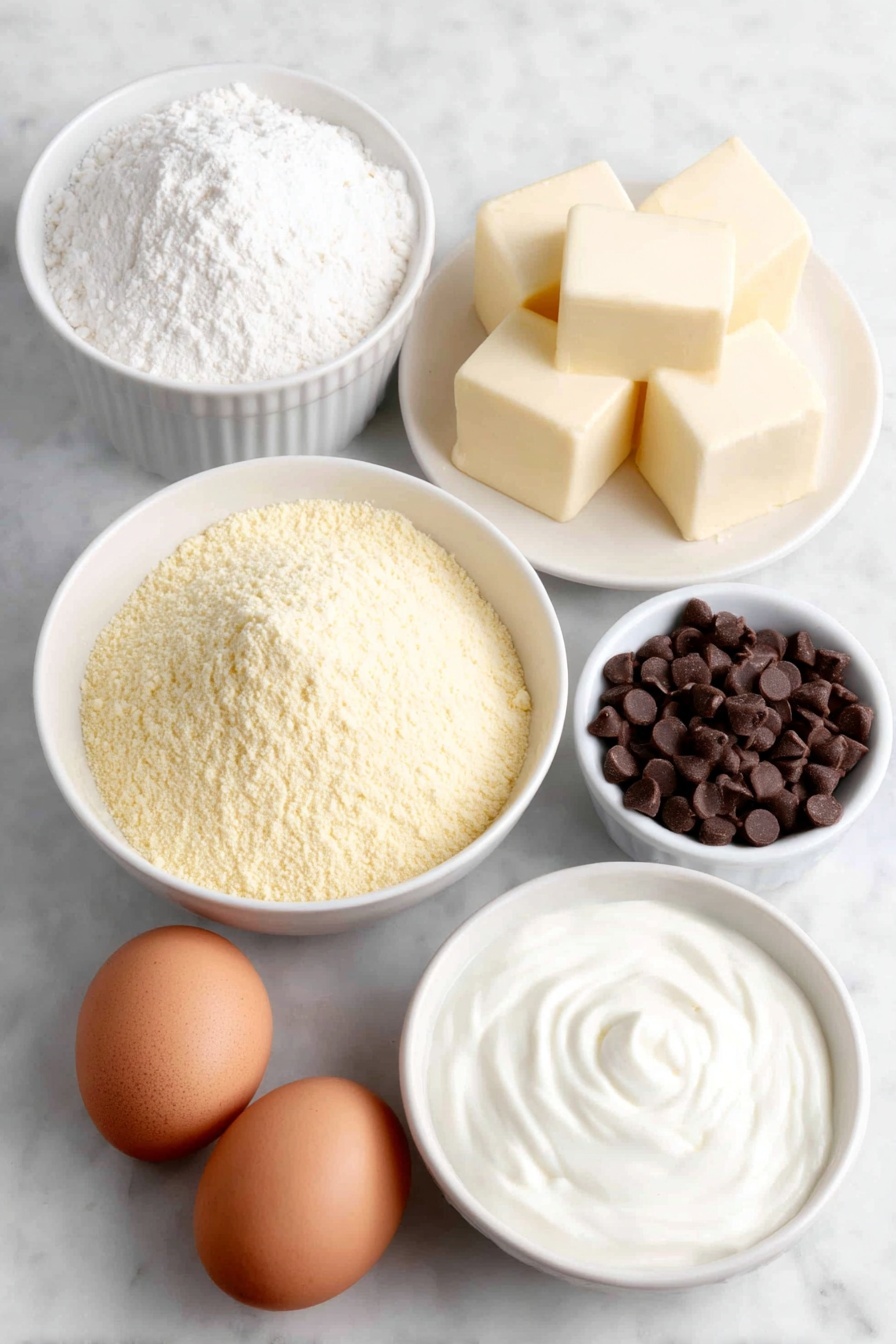
- Yellow cake mix: I used Pillsbury because it gives a nice buttery flavor; make sure you buy a classic yellow mix for authenticity.
- Salted butter: Melt it and cool it before mixing to help combine everything smoothly.
- Large eggs: Room temperature works best for even mixing and better rise.
- Cold whole milk: Using whole milk in the pudding makes it extra creamy and indulgent.
- Instant French vanilla pudding mix: Jell-O brand is my go-to for that classic vanilla flavor — don’t skip this!
- Semi-sweet chocolate chips: The Toll House brand melts beautifully and balances the sweetness with a bit of richness.
- Heavy cream: It’s the key to a smooth, glossy chocolate ganache that sets perfectly atop the pudding.
Variations
I’ve played around with this Boston Cream Pie Cookie Cups Recipe in a few ways over time, and have found it so rewarding to personalize depending on your palate or occasion. Feel free to get creative — there’s really no wrong way!
- Flavor Boost: Swap the vanilla pudding for chocolate or butterscotch pudding for a different twist; I tried chocolate once and loved the richer vibe.
- Dairy-Free Version: Use coconut milk and dairy-free chocolate chips for a tasty allergy-friendly option — just know the texture shifts slightly.
- Mini Cheesecake Filling: For a tangy variation, replace the pudding with a simple vanilla cheesecake filling; my friends were pleasantly surprised when I made these for a brunch.
- Decorative Touch: Add a sprinkle of chopped nuts or colorful sprinkles on the ganache before it sets for festive presentation.
How to Make Boston Cream Pie Cookie Cups Recipe
Step 1: Prepare Your Mini Muffin Tin and Dough
First up, preheat your oven to 350°F and lightly spray two mini muffin tins with nonstick cooking spray. Even though your pan might be nonstick, spraying helps prevent any sticky surprises later. In a medium bowl, stir together your yellow cake mix, melted (and cooled!) salted butter, and room temperature eggs until the mixture is smooth with no dry clumps. This batter is a bit thicker than cookie dough but trust me, it bakes into soft, bendable cookie cups perfectly.
Step 2: Shape and Bake the Cookie Cups
Use about 2 to 2 ½ teaspoons of dough per mini muffin cup. Press each portion flat into the bottom, spreading it out gently — you want a thin even layer that will form your cup’s shape after baking. After baking for 9-10 minutes, the edges should look golden and the cookie itself will puff slightly. Don’t worry if they seem a bit soft — that’s perfect for shaping.
Step 3: Form the Cups While Warm
Once out of the oven, let the cookies cool in the pan for 3-5 minutes. While still warm and pliable, gently press the center of each cookie with the end of a small rolling pin, a wooden spoon, or a tart shaper to create the cup shape. I like to spray a paper towel with cooking spray and wipe the tool before pressing — this helps prevent sticking. Be super gentle here because pushing too hard can poke holes, making your cookie cups leaky.
Step 4: Whip Up the Vanilla Pudding Filling
Next, grab a medium bowl and pour in your cold whole milk. Sprinkle the instant French vanilla pudding mix over the top, then use a handheld mixer on low speed to blend until it thickens — about 1 ½ to 2 minutes. You’ll love how quick this comes together and that creamy, dreamy vanilla flavor that’s exactly what you want!
Step 5: Pipe the Filling Into Your Cookie Cups
Transfer your pudding filling into a disposable piping bag or a gallon-size ziplock bag with a small corner snipped off. This makes filling each cookie cup so much neater and easier to control. Slowly squeeze the pudding into each cup cavity until they’re filled just to the top. This part’s satisfying — seeing those cups come alive with creamy center is the best!
Step 6: Make the Chocolate Ganache Topping
For the ganache, combine your semi-sweet chocolate chips in a small heat-safe bowl. Heat the heavy cream in the microwave until you see tiny bubbles forming around the edges — about 1 minute. Pour the hot cream over the chocolate and let it sit for 1 minute without stirring. Then, stir gently until the ganache is smooth and glossy with no chocolate lumps. This ganache is silky and melts beautifully on top of the pudding layer.
Step 7: Top and Chill
Use a small spoon to drop about 1 teaspoon of ganache onto each cookie cup, right in the center atop the pudding. Place your tray of cookie cups in the refrigerator for the chocolate to set and firm up properly before serving. This chilling also helps the flavors marry nicely.
Pro Tips for Making Boston Cream Pie Cookie Cups Recipe
- Don’t Skip Butter Cooling: Make sure your melted butter has cooled before mixing—hot butter can cook the eggs prematurely.
- Press Gently to Avoid Holes: When shaping the cookie cups, a light touch preserves bottom integrity and keeps the filling inside.
- Use Cold Milk for Pudding: Cold milk helps the instant pudding thicken quickly and ensures a smooth finish.
- Chill for Ganache Set-Up: Allow enough refrigeration time for the ganache to set and avoid messy toppings that melt or drip.
How to Serve Boston Cream Pie Cookie Cups Recipe
Garnishes
I like to keep things classic with just the chocolate ganache topping, but adding a dusting of powdered sugar or a tiny fresh raspberry on top can bring a lovely pop of color and flavor. Sometimes a little mint leaf makes these look super fancy — great if you’re serving at a party!
Side Dishes
Personally, I enjoy pairing these cookie cups with a simple cup of coffee or tea to balance their richness. They’re also a hit alongside fresh fruit platters or light whipped cream if you want a dessert platter vibe.
Creative Ways to Present
For birthdays or gatherings, try serving them in a layered glass trifle dish with additional layers of berries or crushed cookies between. Or arrange them neatly on a decorative platter with small doilies underneath each cup to make them feel extra special. I’ve even packaged a batch in pretty cupcake liners as favors once — everyone loved the thoughtful touch!
Make Ahead and Storage
Storing Leftovers
I store leftover Boston Cream Pie Cookie Cups in a single layer inside an airtight container in the refrigerator. They stay fresh for up to 4 days, and I usually bring them out about 10-15 minutes before serving so they’re not too cold but still hold their shape.
Freezing
I don’t recommend freezing these once filled because the pudding can “weep” when thawed, making your cookie cups soggy — such a bummer! But you could freeze just the baked cookie cups (without filling) for a couple of months, then thaw and fill fresh when ready.
Reheating
These cookie cups are best served chilled or at room temperature. If you prefer them a little warmer, let them sit out for 20 minutes or so—microwaving is tricky because the ganache can melt and the filling may get runny.
FAQs
-
Can I make the cookie cups without a mini muffin tin?
While a mini muffin tin is ideal for shaping these cookie cups, you could try using a mini tart pan or silicone molds. Just be sure to adjust baking times as needed and watch closely so the cookies don’t overbake.
-
What if I don’t have instant pudding mix?
Instant pudding mix is key for quick thickening and flavor. If you can’t find it, you could make a homemade vanilla custard or pastry cream, but the process is longer and more involved.
-
How do I prevent the cookie cups from sticking?
Spraying your mini muffin tins well with nonstick spray before baking is critical. Also, when shaping cups, spraying your shaping tool with nonstick spray helps avoid tearing the cookies.
-
Can I make this recipe gluten-free?
Absolutely! Use a gluten-free yellow cake mix and ensure your pudding and chocolate chips are gluten free as well. The end result might have a slightly different texture, but still delicious!
-
How many cookie cups does this recipe make?
This Boston Cream Pie Cookie Cups Recipe yields about 48 mini cookie cups — perfect for parties, potlucks, or holiday treats.
Final Thoughts
This Boston Cream Pie Cookie Cups Recipe is one of those gems that always gets compliments, yet feels so approachable to make at home. I’m always thrilled when I whip them up because they bring together all the familiar flavors of Boston Cream Pie but in a fun, handheld form everyone loves. Seriously, once you try these, you’ll find yourself looking for excuses to bake them again. Go ahead—make some for your family or next get-together. They’ll thank you, and you’ll feel like the dessert hero you are!
Print
Boston Cream Pie Cookie Cups Recipe
- Prep Time: 20 minutes
- Cook Time: 10 minutes
- Total Time: 30 minutes
- Yield: 48 cookie cups
- Category: Dessert
- Method: Baking
- Cuisine: American
Description
These Boston Cream Pie Cookie Cups combine the nostalgic flavors of the classic dessert into delicious, bite-sized treats. A soft yellow cake cookie forms the base, filled with creamy vanilla pudding and topped with a rich chocolate ganache, creating the perfect handheld dessert for any occasion.
Ingredients
Cookie Cup:
- 15.25 ounces (432g) yellow cake mix (Pillsbury brand recommended)
- ⅓ cup salted butter, melted and cooled
- 2 large eggs, room temperature
Filling:
- 1¾ cups cold whole milk
- 3.4 ounces (96g) instant French vanilla pudding mix (Jell-O brand recommended)
Ganache:
- ¾ cup semi-sweet chocolate chips (Toll House brand recommended)
- ½ cup heavy cream
Instructions
- Preheat Oven: Preheat your oven to 350°F. Spray two mini muffin tins with nonstick cooking spray to prevent sticking.
- Prepare Cookie Dough: In a medium mixing bowl (2-3 quarts), combine the yellow cake mix, melted butter, and room temperature eggs. Stir until fully incorporated with no dry lumps remaining.
- Portion Dough: Measure about 2 to 2 ½ teaspoons of cookie dough into each mini muffin cup. Press the dough flat into the bottom of each cup to prepare for baking.
- Bake Cookie Cups: Bake the cookie cups for 9 to 10 minutes, or until they puff up and turn golden brown.
- Form the Cups: Let the cookie cups cool in the pan for 3 to 5 minutes. Then, gently press the center of each cookie cup with the end of a small rolling pin, round wooden spoon, or tart shaper to create a cavity. Be careful not to press too hard to avoid holes. To prevent sticking, spray your pressing tool with nonstick spray on a paper towel. Allow the cookie cups to cool completely, then transfer them to a wire rack.
- Make the Pudding Filling: Pour the cold milk into a medium bowl. Sprinkle the instant French vanilla pudding mix over the milk. Using a handheld mixer on low speed, beat for 1½ to 2 minutes until the pudding thickens.
- Fill Cookie Cups: Transfer the pudding filling to a piping bag or a gallon-sized zip-top bag with a corner snipped off. Pipe the pudding gently into the centers of the cooled cookie cups until full.
- Prepare Ganache: Place the chocolate chips in a small heat-safe bowl. Heat the heavy cream in a microwave-safe bowl for 1 minute at full power, or until small bubbles form around the edges. Pour the hot cream over the chocolate chips and let sit for 1 minute. Stir until smooth and fully combined.
- Top with Ganache: Spoon about 1 teaspoon of the chocolate ganache onto the top of each pudding-filled cookie cup.
- Chill and Serve: Refrigerate the assembled cookie cups to allow the ganache to set before serving. Store leftovers in an airtight container in the refrigerator for up to 4 days. Avoid freezing as the pudding may cause sogginess.
Notes
- Storage: Keep leftover cookie cups in an airtight container in the refrigerator. Best within 4 days.
- Prevent Sticking: Even with nonstick mini muffin tins, lightly spray the pan before adding dough to ensure easy removal.
- Forming Cookie Cups: Use the end of a small rolling pin, a wooden spoon handle, or a tart shaper to gently press the cups after baking. Spray the tool lightly with nonstick spray on a paper towel to avoid sticking.
- Do Not Freeze Filled Cups: Freezing may cause the pudding filling to weep and the cookie cups to become soggy upon defrosting.
Nutrition
- Serving Size: 1 cookie cup
- Calories: 130
- Sugar: 10g
- Sodium: 110mg
- Fat: 7g
- Saturated Fat: 4g
- Unsaturated Fat: 2g
- Trans Fat: 0g
- Carbohydrates: 15g
- Fiber: 1g
- Protein: 2g
- Cholesterol: 30mg


