
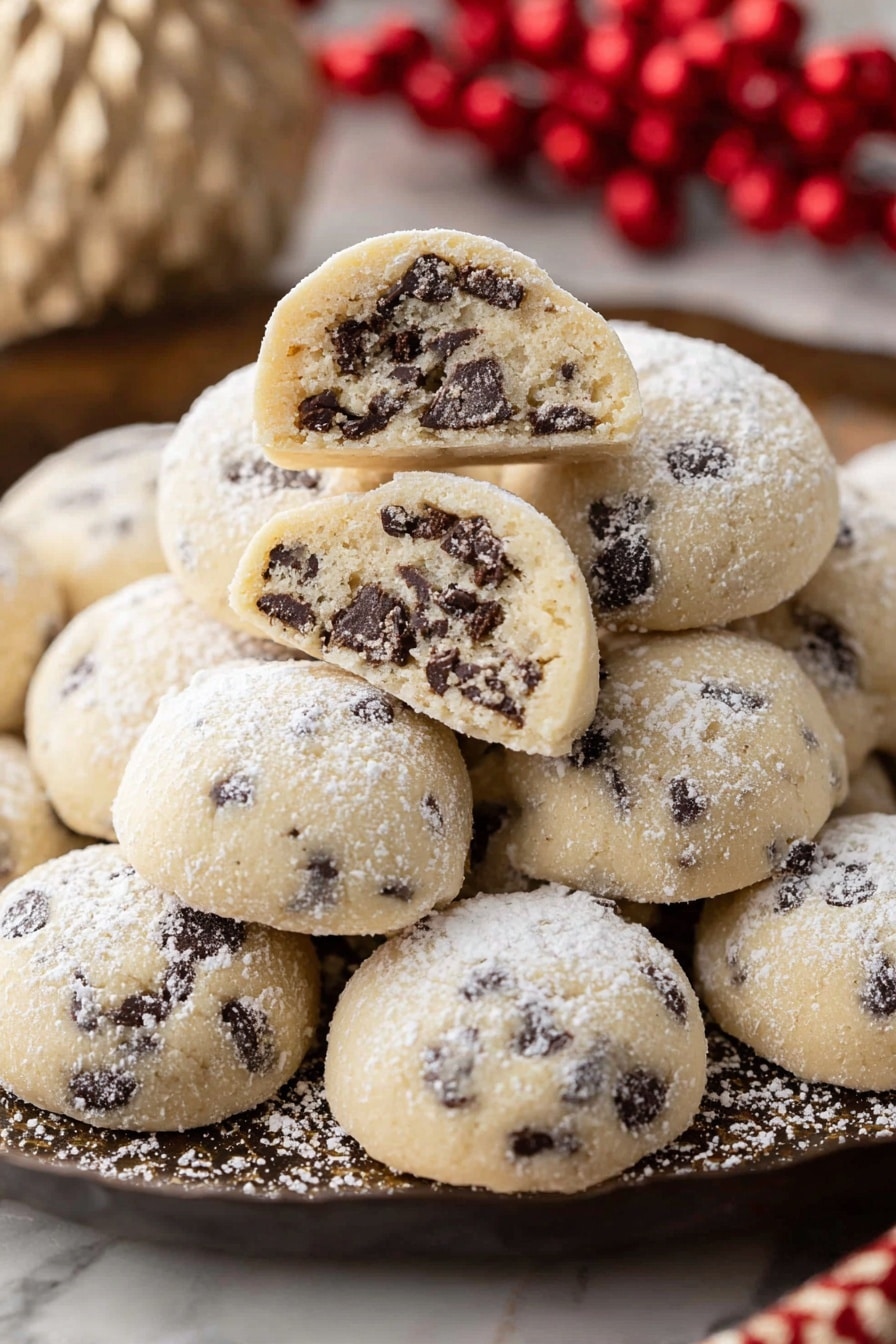
If you’re looking for a cookie that perfectly balances melt-in-your-mouth tenderness with a fun twist of chocolate, you’re going to adore this Chocolate Chip Snowball Cookies Recipe. I absolutely love how these cookies look dusted in powdered sugar, like little snowballs that taste far better than any winter treat you can buy. When I first tried making them, I was amazed by how the mini chocolate chips added just enough sweet surprise in every bite without overpowering the classic buttery dough.
Why You’ll Love This Recipe
- Perfect Texture: These cookies are tender and crumbly but hold together beautifully thanks to the right flour-to-butter ratio.
- Easy to Make: The recipe uses simple ingredients and straightforward steps that even a beginner can handle with confidence.
- That Classic Snowball Look: The generous coating of confectioners’ sugar creates a festive, snowy appearance that’s irresistible.
- Chocolate Chip Surprise: Mini semi-sweet chips peek out from inside, adding sweetness without overwhelming the delicate dough.

Ingredients You’ll Need
The magic of this Chocolate Chip Snowball Cookies Recipe really comes from high-quality staples working in harmony. I find that soft, room-temperature butter is a key player here — it mixes up smooth and light, helping create that melt-in-your-mouth texture.
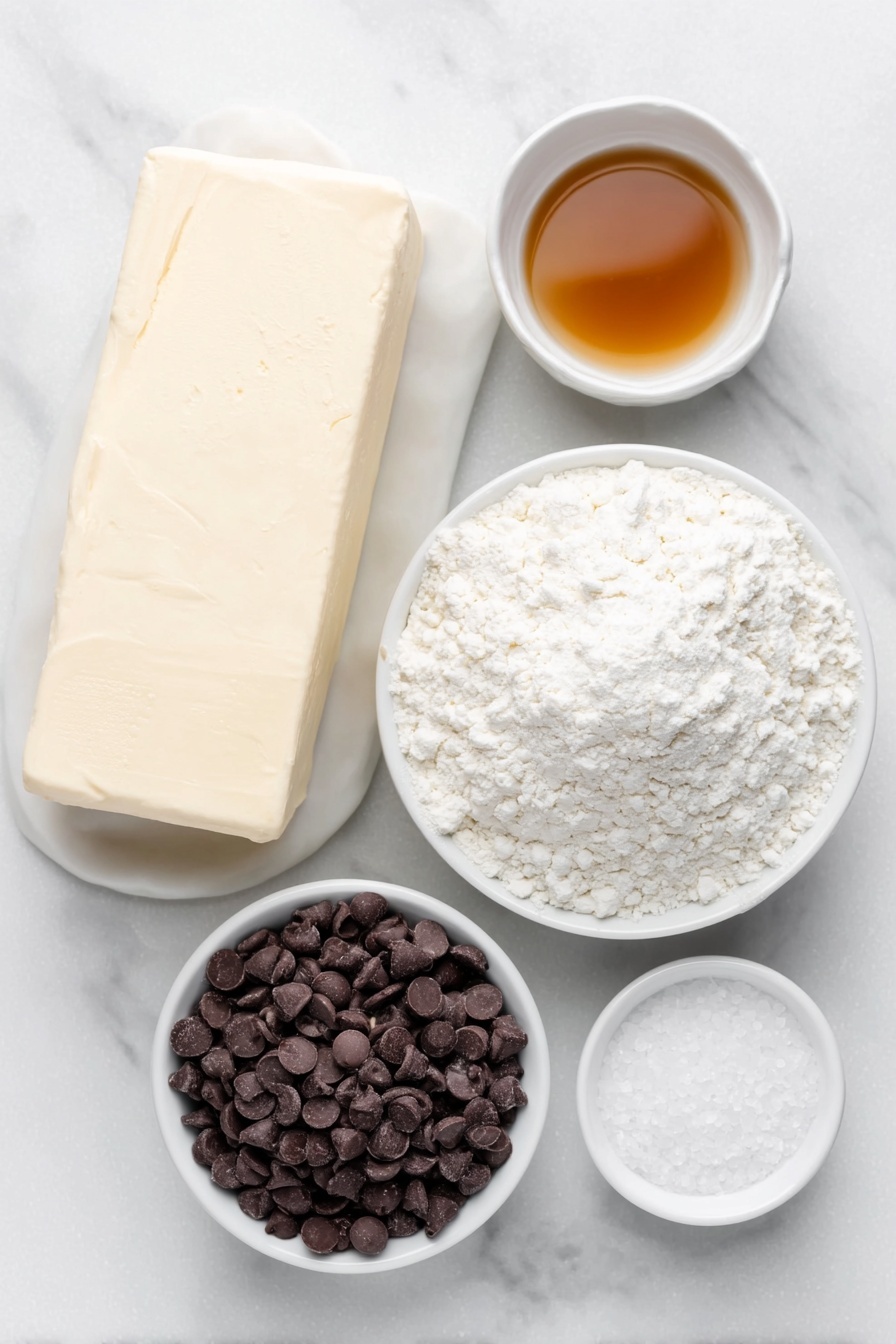
- Unsalted butter: I always use unsalted so I can control the salt level better; be sure it’s softened to room temp for easier mixing.
- Confectioners sugar: This powdery sugar is essential not only inside the dough but also for rolling the cookies so they get that classic snowy finish.
- Vanilla extract: Choose pure vanilla for a rich, warm flavor that complements the chocolate chips.
- All-purpose flour: The no-fuss choice to create structure while keeping the cookies tender.
- Salt: Just a pinch balances the sweetness and enhances all other flavors.
- Mini semi-sweet chocolate chips: I like minis because they distribute evenly and melt gently without overpowering each bite.
- Additional confectioners sugar (for rolling): This double dusting is what really nails the look and taste.
Variations
I love how adaptable this Chocolate Chip Snowball Cookies Recipe is—sometimes I like to mix things up depending on the season or what I have on hand. Don’t hesitate to get creative and make this recipe your own.
- Nutty Twist: Adding finely chopped pecans or walnuts into the dough gives a lovely crunch that my family goes crazy for, especially around the holidays.
- White Chocolate Version: Swapping mini chips with white chocolate chips provides a sweeter, creamier flavor that’s just as delicious.
- Gluten-Free Swap: Replace all-purpose flour with a 1-to-1 gluten-free baking flour for a version that everyone can enjoy.
- Seasonal Spices: A pinch of cinnamon or nutmeg adds a warm, cozy vibe that I adore when it’s chilly outside.
How to Make Chocolate Chip Snowball Cookies Recipe
Step 1: Cream Your Butter, Sugar & Vanilla
Start by preheating your oven to 350°F and lining two baking sheets with parchment paper. Then, in a stand mixer or with a hand mixer, beat your softened butter, confectioners sugar, and vanilla extract until it’s light, fluffy, and creamy—about 3 to 5 minutes. It’s really worth taking the time here; this is what gives the cookies their tender crumb and delicate texture.
Step 2: Gradually Add Flour and Salt
Switch your mixer to low and slowly incorporate the flour and salt. Then bump up the speed to medium and mix just until everything comes together into a dough. Watch out not to overmix — you want a dough that holds together but stays soft enough to shape easily. Scrape down the sides of your bowl as needed to make sure it all combines.
Step 3: Stir in Mini Chocolate Chips
With your dough ready, gently fold in the mini semi-sweet chocolate chips by hand. This keeps them evenly spread without crushing or melting them before baking.
Step 4: Form and Bake Your Cookies
Scoop your dough by the tablespoon and roll into balls. Place them on your lined baking sheets, giving each at least an inch of space—they don’t spread much, but you want to avoid sticking. Bake for 10 to 12 minutes, keeping a close eye so the bottoms are just lightly golden. Overbaking can dry these out, so take them out as soon as you see that gentle tint of color.
Step 5: Roll in Confectioners Sugar and Cool
Once the cookies come out of the oven, let them cool for a few minutes—just warm enough to handle without burning your fingers. Roll each cookie generously in the additional confectioners sugar. They’ll look so festive and gorgeous! Transfer to a wire rack to cool completely. For an extra-thick snowy coat, roll them in fresh powdered sugar again once fully cooled.
Pro Tips for Making Chocolate Chip Snowball Cookies Recipe
- Use Room Temperature Butter: I learned this trick the hard way—cold butter won’t cream properly, and your dough won’t get that perfect delicate texture.
- Mind the Baking Time: I used to overbake, thinking they needed more time, but pulling them out as soon as the bottoms turn light golden keeps them tender inside.
- Double Dust for Best Look: Rolling the cookies twice in fresh confectioners sugar once cooled gives that picture-perfect snowball effect every time.
- Dough Chill for Softer Handling: If your dough feels too sticky to roll easily, pop it in the fridge for 15–20 minutes—it makes shaping much easier.
How to Serve Chocolate Chip Snowball Cookies Recipe
Garnishes
For a festive presentation, I sometimes sprinkle a tiny pinch of cinnamon or even a touch of edible glitter on top after rolling in the confectioners sugar—it adds a subtle sparkle that’s fun for holiday gatherings. Fresh mint leaves on the plate also brighten up the feel if you’re serving these for a party.
Side Dishes
I’ve found these cookies pair beautifully with a warm cup of chai tea or a glass of cold milk for the kids. Around the holidays, I love serving them alongside my homemade hot chocolate topped with whipped cream for an extra indulgent combo.
Creative Ways to Present
For special occasions, I arrange these snowball cookies in a decorative tin layered with parchment paper and tied with a festive ribbon. Another fun idea I discovered is stacking them into a “cookie snowman” and decorating with mini candies as buttons—it’s always a hit with guests of all ages!
Make Ahead and Storage
Storing Leftovers
I keep mine in an airtight container at room temperature, layered with parchment paper to keep them from sticking together. They usually stay fresh for up to a week, though mine rarely last that long because everyone sneaks them!
Freezing
One trick I love is freezing the dough balls before baking—just shape and freeze on a tray, then pop them into a labeled bag. When you’re ready, bake directly from frozen and add a couple extra baking minutes. This way, fresh cookies are always just minutes away when guests drop by.
Reheating
If you want to reheat leftover cookies, I use a 300°F oven for about 5 minutes wrapped loosely in foil to soften them up without drying them out. Avoid microwaving, which can make cookies too soft and mushy instead of wonderfully tender.
FAQs
-
Can I use regular-sized chocolate chips instead of mini ones?
Absolutely! Using regular-sized chocolate chips works fine, but the mini chips distribute more evenly and melt gently throughout the cookie. If you use larger ones, you might get bigger pockets of chocolate, which can be delicious but a little less consistent.
-
Why are my cookies not crumbly like snowballs?
If your cookies end up too dense or firm, it might be due to overmixing the dough or overbaking them. Also, make sure your butter is properly softened; too cold or melted butter can affect the texture. Follow the recommended mixing times and keep an eye on the bake time for best results.
-
Can I make these cookies vegan or dairy-free?
Yes! You can swap the butter for vegan butter or coconut oil, and make sure to double-check your chocolate chips are dairy-free. The texture might vary slightly, but with some experimentation, you’ll still get tasty snowball cookies.
-
How long do these cookies stay fresh?
Stored in an airtight container at room temperature, these cookies stay fresh and tender for about a week. Beyond that, freezing is your best bet to keep them tasting their best.
Final Thoughts
This Chocolate Chip Snowball Cookies Recipe has become one of my absolute favorites because it combines simplicity with a bit of whimsy—the snowball look makes them feel special, but they’re so easy to whip up on any given day. Whether it’s a holiday party, a cozy night in, or just an excuse to bake something delightful, these cookies never disappoint. I can’t wait for you to try them and enjoy each tender, chocolate-studded bite just as much as my family and I do!
Print
Chocolate Chip Snowball Cookies Recipe
- Prep Time: 20 minutes
- Cook Time: 10-12 minutes
- Total Time: 30-32 minutes
- Yield: 32 cookies
- Category: Dessert
- Method: Baking
- Cuisine: American
- Diet: Vegetarian
Description
Delight in these classic Chocolate Chip Snowball Cookies, featuring a buttery dough studded with mini semi-sweet chocolate chips, baked to perfection and generously rolled in confectioners sugar for a festive, melt-in-your-mouth treat. Perfect for holiday gatherings or any cozy occasion.
Ingredients
Cookie Dough
- 1 cup unsalted butter, room temperature
- ½ cup confectioners sugar
- 1 ½ teaspoons vanilla extract
- 2 ¼ cups all-purpose flour
- ½ teaspoon salt
- 1 cup mini semi-sweet chocolate chips
For Rolling
- 1-2 cups additional confectioners sugar
Instructions
- Preheat Oven: Preheat your oven to 350°F (175°C) and line two baking sheets with parchment paper to ensure the cookies don’t stick.
- Cream Butter Mixture: In a stand mixer or large bowl, beat the room temperature butter, ½ cup confectioners sugar, and vanilla extract until the mixture is light and fluffy. This usually takes about 3 to 5 minutes and creates a smooth base for the dough.
- Add Dry Ingredients: With your mixer on low speed, gradually blend in the all-purpose flour and salt. Increase the mixer to medium speed and continue mixing until a cohesive dough forms, scraping the bowl as needed to incorporate all ingredients evenly.
- Incorporate Chocolate Chips: Fold in the mini semi-sweet chocolate chips evenly into the dough, ensuring every bite has delicious chocolate.
- Shape Cookies: Using a tablespoon or cookie scoop, form the dough into balls and place them on the prepared baking sheets, spacing them at least 1 inch apart to allow for gentle expansion.
- Bake: Bake the cookies in the preheated oven for 10 to 12 minutes. They should be lightly golden on the bottoms; avoid overbaking to keep the cookies tender.
- Cool Slightly: Let the cookies cool on the baking sheets for 3 to 5 minutes until they are warm but firm enough to handle.
- Roll in Sugar: Roll the warm cookies in the reserved confectioners sugar until fully coated, then transfer them to a wire rack to cool completely.
- Optional Second Coating: For an extra thick, snowy sugar coating, roll the cookies again in fresh confectioners sugar once they are completely cooled.
Notes
- If the dough feels too soft and sticky to roll, chill it briefly in the refrigerator to firm it up for easier handling.
- Replace the confectioners sugar used for rolling if it becomes clumpy to maintain a smooth and attractive coating.
- Store the cookies in an airtight container at room temperature for up to one week or freeze them for up to three months to enjoy later.
Nutrition
- Serving Size: 1 cookie
- Calories: 110
- Sugar: 7g
- Sodium: 70mg
- Fat: 6g
- Saturated Fat: 3.5g
- Unsaturated Fat: 2g
- Trans Fat: 0g
- Carbohydrates: 14g
- Fiber: 1g
- Protein: 1g
- Cholesterol: 20mg


