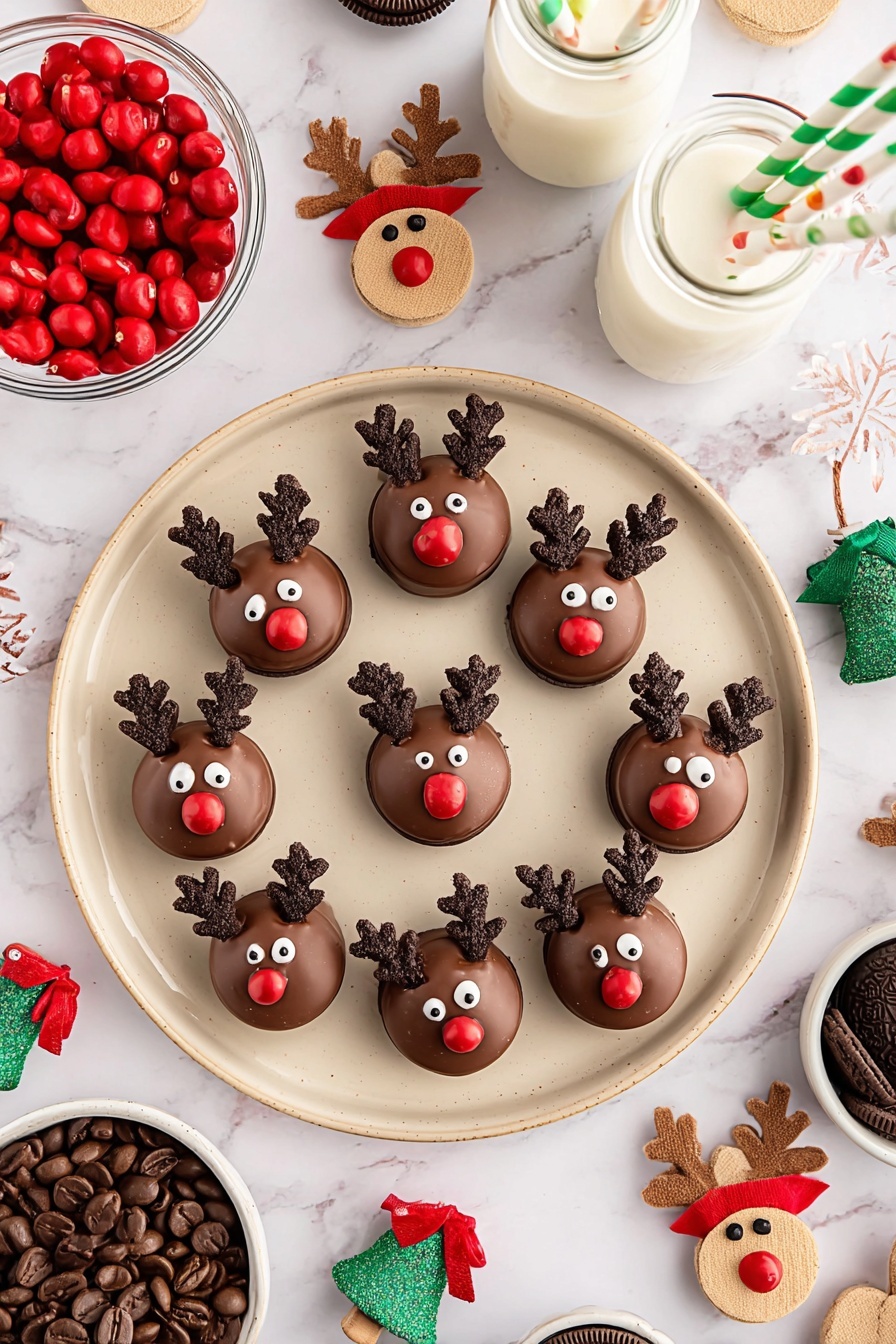
If you’re on the hunt for a fun, festive treat that’s just as adorable as it is delicious, you’ve come to the right place. I absolutely love this Reindeer Oreo Cookies Recipe because it’s super simple yet totally charming—perfect for holiday parties, gifting, or just satisfying that seasonal sweet tooth. Trust me, once you try it, you’ll find yourself coming back to these festive bites again and again!
Why You’ll Love This Recipe
- Eye-Catching & Festive: These cookies literally become the cutest reindeer you’ve ever seen, making them instant conversation starters.
- Super Easy to Make: No complicated baking involved—you just melt, dip, and decorate!
- Perfect for All Skill Levels: Whether you’re a kitchen newbie or a cookie pro, you’ll find success here.
- Great for Gifting: These adorable cookies make charming homemade gifts that everyone will appreciate.

Ingredients You’ll Need
This Reindeer Oreo Cookies Recipe uses simple ingredients that come together beautifully to create a fun holiday treat. I always keep these basics in my pantry because they’re great for last-minute gatherings or when I want to get creative with desserts.
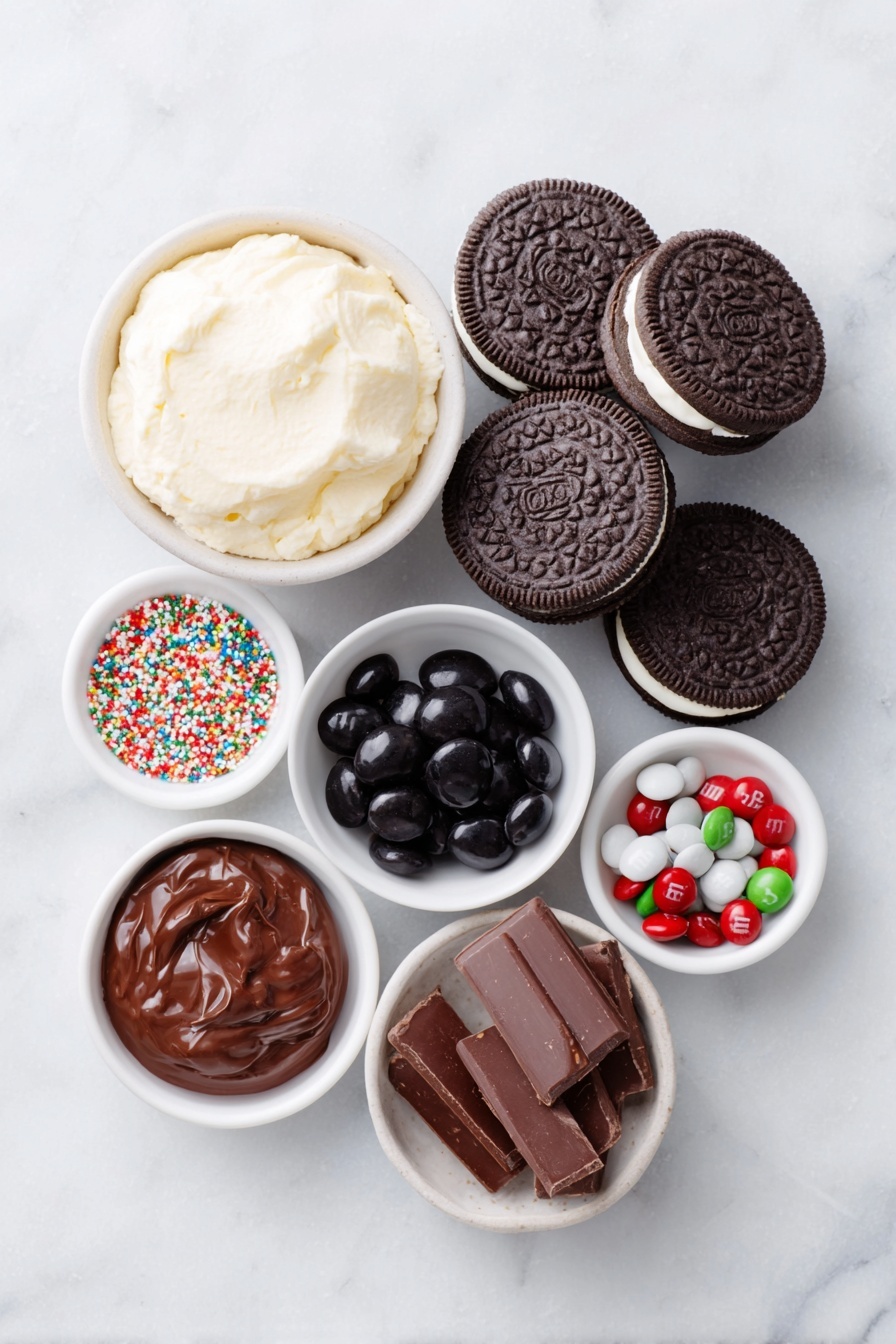
- Double Stuffed Oreos: The perfect base for these cookies—the extra cream filling makes decorating easier and tastier.
- Ghirardelli dark chocolate melting wafers: High-quality chocolate melts smoothly and hardens beautifully for a flawless finish.
- Black candy melts: Essential for piping the adorable antlers; smooth and easy to work with when melted properly.
- Small round sprinkles or candy eyes: Adding these gives your reindeer expression and a lot of charm.
- M&M candies (brown and red): Use the brown for noses and red for Rudolph’s signature bright red nose!
Variations
I love that this recipe is so adaptable. You can personalize your Reindeer Oreo Cookies in so many ways, whether you want to make them gluten-free, dairy-free, or just switch up the colors for different holiday themes. Below are a few of my favorite twists!
- Gluten-Free Variation: Use gluten-free sandwich cookies to make these suitable for friends with dietary restrictions—I’ve tried it and no one even guessed!
- White Chocolate Version: Swap the dark chocolate melting wafers for white chocolate for a snowy, festive vibe.
- Nut-Free Option: Just double-check your candy melts and decorations to avoid nut ingredients for little ones with allergies.
- Holiday Color Themes: Instead of classic red noses, try green or gold M&Ms for a fun twist that matches your party décor.
How to Make Reindeer Oreo Cookies Recipe
Step 1: Prep Your Workspace
First things first, line two baking sheets with parchment paper or silicone mats—this keeps everything neat and helps your cookies not stick. I always warm up the spots where I’ll pipe the antlers and dip the Oreos to be ready for action. Getting organized ahead like this makes the whole process smoother and way more enjoyable.
Step 2: Melt the Black Candy for Antlers
Pop your black candy melts into a heatproof bowl and microwave at half power for one minute, then stir. It won’t be smooth yet, so keep heating in 30-second bursts, stirring between each, until silky and fluid. If you try to pipe when it’s too hot, the chocolate flows too fast and can get messy. Let it cool for 2-3 minutes before filling your piping bag—that’s a trick I discovered after a few hilarious failed attempts!
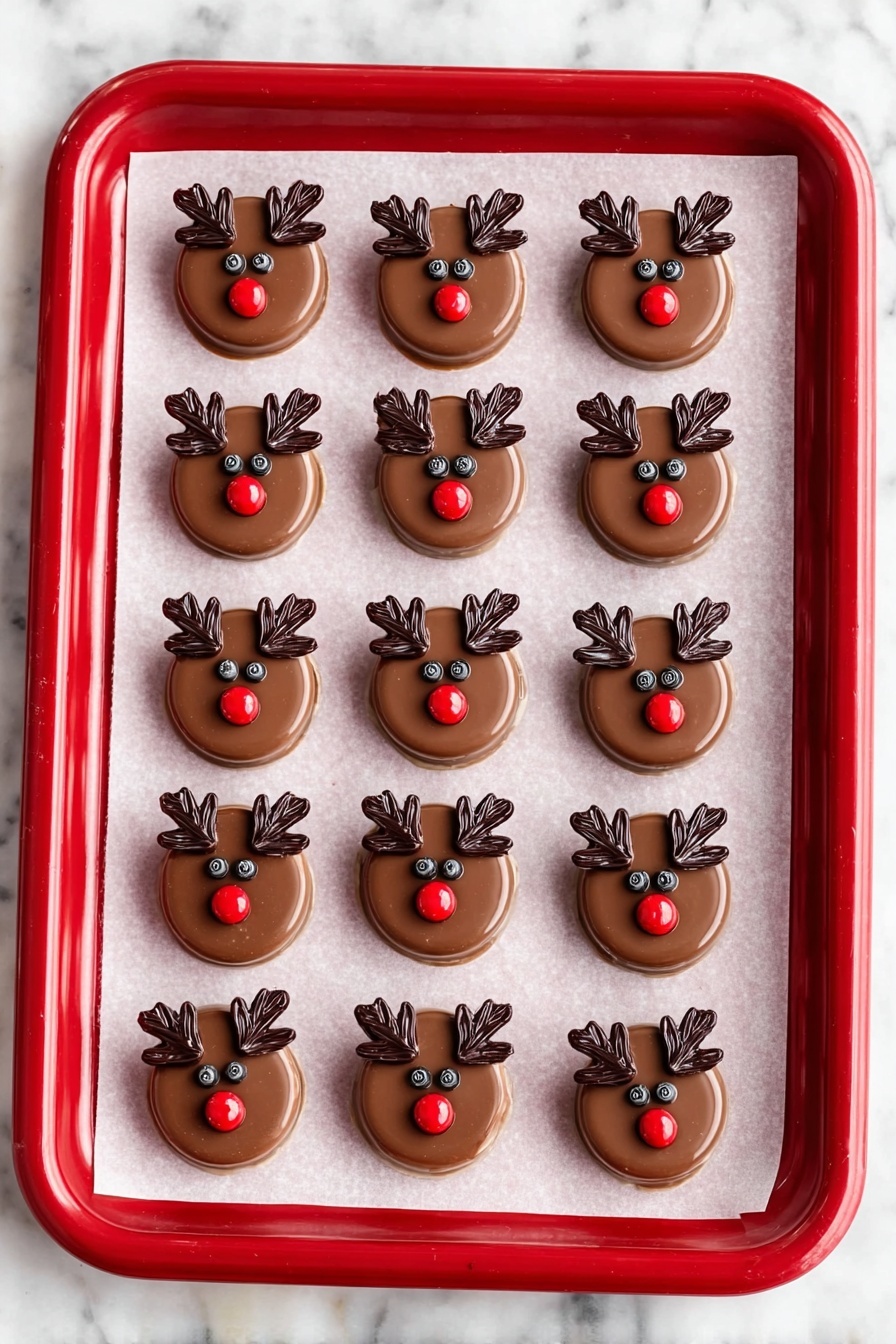
Step 3: Pipe the Antlers
If you don’t have a piping bag with a fine tip, no worries—I’ve used a zip-top freezer bag and carefully snipped a tiny corner. Pipe small “V” shapes side by side, then connect them with a line to form antlers about 1 to 1¼ inches long. Refrigerate the tray for about 10 minutes to harden. This step is the magic that makes these Oreos stand out as reindeers—it’s honestly so fun to see them take shape!
Step 4: Melt the Dark Chocolate for Coating
Now melt your Ghirardelli dark chocolate wafers the same way you did the black candy melts. Be patient—melting slowly prevents seizing and keeps your chocolate glossy and smooth. This chocolate is what gives the cookies that rich, irresistible coating, so it’s worth taking your time here.
Step 5: Dip the Oreos
Using a fork, gently dip each Oreo into the melted dark chocolate. Tap off any excess by lightly tapping the fork’s edge against the bowl so the chocolate layer is smooth and even—not too thick, not too thin. Experience has taught me to press the fork gently into the cream filling at the edges to avoid breaking the cookie or getting chocolate everywhere. Place each dipped Oreo back onto the lined sheet.
Step 6: Add Faces and Antlers
While the chocolate is still soft, decorate each cookie with your small round sprinkles or candy eyes, and use brown and red M&Ms to create cute noses. Attach the chilled antlers with a dab of extra melted chocolate—this part always feels like assembling a tiny edible art piece! I find working in small batches (dipping 2-3 Oreos then decorating) keeps everything well-timed so the chocolate doesn’t harden too soon.
Step 7: Chill and Set
Pop the tray into the fridge for 15 minutes or until the chocolate is fully set. This gives you that satisfying snap when you bite in, and the decorations stay firmly in place. Trust me, it’s worth the wait just to see these little reindeer ready for their moment!
Pro Tips for Making Reindeer Oreo Cookies Recipe
- Use a Butter Knife to Release Cookies: After dipping, I gently slide a butter knife under the Oreo to remove it from the fork without breaking the coating.
- Cool Your Chocolate Properly: If decorations won’t stick, your chocolate might be too warm—pop the cookies back in the fridge for a bit before trying again.
- Batch Your Work: I find dipping a few Oreos at once and then decorating helps control the chocolate setting, making it easier to work fast.
- Keep Your Workspace Cool: I avoid making these on warm or humid days to prevent the chocolate from melting too quickly and the antlers from softening.
How to Serve Reindeer Oreo Cookies Recipe
Garnishes
I usually keep it simple with just candy eyes and festive M&Ms for noses—sometimes I add a light dusting of powdered sugar or edible glitter for a little holiday sparkle that really wows the crowd. It’s easy, subtle, and totally festive.
Side Dishes
These cookies pair wonderfully with a warm cup of hot cocoa or a peppermint-spiced latte. For a holiday party, serve alongside gingerbread or spiced nuts to balance the sweetness.
Creative Ways to Present
For festive gatherings, I like arranging the cookies on a rustic wooden board surrounded by fresh pine sprigs and holly berries. Wrapping a batch in cellophane with a red ribbon turns them into an instant gift. One year, I even made a “reindeer herd” display on a tiered tray—it was a huge hit!
Make Ahead and Storage
Storing Leftovers
I store leftover Reindeer Oreo Cookies in an airtight container at room temperature with parchment paper between the layers to prevent sticking. They typically stay fresh and delicious for up to a week.
Freezing
Freeze the decorated Oreos in a single layer on a baking sheet, then transfer to a freezer-safe container. When thawed, they keep their crisp chocolate coating without condensation—we’ve enjoyed frozen cookies for weeks without any loss of flavor or texture.
Reheating
Since these are no-bake decorated cookies, you don’t really need to reheat them. If you want to slightly soften the chocolate before serving, let them sit at room temperature for 15 minutes—the flavor and texture will feel just right!
FAQs
-
Can I use regular Oreos instead of Double Stuffed in the Reindeer Oreo Cookies Recipe?
Yes, you can! Double Stuffed Oreos are great because the larger cream center helps the chocolate adhere better and makes decorating a bit easier, but regular Oreos will work just fine if that’s what you have on hand.
-
What if my candy melts are too thick or won’t pipe smoothly?
If your candy melts are too thick, try stirring in a tiny bit of vegetable oil or shortening to thin them out. Also, make sure they’re melted slowly and thoroughly to avoid clumps, which can clog your piping tip or bag.
-
Can I prepare the antlers ahead of time?
Absolutely! You can pipe the antlers and store them in the fridge for a couple of days before assembly. Just be careful when attaching them so they don’t break.
-
What’s the best way to attach candy eyes and noses if they don’t stick?
Use a little extra melted chocolate as edible glue. Apply a small dab with a toothpick to secure the decorations firmly—this trick saved me many times during cookie decorating marathons!
-
Can I use a different type of chocolate for dipping?
Totally! White chocolate, milk chocolate, or semi-sweet chocolate can all work, but keep in mind that different chocolates melt differently, so watch your melting times closely to avoid burning.
Final Thoughts
Honestly, this Reindeer Oreo Cookies Recipe has become a staple for me every holiday season. I remember the first year I made them—they were such a hit that I had to hide some to make sure the kids didn’t eat them all at once! They’re fun to make, easy to customize, and always bring a smile to everyone’s face. I hope you enjoy making and sharing these as much as I do—it’s like capturing a little bit of holiday magic with every bite.
Print
Reindeer Oreo Cookies Recipe
- Prep Time: 35 minutes
- Cook Time: 4 minutes
- Total Time: 55 minutes
- Yield: 20 cookies
- Category: Dessert
- Method: Dipping
- Cuisine: American
Description
These adorable Reindeer Oreos are a festive and fun holiday treat made by dipping chocolate sandwich cookies in rich dark chocolate and decorating them with candy antlers, eyes, and noses. Perfect for Christmas parties or gifting, this recipe turns classic Oreos into whimsical reindeer with simple ingredients and straightforward steps.
Ingredients
Cookies
- 20 Double Stuffed Oreos or other chocolate sandwich cookies
Chocolate Coatings
- 15 ounces Ghirardelli dark chocolate melting wafers
- ¾ cup black candy melts
Decorations
- 40 small round sprinkles (or candy eyes)
- 20 M&M candies (brown and red) for noses
Instructions
- Prepare the Baking Sheets: Line two baking sheets with parchment paper or silicone baking mats and set aside for the chocolate-dipped Oreos and candy antlers to cool on.
- Melt Black Candy Melts: Place the black candy melts in a heatproof bowl and microwave at half power for one minute. Stir well, then continue heating in 30-second increments until smooth and melted.
- Pipe Antlers: Fill a small piping bag fitted with a Wilton #3 tip, or use a zip-top plastic bag with the corner cut off, with the melted black candy melts. Let it cool 2-3 minutes for better control. Pipe small antlers about 1 to 1¼ inches long on the lined baking sheet by piping two small “V” shapes in a row and then connecting them with a line down the center. Refrigerate the antlers for 10 minutes to set.
- Melt Dark Chocolate: In another heatproof bowl, melt the dark chocolate wafers in the microwave at half power for one minute. Stir and continue heating in 30-second increments until smooth and fully melted.
- Dip Oreos: Using a fork, dip each Oreo into the melted dark chocolate, tapping off excess gently on the bowl’s edge. Place the dipped Oreo onto the prepared baking sheet.
- Decorate Cookies: Work in batches of 2-3 cookies at a time. While the chocolate is still wet, add the antlers, candy eyes (or sprinkles), and M&M noses to each dipped Oreo to form the reindeer face.
- Set the Chocolate: Place the decorated Oreos in the refrigerator for 15 minutes or until the chocolate is completely set and firm.
- Serve and Enjoy: Once set, the Reindeer Oreos are ready to be served as a festive holiday treat or packaged for gifting.
Notes
- Use a fork to dip the cookies by pressing into the cream filling area to avoid touching the top or bottom surfaces. Use a butter knife to gently release the Oreo from the fork after dipping.
- If the decorations don’t stick well, the chocolate coating might be too warm. Refrigerate the Oreos briefly before trying again.
- Room temperature can affect the setting of chocolate and decorations; cooler temperatures help maintain shape and stickiness.
- For extra secure attachment, use melted chocolate and a toothpick as edible glue to attach candy eyes, noses, and antlers once the chocolate coating is set.
Nutrition
- Serving Size: 1 cookie
- Calories: 150
- Sugar: 20g
- Sodium: 115mg
- Fat: 7g
- Saturated Fat: 4g
- Unsaturated Fat: 2.5g
- Trans Fat: 0g
- Carbohydrates: 22g
- Fiber: 1g
- Protein: 1g
- Cholesterol: 5mg


