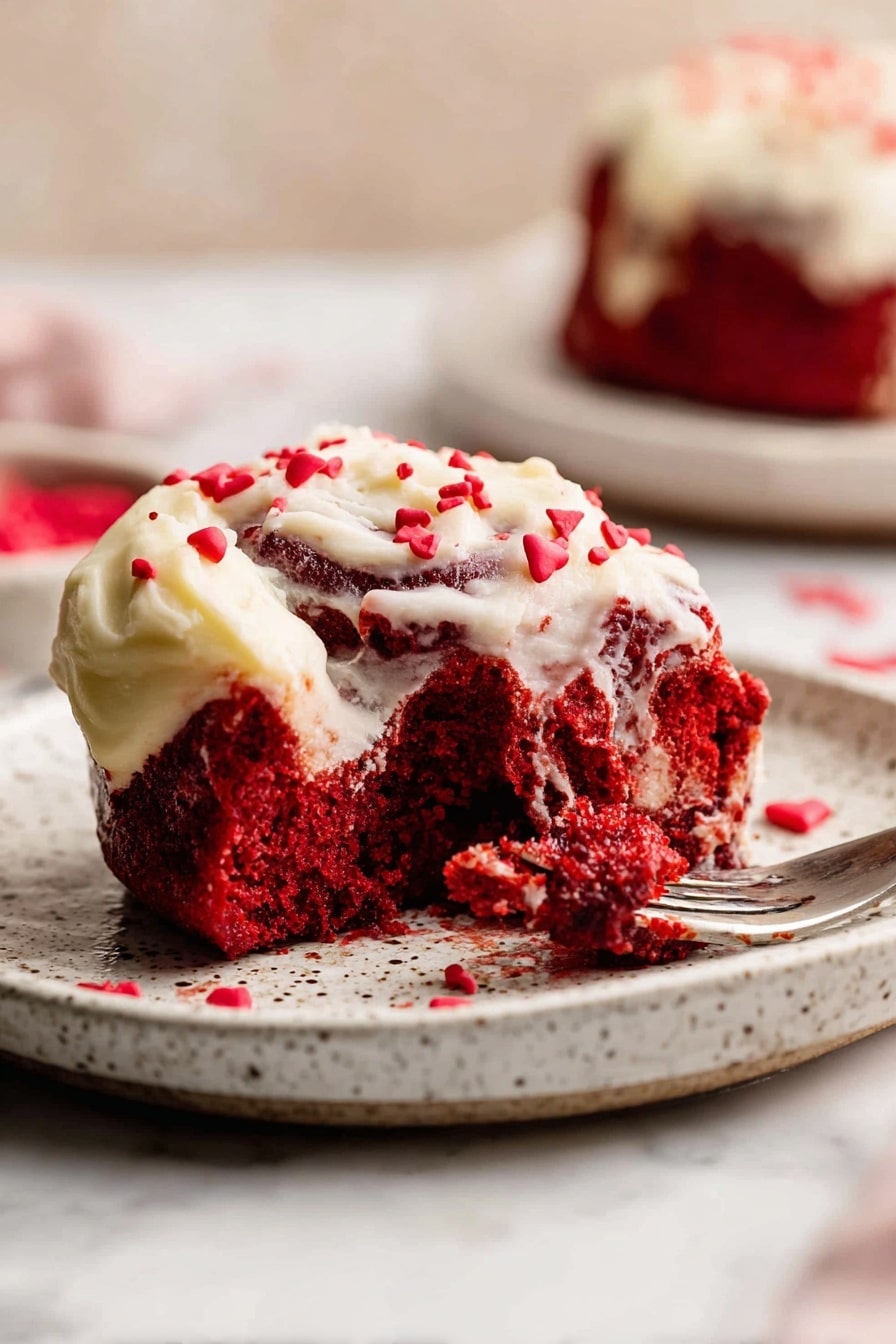
If you’re craving a treat that’s as stunning as it is delicious, then I’ve got just the thing for you. This Red Velvet Cinnamon Rolls Recipe is one of my absolute favorites to make when I want to impress friends or just indulge myself on a cozy weekend morning. Imagine soft, pillowy dough infused with that classic red velvet flavor, filled with a perfectly spiced cinnamon filling, and topped with luscious cream cheese icing that melts into every nook and cranny. Trust me, once you try these, they’ll quickly become a breakfast staple you look forward to!
Why You’ll Love This Recipe
- Irresistible Flavor Combination: The rich cocoa undertones of red velvet paired with warm cinnamon create a uniquely comforting twist.
- Perfectly Soft Texture: These rolls are fluffy and tender, thanks to the 5-minute kneading and proper rising times.
- Cream Cheese Icing Dream: The tangy-sweet icing glides over the rolls, soaking beautifully into every swirl.
- Fun and Festive: The vibrant red dough makes these cinnamon rolls stand out for special occasions or just a cheerful morning.

Ingredients You’ll Need
The ingredients here work in harmony to give you that classic red velvet flavor with a cinnamon roll twist. I usually grab the best quality cocoa powder I can find – it really helps the depth of flavor. Also, the Americolor super red gel food dye is perfect for a bright, vivid color that doesn’t taste artificial.
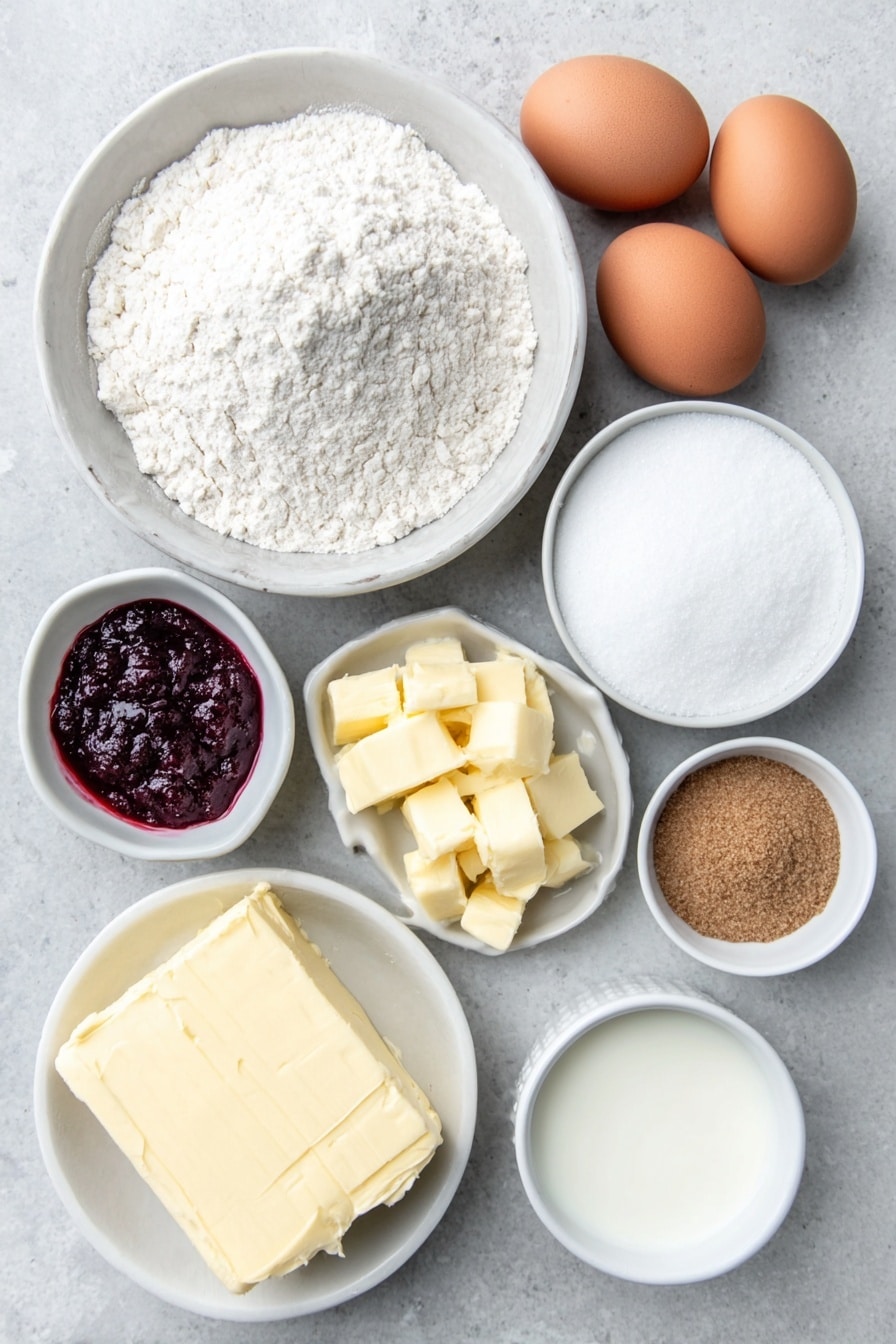
- Milk: Warm it just right to activate the yeast without killing it; think warm bath temperature.
- Active dry yeast: Always check your yeast’s freshness to ensure your dough rises beautifully.
- Large eggs: Room temperature eggs blend evenly for smooth dough consistency.
- Red gel food dye: Gel colors give you vibrant hues without watering down the dough.
- All-purpose flour: Spoon and level the flour for accurate measurement, or weigh it for best results.
- Unsweetened cocoa powder: Adds the signature flavor and richness to the dough.
- Salt: Balances the sweetness perfectly in the dough.
- White granulated sugar: Sweetens the dough and helps its structure.
- Unsalted butter: Room temperature butter blends into the dough and the filling to keep everything tender.
- Brown sugar: For the cinnamon filling, packed well, to get that caramelized taste.
- Ground cinnamon: The star spice in the filling, adjusted to your preference.
- Heavy cream: Pouring this around the rolls before baking makes the centers extra moist.
- Cream cheese: The base of the silky icing; make sure it’s soft for easy mixing.
- Powdered sugar: Sifted to avoid lumps in your cream cheese icing.
- Pure vanilla extract: Boosts the flavor of the icing with its warm aroma.
- Milk (for icing): Adjust to get the perfect spreading consistency.
Variations
I love encouraging folks to make a recipe their own, and this Red Velvet Cinnamon Rolls Recipe is no exception. You can get creative with fillings or even icing while keeping the same core deliciousness. Here are a few ideas that I’ve either tried or want to try, and maybe you will too!
- Spiced Up: I’ve added a pinch of nutmeg and cloves to the cinnamon filling sometimes, and it gives the rolls a warm, cozy holiday vibe that my family absolutely adores.
- Chocolate Lover’s Dream: Swirl in mini chocolate chips with the cinnamon filling for an extra gooey surprise inside every bite.
- Dairy-Free Option: Swap butter for coconut oil and use a dairy-free cream cheese for the icing. The rolls still come out tender and flavorful!
- Gluten-Free: Using a 1-to-1 gluten-free flour blend works well, but the dough might be a bit more delicate when rolling and shaping.
How to Make Red Velvet Cinnamon Rolls Recipe
Step 1: Activate the yeast and prep the dough base
Start by warming your milk to about 110°F—warm to the touch but not scalding. I use my microwave in short bursts and check the temperature with a thermometer. Stir in your active dry yeast and let it bloom for 10 minutes until frothy and bubbly; this is a sign your yeast is alive and kicking. Next, in a large bowl, combine your flour, cocoa powder, sugar, and salt. Adding the cold butter in cubes and blending it with your fingers or a pastry cutter until it’s pea-sized really helps create that tender texture in the final rolls. I love this tactile step; it reminds me how hands-on baking can be so rewarding.
Step 2: Combine wet and dry ingredients and knead the dough
With your trusty stand mixer fitted with a dough hook, add the yeast mixture, lightly beaten eggs, and that vibrant red gel food dye to the dry ingredients. Mix on low speed until a dough starts to form, then bump up to medium and knead for about 5 minutes. The dough should become smooth, bright red, and elastic. When I first tried kneading this by hand, I underestimated the time; sticking with the mixer really saves effort and ensures consistency, especially if you’re new to bread making.
Step 3: Let the dough rise
Preheat your oven to 200°F and then immediately turn it off—this creates the perfect warm environment for rising. Spray a large bowl with nonstick spray and place your dough ball inside. Cover it with a clean towel and let it rise for about an hour or until it doubles in size. This step is crucial for light, fluffy rolls. Patience here always pays off.
Step 4: Make the cinnamon filling and roll it up
While your dough is rising, whip up the cinnamon filling by beating together room temperature butter, brown sugar, and cinnamon until it forms a thick, spreadable paste. When your dough has risen, lightly flour your workspace and roll the dough out to about a 1/4-inch thickness in a large rectangle—think of it like preparing to roll a cinnamon roll log. Use an offset spatula to spread the entire surface with cinnamon filling, reaching right to the edges. I learned the hard way that leaving edges bare can cause your filling to bleed or the rolls to be less flavorful inside.
Step 5: Roll, slice, and let rise again
Roll the dough starting from the short edge into a tight log—this technique helps create more cinnamon spirals in each roll. I always use unflavored dental floss to slice the log into even rolls because it cuts cleanly without squashing the dough like a knife sometimes does. After trimming the uneven ends, slice into 12 rolls and place them spaced slightly apart in a baking pan sprayed with nonstick spray. Cover and let them rise for an additional 20 minutes while you preheat your oven to 375°F.
Step 6: Bake with heavy cream and prepare the icing
Before baking, pour the heavy cream evenly around the cinnamon rolls in the pan—this little trick keeps them super moist and adds richness to the centers. Bake for about 25 to 27 minutes or until the tops are lightly golden and the center reaches 160°F. While they bake, beat your cream cheese and butter until silky smooth, then mix in powdered sugar, vanilla, and milk to make that irresistible cream cheese icing. I always wait until the rolls are hot out of the oven to spread the icing so it melts perfectly into every crease.
Pro Tips for Making Red Velvet Cinnamon Rolls Recipe
- Milk Temperature Matters: Keeping milk at about 110°F activates yeast perfectly—too hot and you kill it, too cold and it won’t wake up.
- Use Gel Food Coloring: I learned this trick from a baker friend—gel food dye gives rich color without thinning your dough.
- Dental Floss for Clean Cuts: Using unflavored dental floss to slice the rolled dough keeps edges sharp without squishing rolls.
- Don’t Skip the Second Rise: That extra 20-minute rise after shaping leads to lighter rolls with beautiful texture.
How to Serve Red Velvet Cinnamon Rolls Recipe
Garnishes
I usually keep the top simple with the cream cheese icing because that’s where all the magic is. But if you want an extra touch, sprinkle some crushed pecans or a dusting of cocoa powder. For a festive flair, pick fresh edible flowers or a few chocolate shavings to complement the red tones.
Side Dishes
These rolls are wonderfully filling on their own, but I love pairing them with a nice, hot cup of coffee or a creamy latte. If you want to add something light, fresh fruit like orange slices or berries balance the sweetness perfectly.
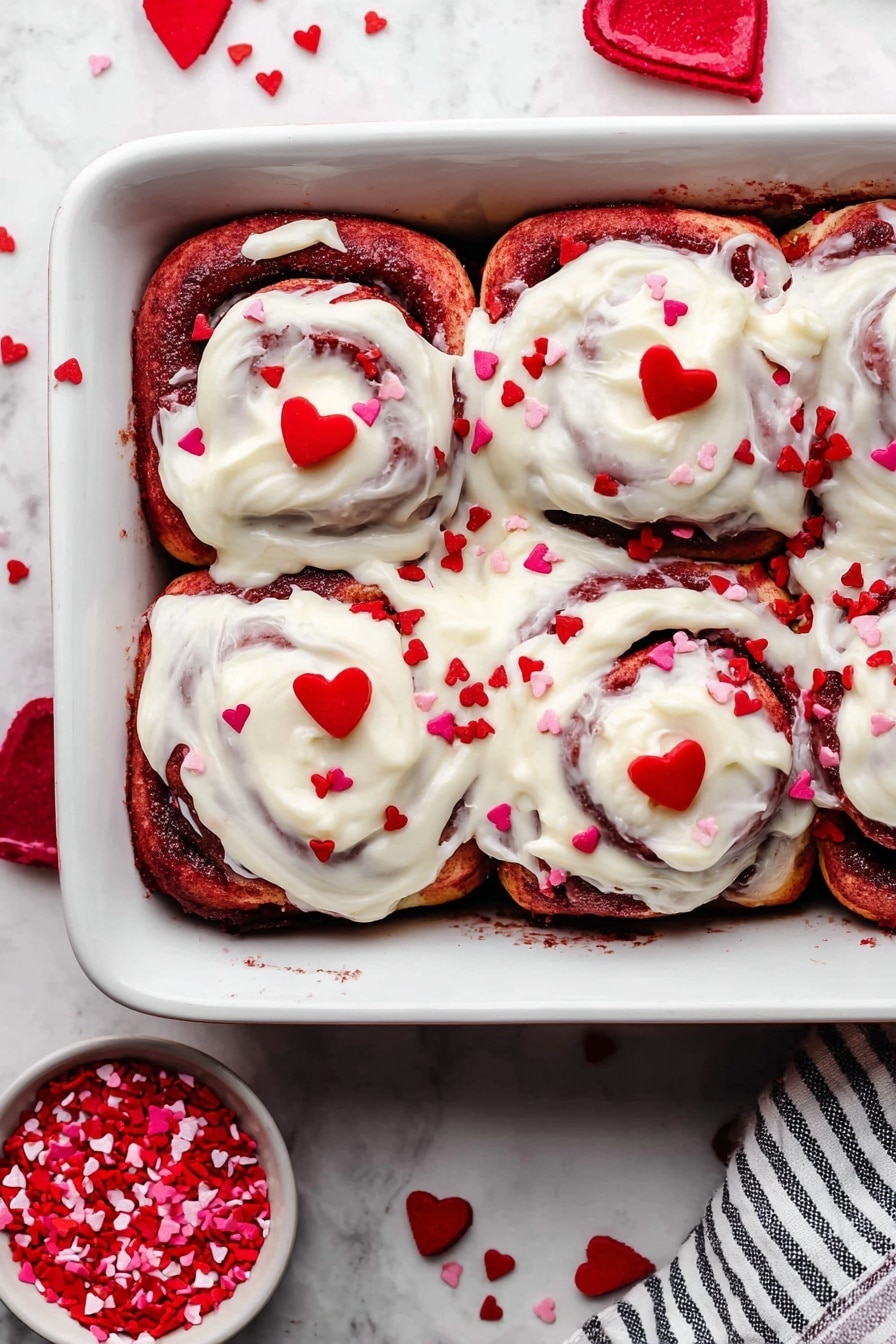
Creative Ways to Present
For birthdays or holiday brunches, I like placing these cinnamon rolls in a circular pan lined with parchment and topping with a swirl of extra icing and sprinkles. Another fun idea is to separate the rolls slightly so they pull apart easily, making sharing at gatherings a breeze!
Make Ahead and Storage
Storing Leftovers
When I have leftovers, I store the cinnamon rolls in an airtight container at room temperature for up to 2 days. This keeps them soft and prevents the icing from drying out. If your kitchen is warm, you can refrigerate them but be sure to bring to room temperature before reheating.
Freezing
I learned freezing these rolls works great if you wrap them tightly in plastic wrap and then foil. Freeze before the second rise or after baking and icing. Thaw either overnight in the fridge or for a few hours at room temperature — makes busy mornings so much easier!
Reheating
To bring leftovers back to life, I pop them in the microwave for about 20 seconds or warm in a 300°F oven for 5-7 minutes, loosely covered with foil to avoid drying out. Sometimes, I add a little extra cream cheese icing on top after reheating for that fresh-baked feel.
FAQs
-
Can I make this Red Velvet Cinnamon Rolls Recipe without a stand mixer?
Absolutely! You can mix the dough by hand using a rubber spatula to combine wet and dry ingredients, then knead on a lightly floured surface for 5-8 minutes. You’ll know it’s ready when you can stretch the dough thinly without it tearing.
-
What if I don’t have red gel food coloring?
You can use liquid red food dye, but be cautious not to add too much or the dough could become too wet. Alternatively, natural alternatives like beet powder can add color but may alter the flavor slightly.
-
How do I know when the dough has risen enough?
Your dough should double in size and feel puffy and soft to the touch. A good test is gently pressing a finger into the dough — if it springs back slowly and leaves a slight indentation, it’s ready.
-
Can I prepare the rolls the night before?
Yes! After shaping the rolls, cover them tightly and refrigerate overnight. The next morning, let them come to room temperature and rise a bit before baking for fresh-tasting cinnamon rolls.
-
What’s the best way to prevent the rolls from drying out after baking?
Cover the rolls loosely with foil or store in an airtight container while still slightly warm. Adding cream cheese icing right after baking also helps seal in moisture and keeps them soft for longer.
Final Thoughts
This Red Velvet Cinnamon Rolls Recipe is one of those special treats I always come back to when I want something that looks and tastes like a bakery masterpiece but comes from my own kitchen. I love how its vibrant color instantly lifts moods and how the cinnamon filling makes every bite feel cozy. Whether you’re baking for a holiday, brunch with friends, or just a laid-back Sunday morning, these cinnamon rolls promise smiles all around. Give this recipe a try—I’m confident it’ll soon hold a cozy spot in your recipe collection too!
Print
Red Velvet Cinnamon Rolls Recipe
- Prep Time: 1 hour 20 minutes
- Cook Time: 25 minutes
- Total Time: 1 hour 45 minutes
- Yield: 12 cinnamon rolls
- Category: Breakfast
- Method: Baking
- Cuisine: American
Description
Delight in these irresistibly soft and moist Red Velvet Cinnamon Rolls, featuring a rich cocoa-infused dough dyed vibrant red and swirled with a luscious cinnamon and brown sugar filling. Topped with a creamy, tangy cream cheese icing, these rolls are perfect for a luxurious breakfast or dessert treat.
Ingredients
Red Velvet Dough
- 1 cup Milk, warmed to 110°F
- 2 1/4 tsp Active dry yeast (1 full packet)
- 2 Large eggs, room temperature
- 1 tsp Red gel food dye (preferably Americolor super red)
- 4 1/4 cups All-purpose flour
- 1/3 cup Unsweetened cocoa powder
- 1 tsp Salt
- 1/4 cup White granulated sugar
- 10 TBSP Unsalted butter, room temperature
Cinnamon Filling
- 1/2 cup Unsalted butter, room temperature
- 3/4 cup Brown sugar, packed (light or dark)
- 1 TBSP Ground cinnamon
- 1/3 cup Heavy cream
Cream Cheese Icing
- 4 oz Cream cheese, room temperature
- 4 TBSP Unsalted butter, room temperature
- 1 cup Powdered sugar, sifted
- 2 tsp Pure vanilla extract
- 2 TBSP Milk
Instructions
- Activate the yeast: Warm the milk until it reaches 110°F, warm but not hot, then add the active dry yeast. Let it sit for 10 minutes to become foamy and active.
- Prepare dry ingredients: In a large bowl, combine the flour, cocoa powder, sugar, and salt. Cube the butter and cut it into the dry mixture using a pastry blender or fingers until the pea-sized crumbs form.
- Combine wet and dry ingredients: Using a stand mixer fitted with a dough hook, add the milk-yeast mixture, lightly beaten eggs, and red gel food dye into the dry ingredients. Mix on low speed until dough starts to form.
- Knead the dough: Increase mixer speed to medium and knead for 5 minutes until the dough is bright red, smooth, and elastic.
- First rise: Preheat oven to 200°F. Spray a large bowl with nonstick spray, form the dough into a ball, place it in the bowl, and cover with a kitchen towel. Allow to rise for 1 hour or until doubled in size.
- Make cinnamon filling: In a small bowl, beat the butter, brown sugar, and cinnamon with a hand mixer until smooth and thick.
- Roll out dough: On a lightly floured surface, roll the dough into a large rectangle about 1/4 inch thick.
- Spread filling: Use an offset spatula to evenly spread the cinnamon filling over the entire surface of the dough, including edges.
- Roll the dough log: Starting from the short side, roll the dough tightly into a log to maximize swirl count.
- Cut into rolls: Using unflavored dental floss or a serrated knife with gentle sawing, cut off uneven ends and then slice the log evenly into 12 rolls.
- Second rise: Spray a 9×14 inch casserole pan with nonstick spray. Arrange the rolls in the pan, cover with a towel, and let rise for 20 minutes.
- Prepare to bake: Preheat oven to 375°F. Pour heavy cream around the rolls in the pan, avoiding disturbing them.
- Bake the rolls: Bake for 25-27 minutes until tops are lightly golden and the internal temperature reaches 160°F.
- Prepare cream cheese icing: While rolls bake, beat cream cheese and butter on high speed until smooth. Add powdered sugar and mix on low until fully combined. Then add vanilla extract and milk, mixing to desired spreading consistency.
- Ice the rolls: Immediately after removing rolls from oven, spread the cream cheese icing generously on top so it softly melts into cracks.
Notes
- Use spooned and leveled flour or a kitchen scale to ensure accurate measurement; compacted flour can dry out the rolls.
- For high altitude baking, add an extra 3 tablespoons of flour.
- Remove dairy ingredients 2 hours before baking for better texture.
- Hand-mixing instructions: Combine wet ingredients with dry using a rubber spatula, then knead by hand on a floured surface for 5-8 minutes until dough is elastic and thin enough to let light pass through.
Nutrition
- Serving Size: 1 cinnamon roll
- Calories: 350
- Sugar: 20g
- Sodium: 220mg
- Fat: 18g
- Saturated Fat: 10g
- Unsaturated Fat: 6g
- Trans Fat: 0g
- Carbohydrates: 40g
- Fiber: 2g
- Protein: 5g
- Cholesterol: 65mg


