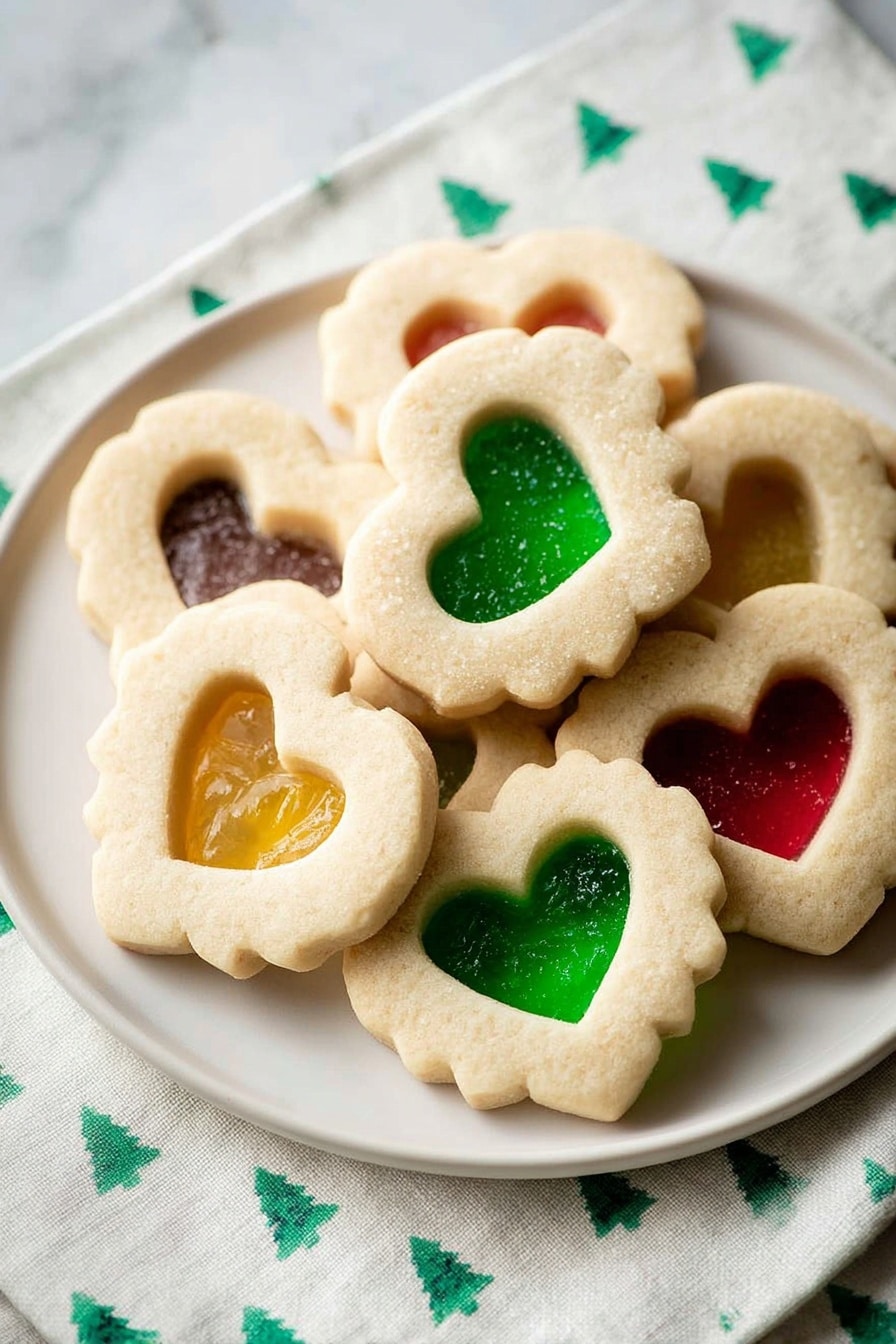
If you’re looking for a fun, festive, and utterly charming treat to bake next time, you can’t go wrong with my Stained Glass Cookies Recipe. These delightful cookies have this magical translucent candy ‘window’ at the center that catches the light and makes them look like little edible works of art. Whether you’re making them for holidays, parties, or just because, they’re incredibly satisfying to create and will wow anyone lucky enough to try one.
Why You’ll Love This Recipe
- Visual Wow Factor: The colorful candy center transforms classic cookies into beautiful stained glass-like treats that your guests will admire.
- Simple Ingredients: You likely have everything on hand except the hard candies, which are easy to find and fun to crush.
- Kid-Friendly Baking: Kids love helping crush the candies and cut shapes, making this a perfect baking project with your little ones.
- Perfect Texture: The cookies stay buttery and tender, with just the right crunch from the candy window, every single time.

Ingredients You’ll Need
These ingredients come together to create a tender, buttery cookie with a sweet, shiny candy window in the center. When shopping, pick good quality hard candies (I usually go for Jolly Ranchers) and make sure your butter is softened properly to get that fluffy dough texture.
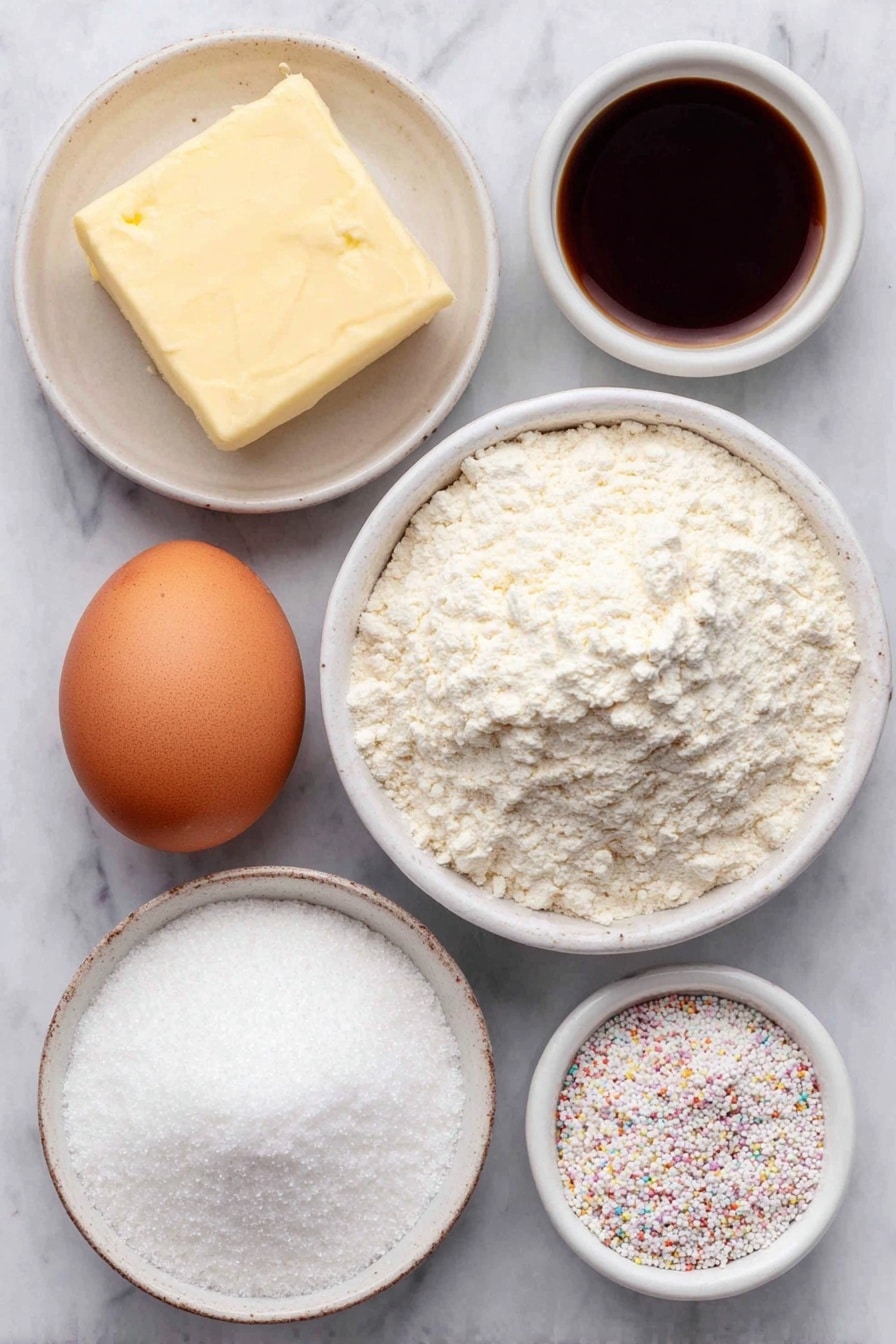
- Unsalted Butter: Softened at room temperature for smooth creaming and better control over salt levels.
- Granulated Sugar: Adds sweetness and texture; stick to granulated for that classic cookie crunch.
- Large Egg: Helps bind everything together and gives the dough structure.
- Vanilla Extract: For that warm, familiar flavor that complements the candy centers.
- Baking Powder: A leavening agent that keeps cookies tender and light.
- Salt: Balances sweetness and enhances flavor.
- All-Purpose Flour: The base of the cookie dough, providing structure.
- Hard Candies (like Jolly Ranchers): Crushed to make the stained glass effect; pick your favorite colors/flavors!
Variations
I love tinkering with this stained glass cookies recipe to suit different occasions and tastes. You can easily tweak the flavor, colors, or even the base cookie dough to match your mood or holiday theme.
- Use Different Hard Candies: I’ve swapped in peppermint candies for a minty holiday vibe, or sour patch candies for a tangy edge. It adds a fun twist every time!
- Gingerbread Base: For a cozy holiday feel, replace the base dough with gingerbread dough—your stained glass windows will look right at home.
- Food Coloring the Dough: Adding a few drops of food coloring to the dough before rolling it out can make your cookies even more festive and personalized.
- Cutout Shapes: Get creative with cookie cutters—stars, hearts, snowflakes—they all look amazing with the translucent centers.
How to Make Stained Glass Cookies Recipe
Step 1: Cream Butter and Sugar Until Fluffy
This is where the magic starts. Using a hand or stand mixer, beat your softened butter and sugar on medium speed for about two minutes until it’s light and fluffy. When I first learned this, I used to skim over this step, but I discovered that taking your time here means softer, melt-in-your-mouth cookies. Then, add the egg and vanilla extract and mix until fully combined—your dough is already coming together beautifully.
Step 2: Add Dry Ingredients and Form Dough
Lower your mixer speed and add baking powder and salt, then gradually mix in the flour until it just comes together. Don’t overmix here or your cookies could turn out tough. When the dough forms a ball, wrap it tightly in plastic wrap and pop it in the fridge for at least an hour. I usually freeze for 30 minutes for a quicker chill. This step is crucial because a chilled dough rolls out smoother and cuts cleanly without sticking or cracking.
Step 3: Roll Out and Cut Your Cookie Shapes
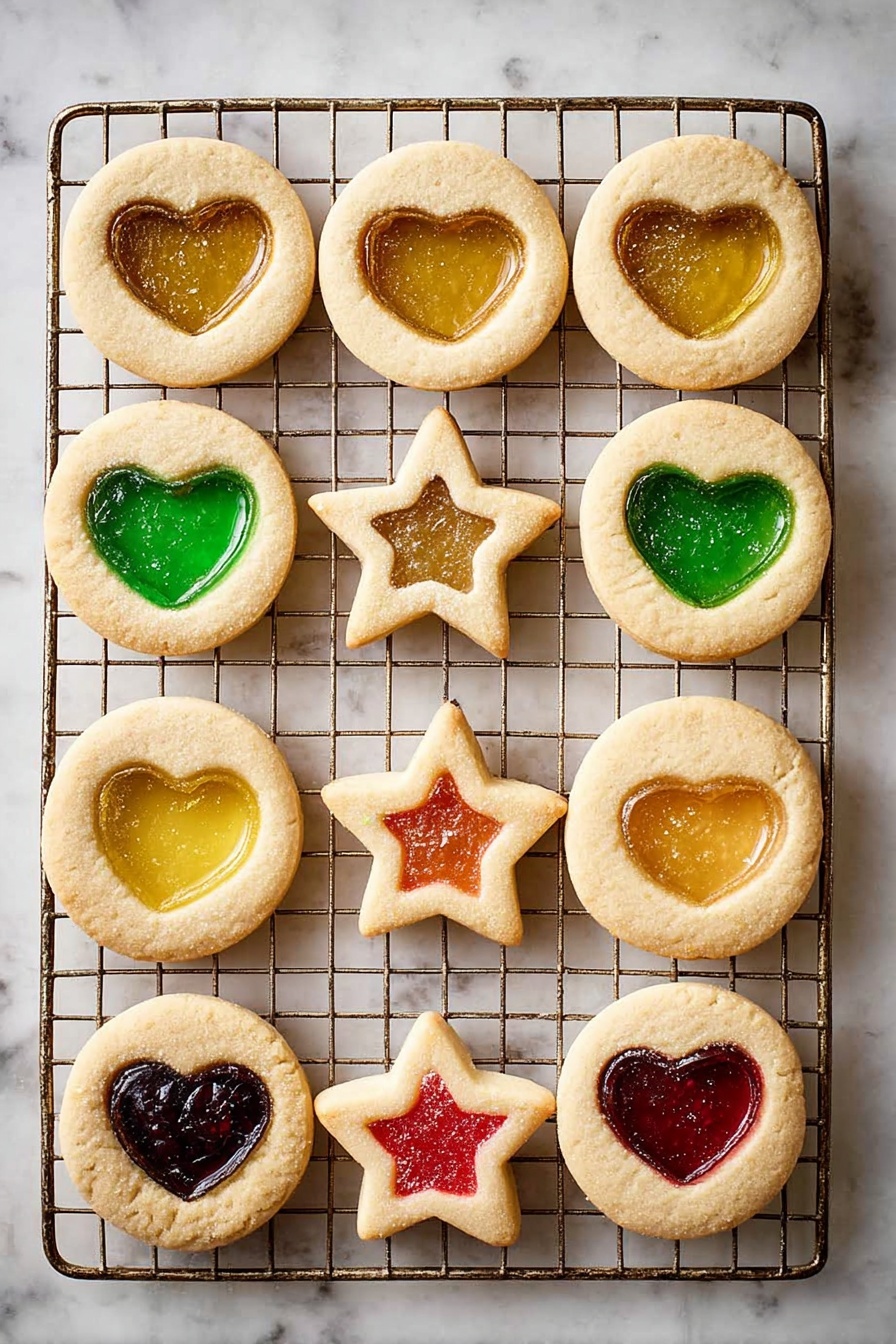
Preheat your oven to 350°F and line your baking sheets with silicone mats (trust me, parchment paper isn’t the best here—candies can stick). On a lightly floured surface, roll your dough to about ¼-inch thickness. Then cut out your large cookie shapes (3 to 4 inches) and use a smaller cutter to cut the centers out for your candy windows. I like to keep the shapes simple—circles and hearts work great and are easy to stamp out. Gather scraps, reroll, and cut more shapes until all dough is used.
Step 4: Fill the Centers with Crushed Candy
The fun part! I crush my candies by putting them in a ziplock bag and tapping with a meat mallet—works perfectly without creating a sticky mess. Fill each cookie center about ¾ full with crushed candy. Be careful not to overfill, or the melted candy will leak over the edges and harden on your baking sheet. This step requires a bit of patience, but you’ll get the hang of it fast.
Step 5: Bake and Cool
Bake your cookies for about 10 minutes until the edges just start to turn golden and the candy centers are melted and glossy. As soon as they come out, let them cool on the baking sheet for 10 minutes—this keeps the candy centers from cracking—and then carefully transfer them to a wire rack to cool completely. I learned the hard way that moving them too soon can cause breakage, so patience really pays off here.
Pro Tips for Making Stained Glass Cookies Recipe
- Candy Crushing Hack: I use a mini food processor or a mallet inside a resealable bag to get perfect chunks without turning candy into dust.
- Chill for Success: Chilling the dough prevents spreading and keeps your windows sharp and neat—definitely don’t skip this.
- Avoid Parchment Paper: Use silicone mats for baking; the candy tends to stick and can ruin your cookies if you use parchment.
- Cool Time Patience: Always cool cookies on the sheet before moving, or the candy windows can crack or break.
How to Serve Stained Glass Cookies Recipe
Garnishes
I usually keep it simple here by dusting the cooled cookies lightly with powdered sugar—just enough to catch in the edges to highlight the colors nicely without overshadowing the candy windows. Sometimes, I add a sprinkle of edible glitter for a festive touch when I’m serving them at holiday parties.
Side Dishes
These cookies pair beautifully with a warm cup of mulled cider or a classic hot cocoa. They’re the kind of sweet that balances out a cozy beverage perfectly. For coffee lovers, a mild latte complements the sugary candy center wonderfully.
Creative Ways to Present
For holiday gatherings, I like arranging these stained glass cookies on a clear glass platter placed under twinkling fairy lights—when the light shines through, it creates a beautiful stained glass effect on the table!wrapped in cellophane bags tied with matching ribbon make adorable homemade gifts that everyone appreciates.
Make Ahead and Storage
Storing Leftovers
I store leftover cookies in an airtight container with parchment paper between layers to keep them from sticking together. Room temperature works just fine, and I’ve found they last up to 4 days perfectly. Just keep an eye on humidity because over time the candy window can get a bit sticky if it’s too moist around.
Freezing
While I don’t usually freeze the baked cookies because the candy windows can crack during thawing, I do freeze the dough successfully. Wrap the dough tightly in plastic wrap and a freezer bag, then freeze for up to 2 months. When you’re ready, thaw overnight in the fridge and bring to room temp before rolling out.
Reheating
Reheating isn’t usually necessary since these cookies are best enjoyed at room temperature. But if you want to warm them slightly, pop them in the oven at 300°F for just 3-4 minutes to take the chill off—the candy remains glossy and delicious without melting further.
FAQs
-
Can I use different hard candies besides Jolly Ranchers for stained glass cookies?
Absolutely! While Jolly Ranchers are a popular choice because of their vibrant colors and great melting consistency, you can experiment with any hard candy you like. Just make sure they don’t have fillings or coatings that might burn or not melt smoothly.
-
Why do my candy centers crack when cooling?
Cracking usually happens if you move the cookies before the candy has cooled and set properly. Let the cookies sit on the baking sheet for about 10 minutes before transferring them carefully to a wire rack to prevent breakage.
-
Can I make stained glass cookies in advance?
Yes! You can prepare the dough ahead of time and freeze it for up to 2 months. Bake as needed for fresh cookies. However, I recommend eating the cookies fresh and not freezing the baked cookies to avoid cracking candy windows.
-
What if the candy melts outside the cookie edges?
This usually happens when the candy center is overfilled. Filling the centers about three-quarters full helps prevent candy from spilling over. Also, using silicone mats instead of parchment prevents sticking and makes cleanup easier.
Final Thoughts
I absolutely love how this Stained Glass Cookies Recipe always brings a little extra sparkle to the kitchen and smiles to everyone’s faces. It’s a recipe that’s both nostalgic and creative—a perfect blend of classic cookie comfort and eye-catching design. Whether you’re making them with family or gifting them to friends, these cookies never fail to impress. Give them a try soon—I know you’ll enjoy every step and every bite as much as I do!
Print
Stained Glass Cookies Recipe
- Prep Time: 15 minutes
- Cook Time: 10 minutes
- Total Time: 1 hour 25 minutes
- Yield: 24-28 cookies
- Category: Dessert
- Method: Baking
- Cuisine: American
Description
These Stained Glass Window Cookies are delightful sugar cookies with a colorful melted candy center that resembles stained glass. Perfect for holidays or special occasions, these cookies combine a classic buttery dough with a vibrant, glossy candy window made from crushed hard candies, creating a fun and festive treat that’s as beautiful as it is delicious.
Ingredients
Cookie Dough
- ½ cup unsalted butter, softened to room temperature
- ½ cup granulated sugar
- 1 large egg
- 1 teaspoon vanilla extract
- ½ teaspoon baking powder
- ¼ teaspoon salt
- 2 cups all-purpose flour
Candy Center
- 8-10 Jolly Ranchers or other hard candies, crushed
Instructions
- Cream the Butter and Sugar: In a large mixing bowl, use a hand mixer or stand mixer on medium speed to cream the softened butter and granulated sugar together until light and fluffy, about 2 minutes. Then add the egg and vanilla extract, beating until fully combined.
- Incorporate Dry Ingredients: Lower the mixer speed to low and add baking powder and salt. Gradually add the all-purpose flour into the mixture, mixing until just combined to form a smooth dough.
- Chill the Dough: Shape the dough into a ball, wrap tightly with plastic cling wrap, and freeze for 30 minutes or refrigerate until firm, ideally for at least 1 hour or up to overnight to make it easier to roll out.
- Preheat Oven and Prepare Baking Sheets: Preheat your oven to 350°F (175°C). Line two half sheet baking pans with silicone baking mats; avoid parchment paper as the candy may stick to it.
- Roll and Cut Dough: On a lightly floured surface, roll the dough to about ¼-inch thickness. Use a 3 or 4-inch cookie cutter to cut out the main cookie shapes, followed by a 1 or 1.5-inch cutter to remove the centers, creating the window effect.
- Arrange Cookies for Baking: Transfer the cut-out cookies to the lined baking sheets, leaving about 1 inch of space between each. Re-roll the scraps to cut additional cookies.
- Add Candy Centers: Evenly sprinkle crushed hard candies into the center cut-outs, filling them approximately ¾ full to avoid overflow during melting.
- Bake: Bake in the preheated oven for about 10 minutes, or until the edges of the cookies turn light golden brown and the candy centers have melted and are glossy.
- Cool Cookies: Allow the cookies to set on the baking sheet for about 10 minutes to let the candy centers harden. Then carefully transfer the cookies to a wire rack to cool completely.
Notes
- Crushing Hard Candies: Place hard candies in a plastic ziplock bag and crush them using a hammer, mallet, or meat tenderizer. Alternatively, use a mini blender by pulsing to achieve crushed candy.
- Storage: Store cookies in an airtight container separated by parchment paper layers at room temperature for up to 4 days or refrigerate for 1-2 weeks. Note that humidity can cause candy centers to become sticky over time.
- Freezing Dough: Freeze shaped dough tightly wrapped in plastic and stored in a freezer bag for up to 2 months. Thaw overnight in the fridge before rolling and cutting.
- Freezing Baked Cookies: Not recommended as candy centers may crack upon thawing. If needed, freeze in airtight containers with parchment layers up to 3 months.
- Alternative Cookie Bases: Try using cut-out shortbread cookies, gingerbread cookies, or gingerbread houses as the base for stained glass windows.
Nutrition
- Serving Size: 1 cookie
- Calories: 110
- Sugar: 8g
- Sodium: 65mg
- Fat: 5g
- Saturated Fat: 3g
- Unsaturated Fat: 2g
- Trans Fat: 0g
- Carbohydrates: 15g
- Fiber: 0.2g
- Protein: 1g
- Cholesterol: 20mg


