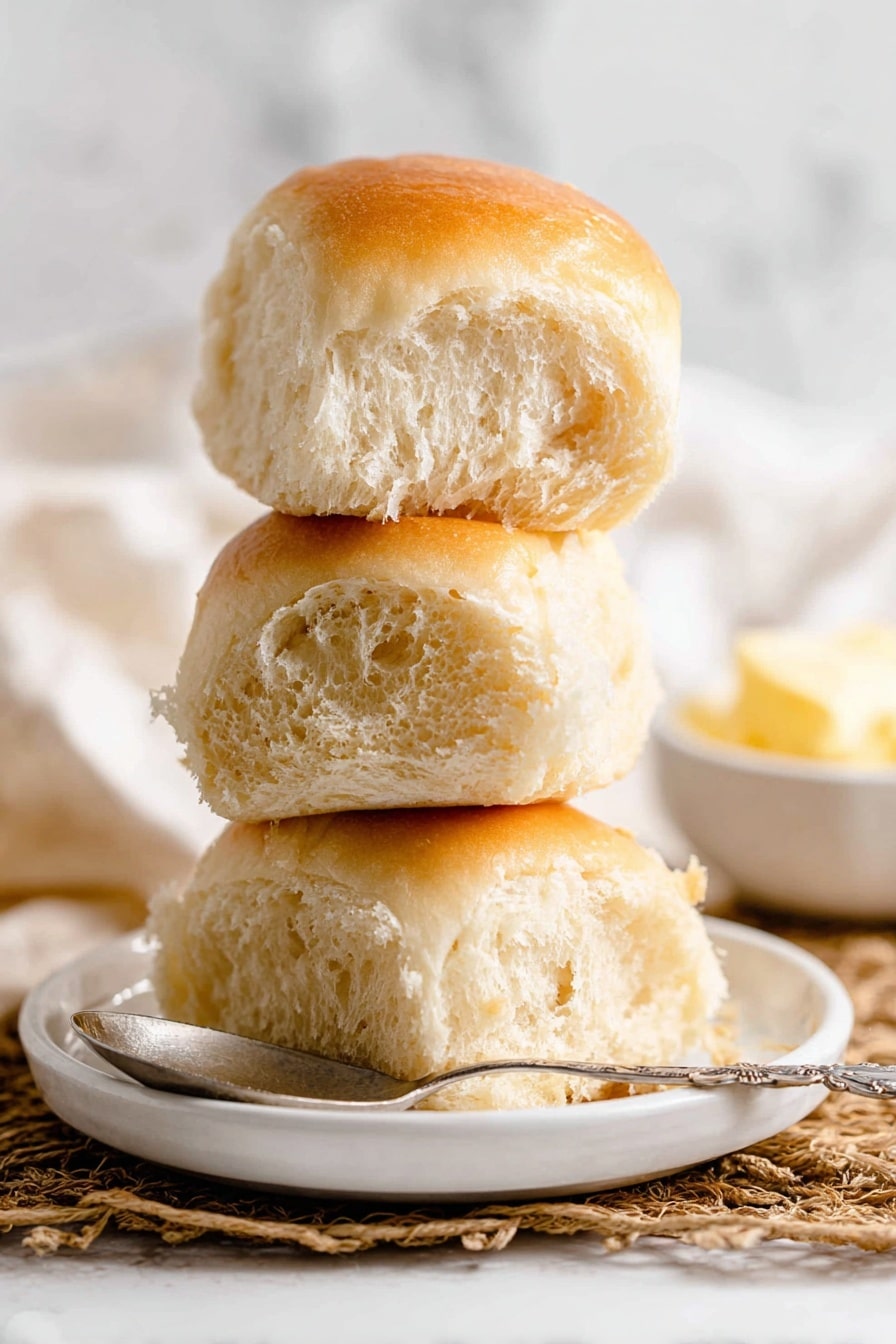
If you’ve ever wanted that perfect, soft, and pillowy bread to accompany any meal, then you’re in for a treat with this Fluffy Yeast Dinner Rolls Recipe. I absolutely love how these rolls turn out—light as air with a golden crust that’s just begging to be slathered with butter. Whether it’s for a holiday feast or a simple weeknight dinner, these yeast rolls never fail to impress, and I’m excited to share all the details so you can make them right in your own kitchen.
Why You’ll Love This Recipe
- Incredibly Soft Texture: Thanks to the yeast and butter combo, these rolls come out pillowy and melt-in-your-mouth every time.
- Simple Ingredients: You don’t need any fancy stuff—just pantry staples that work beautifully together.
- Versatile for Any Meal: Perfect alongside soups, salads, or your holiday turkey—truly a crowd-pleaser.
- Beginner Friendly: I’ve included tips to make kneading and shaping super approachable, even if you’re new to yeast baking.

Ingredients You’ll Need
All these ingredients come together to give you that classic, soft dinner roll flavor and texture. When selecting your yeast and flour, a little attention goes a long way in achieving those fluffy results you’ll adore.
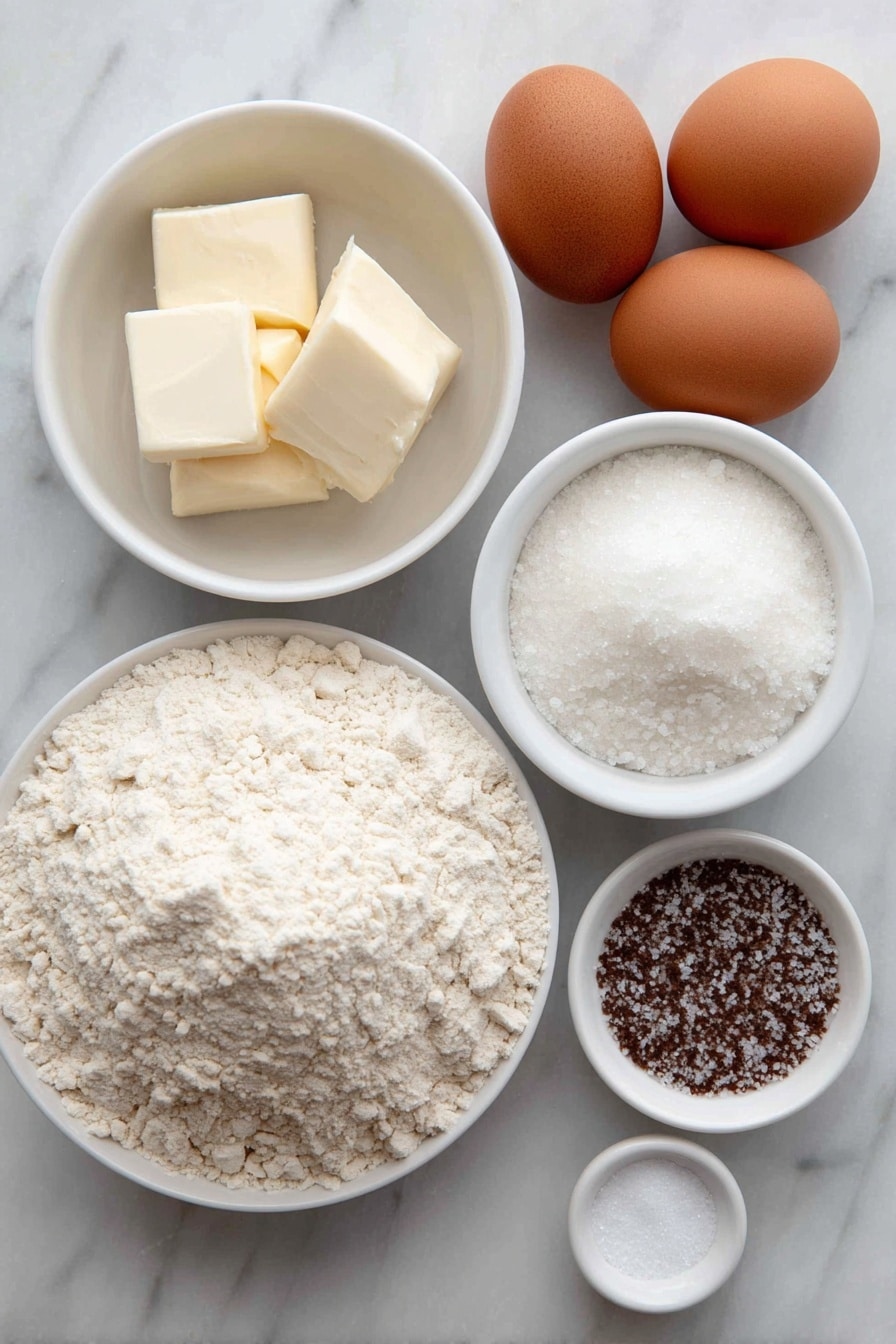
- Lukewarm water: Vital for activating the yeast—too hot can kill it, too cold slows it down.
- Unsalted butter: Adds richness and tenderness; room temperature butter blends easily.
- Active dry yeast: This is the magic ingredient that makes the rolls rise and get fluffy.
- Sugar: Feeds the yeast and balances flavor.
- Eggs: Enrich the dough, giving a beautiful crumb and color.
- All-purpose flour: The backbone of the dough; provides structure.
- Salt: Enhances flavor and controls yeast activity.
Variations
I love making these rolls as-is, but depending on the occasion or what’s in my pantry, sometimes I tweak the recipe a bit. You can easily put your own spin on it, so don’t hesitate to experiment!
- Herb-Infused Rolls: I like adding chopped rosemary or thyme to the dough for a savory twist; my family goes crazy for that earthy aroma fresh from the oven.
- Whole Wheat Version: For a healthier take, swap half the flour for whole wheat flour—the texture gets a bit heartier but remains delicious.
- Sweet Rolls: Increasing sugar slightly and adding a cinnamon swirl turns these into a sweet treat perfect for breakfast or brunch.
- Garlic Butter Finish: Brushing warm rolls with garlic-infused melted butter after baking—this became my quick go-to for dinner parties.
How to Make Fluffy Yeast Dinner Rolls Recipe
Step 1: Activate the Yeast and Mix the Wet Ingredients
Start by combining the lukewarm water, room temperature butter, sugar, eggs, and yeast in a large mixing bowl or your stand mixer bowl. I like using lukewarm water that feels just a little warmer than body temperature—it wakes up the yeast without harming it. Stir everything well until smooth, then let it sit for about 5 minutes. You’ll know it’s ready when the mixture looks bubbly and foamy on top—that’s yeast doing its magic!
Step 2: Add Flour and Salt, Then Mix Into Dough
Next, sprinkle in the flour and salt. Stir everything together until you see no dry flour left and it forms a shaggy, slightly sticky dough. You want to scrape down the sides of your bowl so all the ingredients get incorporated evenly. At this stage, the dough looks rough, but don’t worry—that’s normal!
Step 3: Knead Until Smooth and Elastic
Kneading is where the dough transforms into that soft, stretchy ball we love. If kneading by hand, get ready to enjoy about 8-10 minutes of stretching and folding. Using a stand mixer’s dough hook? Then 5 minutes does the trick. You’ll know it’s ready when the dough feels smooth, slightly tacky, but doesn’t stick relentlessly to your hands or the bowl. Pro tip: lightly oil your hands or the bowl if the dough is too sticky to handle easily.
Step 4: First Rise — Let the Dough Double
Cover your bowl with a clean kitchen towel or plastic wrap, and tuck it in a warm spot to rise. This usually takes about an hour, but keep an eye on it because yeast can be sensitive to room temperature fluctuations. The dough should double in size—this step is crucial for those fluffy rolls, so don’t rush it!
Step 5: Shape the Rolls
Once risen, punch the dough gently to release the air. Roll it out into a log on a floured surface and divide it into 15 equal pieces—I use a bench scraper to make the cuts clean and easy. Keep the dough pieces covered with a damp cloth or cling wrap so they don’t dry out while you work. Then, take each piece and form it into a smooth ball. This is my favorite part because it feels so satisfying! I flatten each dough piece slightly, fold the edges into the center, then roll it in the palm of my hand in circles until it’s smooth and round. It only takes about 30 seconds per piece once you get the hang of it.
Step 6: Arrange and Let Rise Again
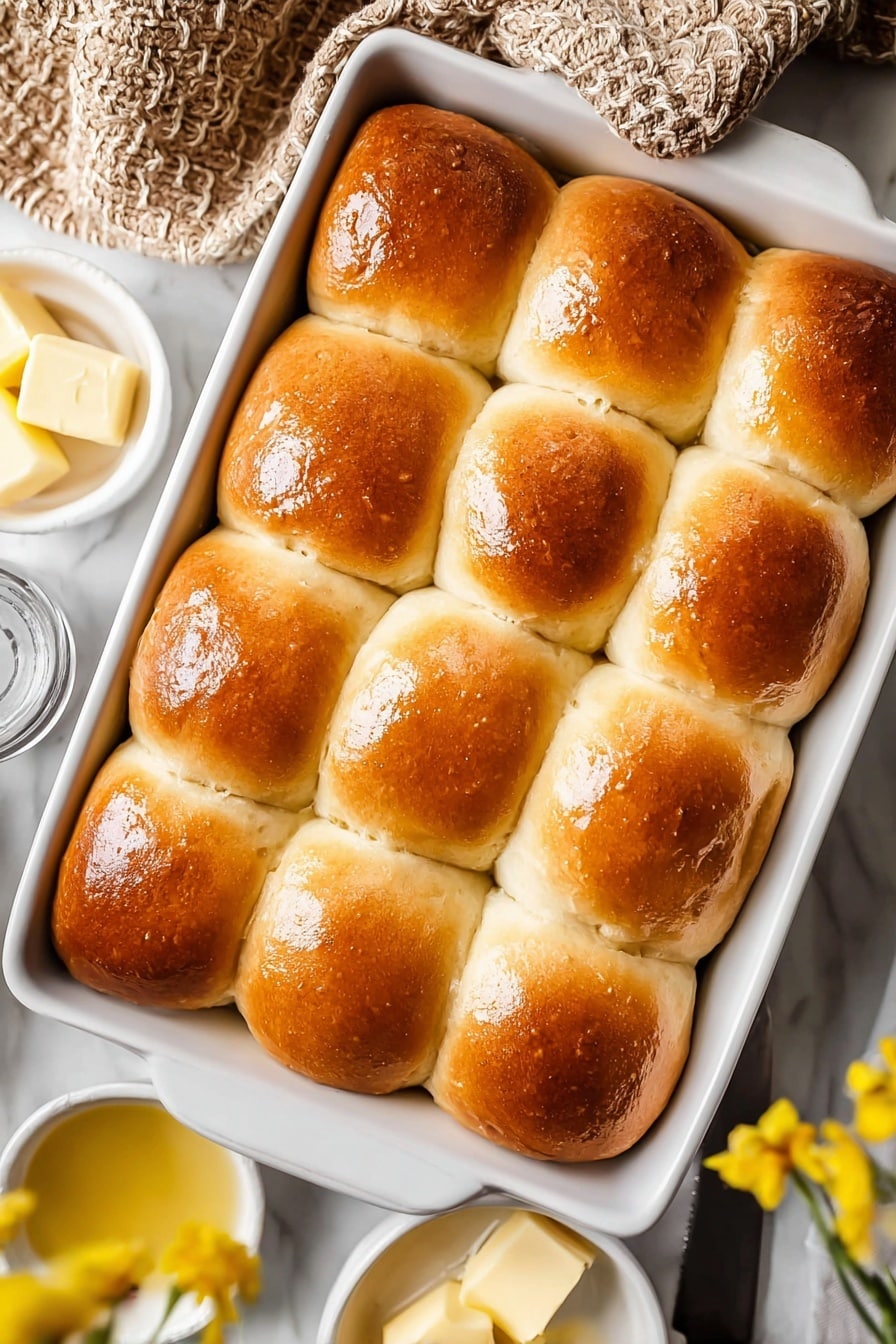
Arrange the shaped rolls in a greased 9×13-inch pan, neatly spaced into 5 rows and 3 columns. Cover them loosely with plastic wrap, then let them rise again for about 30 minutes until nearly doubled. This second rise is the secret behind ultra-light texture and that perfect fluffy crumb.
Step 7: Bake to Golden Perfection
Preheat your oven to 400°F (200°C). Bake the rolls for 15 to 18 minutes, watching closely for that stunning golden-brown tops. The smell during baking is always a signal I’m doing something right! Optional: as soon as they’re out of the oven, brush the tops with melted butter—it adds shine and extra softness that your family will adore. Let the rolls cool on a wire rack for about 15 minutes before digging in.
Pro Tips for Making Fluffy Yeast Dinner Rolls Recipe
- Warm Water Temperature: If you don’t have a thermometer, aim for water that feels like a warm bath—not hot or cold—to kickstart the yeast just right.
- Don’t Skip the Second Rise: I learned the hard way that skipping or shortening the second rise results in dense rolls, so give it the full 30 minutes for fluffiness!
- Oil Your Hands When Shaping: Greasing your palms helps you shape those smooth balls without sticking or tearing the dough.
- Watch the Oven Carefully: Oven temperatures vary, so keep an eye on your rolls after 15 minutes to avoid over-baking and drying out your precious dough.
How to Serve Fluffy Yeast Dinner Rolls Recipe
Garnishes
I often brush the rolls with melted butter right after baking and sprinkle a little flaky sea salt on top for a simple, irresistible finish. For special occasions, a dusting of garlic powder or fresh herbs like parsley can elevate these rolls beautifully.
Side Dishes
These rolls pair like a dream with hearty soups like creamy tomato or chicken noodle. My family also loves them alongside mashed potatoes and gravy, or as a base for mini sliders.
Creative Ways to Present
For holidays, I like arranging the rolls in wreath shapes or pulling them apart family-style from a casserole dish, making the experience warm and interactive. Tucking in small bowls of flavored butters or honey makes it extra special too.
Make Ahead and Storage
Storing Leftovers
Once completely cooled, I store leftover rolls in an airtight container or zip-top bag at room temperature. They stay soft and fresh for about 3-4 days, perfect for quick sandwiches or snacks.
Freezing
When I have extra rolls, I let them cool fully and freeze them in a sealed freezer bag. They keep wonderfully for 3 to 6 months. It’s such a time saver to have a batch ready for a spontaneous dinner or impromptu guests.
Reheating
To bring back that fresh-from-the-oven feeling, I reheat rolls in a preheated 350°F oven for 5-7 minutes or zap them in the microwave for 15-30 seconds wrapped in a slightly damp paper towel. It keeps them soft and inviting without drying them out.
FAQs
-
Can I use instant yeast instead of active dry yeast in this Fluffy Yeast Dinner Rolls Recipe?
Yes! Instant yeast works well here and can even be mixed directly with flour. If you use instant yeast, you might skip the initial step of letting the yeast foam, but giving the dough time to rise is still crucial.
-
Why are my rolls not as fluffy as described?
If your rolls turn out dense, the most common reasons are insufficient rising time or oven temperature that’s too hot or too cool. Make sure the dough doubles during both rises, and don’t skip kneading, as this develops the gluten that traps air for fluffiness.
-
Can I make the dough ahead of time and refrigerate it?
Absolutely! After kneading, cover the dough tightly and refrigerate overnight. The slow rise in the fridge adds great flavor. Just bring the dough to room temperature before shaping and proceed with the second rise.
-
Is there a way to make these rolls dairy-free?
Yes, substitute the butter with a plant-based margarine or coconut oil. The texture will still be soft and delicious, though the flavor will have a slightly different note.
Final Thoughts
This Fluffy Yeast Dinner Rolls Recipe holds a special place in my kitchen—it’s the recipe I come back to when I want that warm, comforting touch of homemade bread. I love knowing I can pull these rolls from the oven, and within minutes, everyone’s gathered around the table ready to dig in. You’ll find that with a little patience and these tips, you can make bakery-worthy dinner rolls that bring joy to any meal. Give it a try—I promise, you won’t regret it!
Print
Fluffy Yeast Dinner Rolls Recipe
- Prep Time: 20 minutes
- Cook Time: 15-18 minutes
- Total Time: 1 hour 35 minutes
- Yield: 15 rolls
- Category: Bread / Rolls
- Method: Baking
- Cuisine: American
Description
This classic yeast rolls recipe produces soft, fluffy, and golden brown rolls perfect for any meal. Made with simple ingredients like yeast, butter, eggs, and flour, these rolls rise beautifully and bake to a tender texture with a buttery finish. Ideal as dinner rolls, for sandwiches, or served alongside soups and salads.
Ingredients
Wet Ingredients
- 1 cup lukewarm water
- ½ cup unsalted butter, at room temperature
- 2 tablespoons active dry yeast
- 3 tablespoons sugar
- 2 eggs
Dry Ingredients
- 3 ½ cups all-purpose flour
- ½ teaspoon salt
Instructions
- Prepare the dough: In a mixing bowl or the bowl of a stand mixer, combine the warm water, room temperature butter, active dry yeast, sugar, and eggs. Stir until the mixture is smooth. Let it rest for 5 minutes until it becomes foamy, indicating the yeast is activated.
- Add dry ingredients and mix: Add the all-purpose flour and salt to the wet mixture. Mix well until a shaggy dough forms, ensuring no dry flour remains by scraping down the sides of the bowl.
- Knead the dough: Knead the dough for 8 to 10 minutes by hand until it forms a smooth and soft ball. Alternatively, use a stand mixer fitted with a dough hook to knead for about 5 minutes until smooth and elastic.
- First rise: Lightly oil the dough ball to prevent sticking. Cover the bowl with a cloth or plastic wrap and let the dough rise in a warm place for 1 hour or until it doubles in size.
- Shape the rolls: Punch down the risen dough and turn it out onto a clean surface. Roll it into a log and divide into 15 equal pieces using a bench scraper. Cover the pieces with a damp cloth or plastic wrap to prevent drying.
- Form dough balls: Take each piece, flatten it with your palms, fold edges into the center, then turn over and roll in your palm to form smooth, tight balls. This step should take about 30 seconds per ball.
- Arrange in pan: Place the shaped rolls evenly in a 9×13-inch casserole pan in 5 rows of 3. Leave some space for expansion.
- Second rise: Cover the pan loosely with plastic wrap and let the rolls rise again for about 30 minutes, until nearly doubled.
- Preheat oven: While the rolls rise, preheat your oven to 400°F (204°C).
- Bake the rolls: Bake rolls in the preheated oven for 15-18 minutes until they turn golden brown on top.
- Finish and cool: Remove the rolls from the oven and brush tops with melted butter if desired, which adds flavor and shine. Transfer to a wire rack and let cool for 15 minutes before serving.
Notes
- Storage: Once cooled, store leftover rolls in an airtight container at room temperature for 3-4 days.
- Reheating: Warm rolls by placing them in a 350°F oven for a few minutes or microwaving for 15-30 seconds to restore freshness.
- Freezing: Store room-temperature rolls in a freezer-safe bag or container and freeze for 3-6 months. Thaw in the refrigerator before reheating.
Nutrition
- Serving Size: 1 roll
- Calories: 160
- Sugar: 3g
- Sodium: 180mg
- Fat: 6g
- Saturated Fat: 3.5g
- Unsaturated Fat: 2g
- Trans Fat: 0g
- Carbohydrates: 22g
- Fiber: 1g
- Protein: 4g
- Cholesterol: 40mg


