
If you’re on the hunt for a show-stopping centerpiece that’s juicy, flavorful, and has that just-right hint of fall sweetness, then you’re going to love this Apple Cider Glazed Turkey with Perfect Gravy Recipe. I absolutely love how the tangy apple cider glaze caramelizes on the turkey skin, giving each bite a beautiful balance of savory and sweet. Plus, the gravy made from the pan drippings is nothing short of magical—smooth, rich, and packed with deep flavor. Stick with me, and I’ll walk you through everything you need to nail this recipe and impress your friends and family!
Why You’ll Love This Recipe
- A Perfect Balance of Flavors: The apple cider glaze adds that irresistible sweet-tart caramelization you don’t get from a plain roast.
- Crisp Skin Every Time: The dry brine technique locks in moisture and guarantees that golden, crispy skin we all crave.
- Gravy Like Grandma’s: Using the turkey drippings and a simple flour slurry yields a silky gravy that elevates every bite.
- Make-Ahead Friendly: The dry brine step happens a day or two ahead, spreading out the work and boosting flavor.

Ingredients You’ll Need
This recipe balances savory herbs and buttery richness with the gentle sweetness of apples and cider. Picking fresh sage and choosing a crisp apple will really make a difference, so try looking for firm, tart apples like Granny Smith or Honeycrisp for that extra zing.
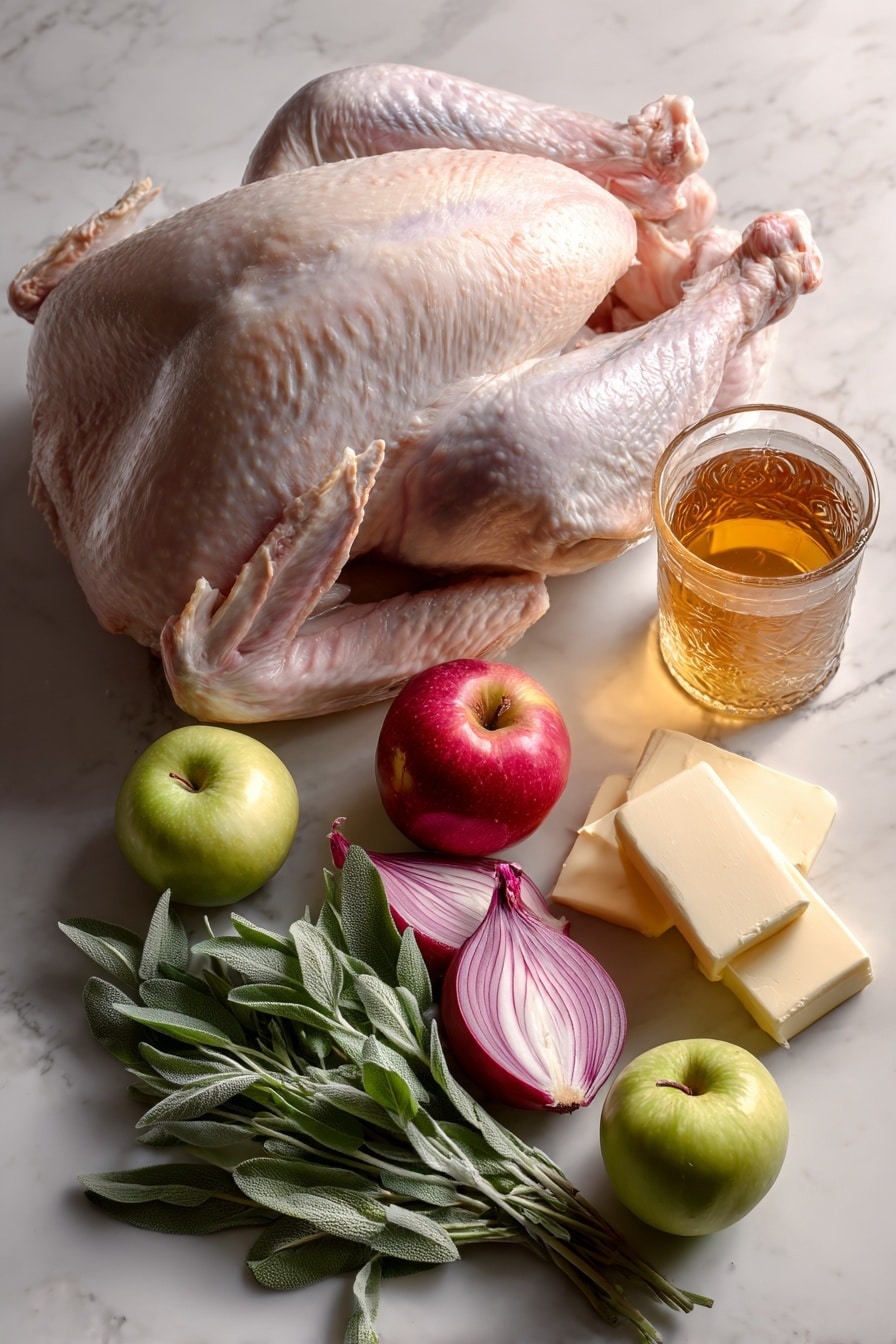
- Whole turkey: Look for a 15-pound bird so you get a good roast time and plenty of leftovers.
- Kosher salt: Ideal for dry brining as it dissolves nicely and seasons deeply.
- Sugar: Gives the dry brine a touch of balance to enhance caramelization without overwhelming.
- Fresh apples: I recommend cutting them in half so they release flavor inside the cavity.
- Sweet onion: Quartered, it adds gentle sweetness and moisture while roasting inside the bird.
- Fresh sage: Its earthy aroma pairs wonderfully with turkey and apple cider.
- Unsalted butter: Softened butter is perfect for rubbing under the skin for added richness.
- Apple cider: Fresh apple cider is key for that authentic fruity glaze.
- Brown sugar or maple syrup: Choose whichever you prefer—maple syrup gives a deeper flavor, but brown sugar works beautifully.
- All-purpose flour: For thickening the gravy to a luscious consistency.
- Cold water: Helps to make a smooth flour slurry for lump-free gravy.
- Salt and pepper: Seasoning essentials you’ll adjust to taste along the way.
Variations
I like to think of this recipe as a foundation you can dress up or down depending on the season, your pantry, or dietary preferences. Feel free to play with spices or even swap out the apples for pears if you want a subtly different twist.
- Herb Variations: I sometimes add rosemary or thyme to the cavity along with sage for a more aromatic bird. It’s a personal favorite that my family asks for again and again.
- Maple Syrup Glaze: If you want a deeper, more caramel-y glaze, swap the brown sugar with pure maple syrup. It adds a lovely complexity.
- Spiced Glaze: Try adding a pinch of cinnamon or ground cloves to the glaze for a cozy fall vibe.
- Giblet-Free Gravy: If you prefer, you can make the gravy using turkey stock instead of drippings and water, especially if you want a milder flavor for picky eaters.
How to Make Apple Cider Glazed Turkey with Perfect Gravy Recipe
Step 1: Dry Brine for Crisp, Flavorful Skin
First things first — make sure your turkey is fully thawed. I learned the hard way that rushing this step leads to uneven cooking and a soggy bird. Plan ahead, because thawing usually takes about one day per five pounds in the fridge. Once thawed, pat the turkey completely dry with paper towels. Mix your kosher salt and sugar, then carefully loosen the skin on the breasts and legs to rub some of this mixture directly on the meat, inside the cavity, and all over the skin. Place your turkey on a wire rack set over a rimmed baking sheet, uncovered, in the fridge for 24 to 48 hours. This dry brine dries out the skin, so it roasts up crisp and gorgeous. It also seasons the meat deeply—trust me, this step is a game changer!
Step 2: Prep Your Turkey and Preheat the Oven
On roasting day, take your turkey out of the fridge at least 30 minutes to an hour ahead to come to room temperature—this helps it cook evenly. Preheat your oven to 425°F. Pat the turkey dry once more if there’s any moisture, but don’t rinse it—just keep that crispy skin plan intact. Truss the legs together for even cooking, and stuff the cavity with the apples, onions, and fresh sage. Smearing 3-4 tablespoons of softened butter under the skin gives rich flavor and moisture, so don’t skip that. I usually season the turkey lightly with pepper here but avoid adding more salt since the dry brine covered that.
Step 3: Roast and Glaze the Turkey
Start roasting at 425°F for 30 minutes to jump-start browning. While the bird is roasting, combine the remaining softened butter, apple cider, and your choice of brown sugar or maple syrup in a saucepan over medium heat. Bring this to a simmer and reduce a bit to get a syrupy glaze. After the first 30 minutes, reduce oven temperature to 350°F. Now here’s the secret I discovered: basting the turkey every 30 minutes with that delicious cider glaze, plus the pan drippings, keeps the skin moist and flavorful as it roasts longer—just set a timer so you don’t forget! Roast until an instant-read thermometer inserted into the thickest part of the thigh reads 180°F. This usually takes about 2 and 1/2 hours after the initial high-heat roast.
Step 4: Let the Turkey Rest
When the turkey is done, resist the temptation to carve immediately. Let it rest 30 to 60 minutes. This allows the juices to redistribute, making your slices juicy and tender. I like to use this downtime to get the gravy started and prepare any garnishes.
Step 5: Make Perfect Gravy from the Drippings
Pour the pan drippings through a fine strainer into a medium saucepan set over medium heat. You can strain them back into the roasting pan if you prefer to make your gravy in the same vessel and capture all those glorious browned bits. In a separate shaker bottle or jar, combine cold water and the flour to form a smooth slurry by shaking vigorously for about a minute—this step is key to avoiding lumpy gravy. Slowly whisk the slurry into the hot drippings, stirring constantly and scraping the bottom to prevent sticking. The gravy will thicken after 10 to 20 minutes—just be patient and keep stirring gently. Taste and season with salt and pepper as needed. I always add a little extra pepper for a subtle kick.
Pro Tips for Making Apple Cider Glazed Turkey with Perfect Gravy Recipe
- Dry Brine Patience: Giving your turkey 24-48 hours uncovered in the fridge ensures that ultra-crisp skin we all dream about.
- Don’t Skip Room Temp: Letting the turkey come to room temperature before roasting means more even cooking and less drying out.
- Baste Religiously: Set a timer and baste every 30 minutes to build layers of flavor and keep the bird moist.
- Whisk Gravy Constantly: Stir the gravy continuously when adding the flour slurry to prevent lumps and scorching.
How to Serve Apple Cider Glazed Turkey with Perfect Gravy Recipe
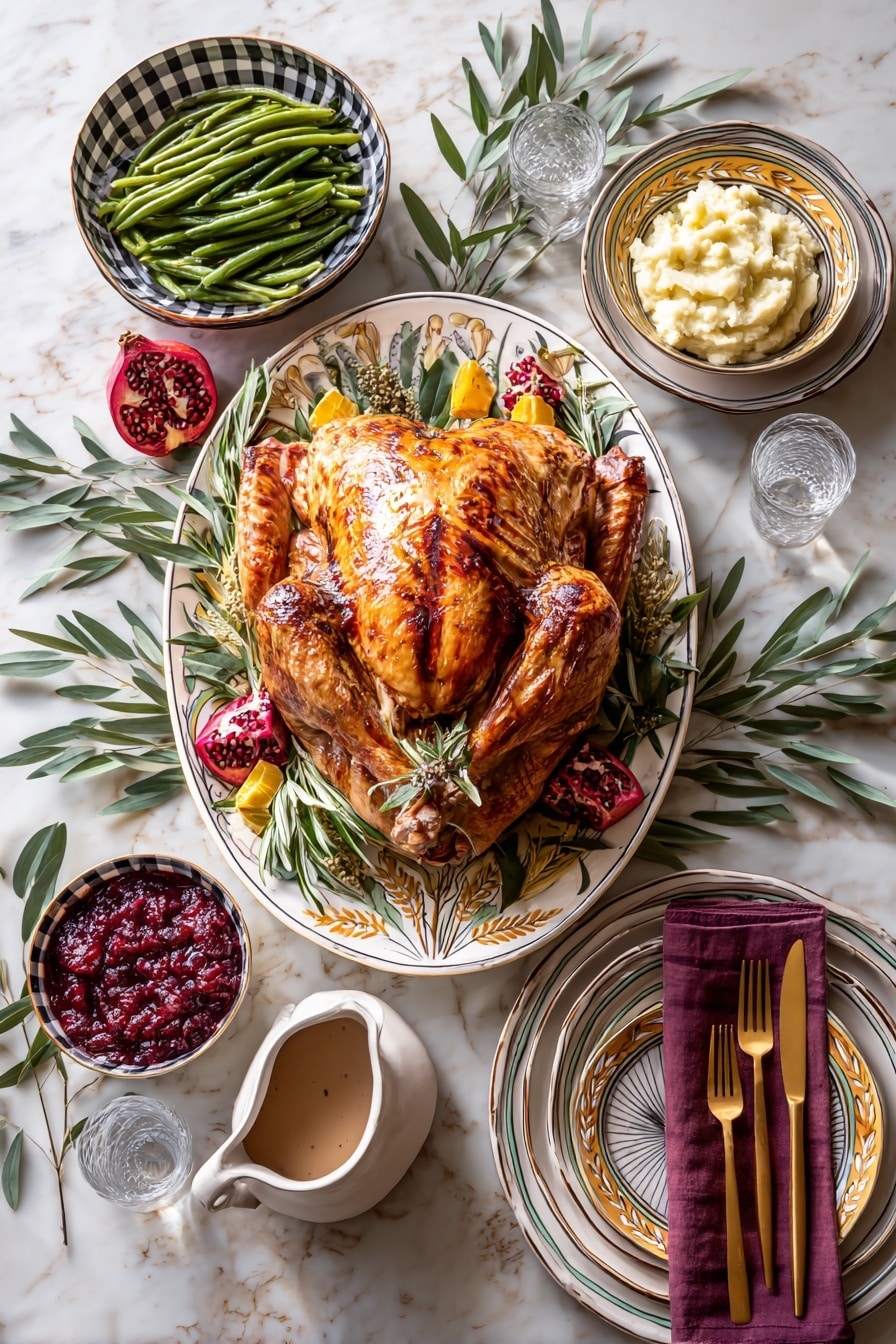
Garnishes
I love to finish the presentation by piling fresh sage leaves and halved apples around the serving platter. It adds a pop of color and invites guests to enjoy the autumn vibe. You could also toss in some whole pomegranates for a festive touch—plus, they’re super eye-catching and pair beautifully with the apple cider glaze.
Side Dishes
My family goes crazy for classic mashed potatoes with a little garlic and chive mixed in to soak up the gravy. Roasted Brussels sprouts or maple-glazed carrots give nice contrasts in both texture and sweetness. And a simple green salad with toasted walnuts and cranberries keeps things fresh and light alongside the rich turkey.
Creative Ways to Present
For holiday dinners, I like to carve the turkey into tidy slices and fan them out on a large platter scattered with fresh apples and sage sprigs. Serving the gravy in a pretty, warmed gravy boat adds elegance and makes passing it around easier. Another fun idea is to serve the turkey on a wooden cutting board with small bowls of glaze and cranberry sauce on the side for everyone to customize their plate.
Make Ahead and Storage
Storing Leftovers
After your feast, I recommend slicing leftover turkey and storing it in airtight containers in the fridge right away. That way, the meat stays juicy and flavorful. I usually add a little bit of the gravy over the turkey to keep it moist during storage—trust me, it makes a huge difference when you reheat it later.
Freezing
Freezing cooked turkey is a lifesaver for using up all the leftovers. I slice the meat, portion it into freezer bags or containers, and pour in a little gravy before sealing tightly. This helps protect against freezer burn and keeps the meat tender. When you’re ready, thaw it overnight in the fridge for best results.
Reheating
The key to reheating leftover turkey without drying it out is low and slow. I like to warm the slices gently in a covered skillet over medium-low heat, adding a splash of broth or gravy to keep things moist. You can also reheat in the oven at 300°F wrapped in foil. Either way, this method helps the meat stay tender and flavorful.
FAQs
-
Can I use apple juice instead of apple cider for the glaze?
Yes, you can substitute apple juice if you don’t have fresh apple cider. Just keep in mind that apple cider tends to have a richer, more complex flavor because it’s less filtered and sometimes fermented, which enhances the glaze. If using apple juice, try to choose one without added sugars for the best balance.
-
How long should I dry brine the turkey?
I recommend dry brining your turkey anywhere from 24 to 48 hours uncovered in the fridge. The longer time intensifies flavor and helps dry out the skin to achieve that coveted crispiness. Just make sure to keep the bird uncovered and elevated on a rack so air circulates evenly.
-
What’s the best way to check if the turkey is done?
The most reliable method is to use an instant-read thermometer. Insert it into the thickest part of the thigh without touching bone; it should register 180°F for perfectly cooked, juicy turkey. This prevents overcooking and drying out your bird.
-
Can I make the perfect gravy without flour?
Absolutely! If you prefer a gluten-free or flour-free gravy, you can use cornstarch or arrowroot as a thickener. Mix either with cold water to create a slurry, then whisk into the hot drippings. Just use about half the quantity to achieve the same thickness, as cornstarch is a stronger thickener.
Final Thoughts
This Apple Cider Glazed Turkey with Perfect Gravy Recipe truly feels like a hug on a plate—it’s comforting, flavorful, and elegant all at once. I remember the first time I made it for my family and how instantly everyone fell in love with that sweet apple glaze and silky gravy. It’s the kind of recipe that turns any gathering into a special occasion. So go ahead, give it a try, and enjoy the happy smiles around your table!
Print
Apple Cider Glazed Turkey with Perfect Gravy Recipe
- Prep Time: 2 days (includes dry brining)
- Cook Time: 3 hours
- Total Time: 2 days and 3 hours
- Yield: Serves 8
- Category: Main Course
- Method: Baking
- Cuisine: American
Description
This Apple Cider Glazed Turkey recipe features a perfectly roasted 15-pound turkey with a fragrant apple cider and brown sugar glaze, complemented by a homemade rich and silky gravy made from the pan drippings. The turkey is dry-brined for crispy skin and juicy meat, infused with fresh sage, apples, and onions for a delightful autumn flavor, making it an ideal centerpiece for holiday meals.
Ingredients
Apple Cider Glazed Turkey
- 1 15-pound whole turkey
- 2 1/2 tablespoons kosher salt
- 2 teaspoons sugar
- 2 apples, cut in half
- 1 sweet onion, cut into quarters
- 1 large bunch of fresh sage
- 8 tablespoons unsalted butter, softened
- 1 cup apple cider
- 1/4 cup brown sugar or maple syrup
Perfect Gravy
- Pan drippings from roasted turkey
- 16 ounces cold water
- 3 heaping tablespoons all-purpose flour
- Salt and pepper, to taste
Instructions
- Dry Brine the Turkey: In a bowl, mix kosher salt and sugar. Pat the turkey dry and separate the skin from the meat to rub the brine underneath on the breast and legs, as well as all over the skin and inside the cavity. Place the turkey uncovered on a wire rack over a rimmed baking sheet and refrigerate for 24 to 48 hours to develop crispy, flavorful skin.
- Prepare for Roasting: Remove the turkey from the fridge 30 to 60 minutes before cooking. Preheat the oven to 425°F. Stuff the cavity with apples, onions, and fresh sage. Truss the legs together. Rub 3 to 4 tablespoons of softened butter under the skin on the breast and thighs. Optionally season with pepper.
- Initial Roast: Roast the turkey at 425°F for 30 minutes to start crisping the skin.
- Make the Apple Cider Glaze: While the turkey roasts, combine the remaining butter, apple cider, and brown sugar or maple syrup in a saucepan over medium heat. Bring to a simmer and reduce slightly to make a glaze.
- Continue Roasting and Basting: Reduce oven heat to 350°F. Roast the turkey for an additional 2 1/2 hours, basting every 30 minutes with the apple cider glaze, pan drippings, or both to keep the meat moist and flavorful. Roast until an internal temperature of 180°F is reached in the thigh.
- Rest the Turkey: Remove the turkey from the oven and let it rest for 30 to 60 minutes before carving. Garnish with extra sage, apples, or whole pomegranates for presentation if desired.
- Make the Gravy: Strain the pan drippings into a saucepan over medium heat. In a separate container, add cold water and all-purpose flour, shaking vigorously to form a smooth slurry. Slowly whisk the slurry into the pan drippings, stirring constantly to avoid lumps and scraping the pan bottom. Cook until thickened, about 10 to 20 minutes. Season with salt and pepper to taste.
Notes
- Allow ample time to thaw the turkey, roughly 1 day per 5 pounds.
- Dry brining uncovered in the fridge is essential for crisp skin.
- Do not rinse the turkey after brining to maintain seasoning.
- Use a meat thermometer to ensure the turkey reaches the safe internal temperature of 180°F in the thigh.
- Basting regularly helps keep the turkey moist and flavorful.
- The gravy can be made in the same roasting pan after straining for extra depth of flavor.
- Letting the turkey rest before carving allows juices to redistribute for moist meat.
Nutrition
- Serving Size: 1/8 of turkey with gravy
- Calories: 650
- Sugar: 6g
- Sodium: 450mg
- Fat: 38g
- Saturated Fat: 15g
- Unsaturated Fat: 20g
- Trans Fat: 0g
- Carbohydrates: 12g
- Fiber: 2g
- Protein: 60g
- Cholesterol: 160mg


