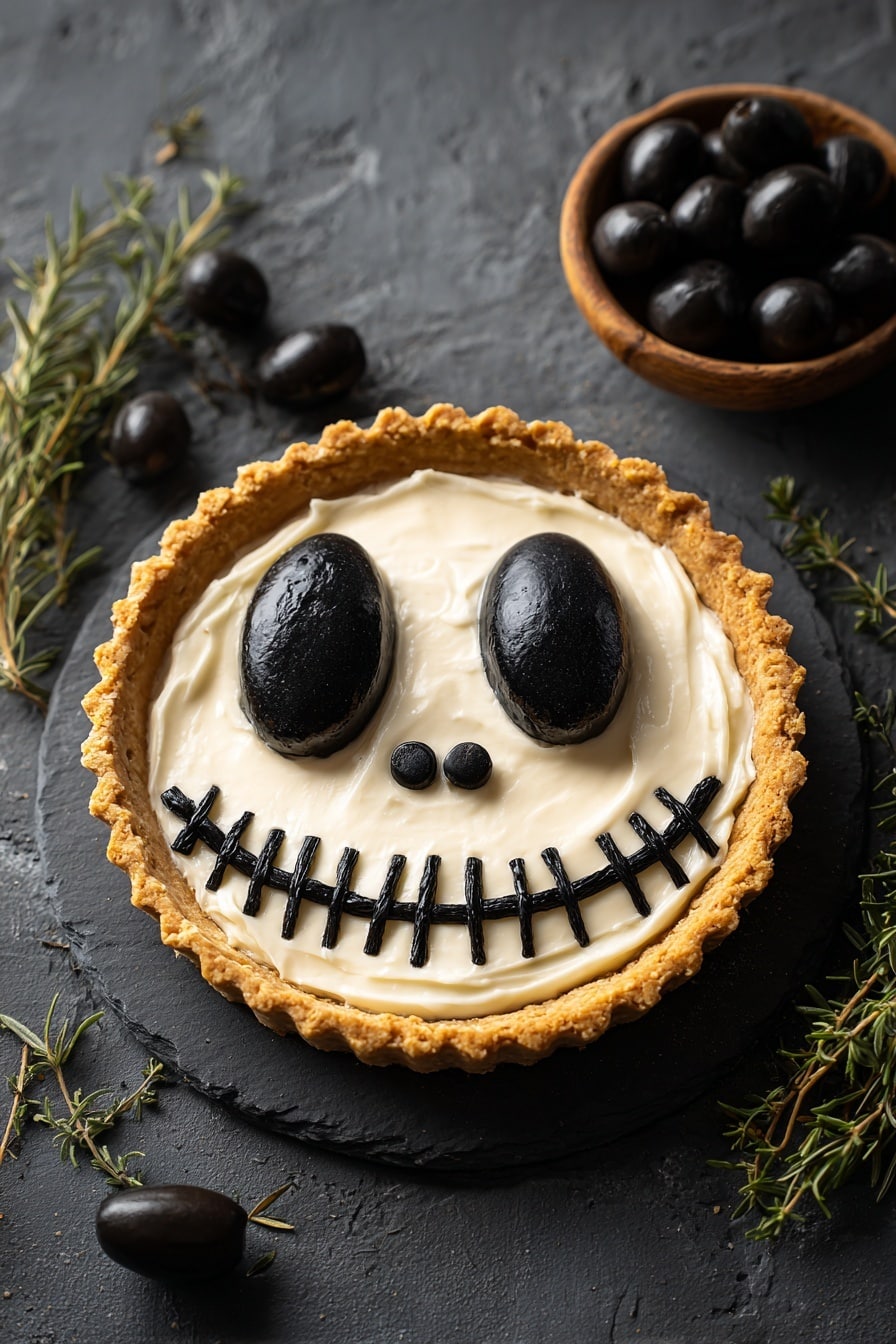
If you’re looking for a Halloween treat that’s both spooky and downright delicious, I can’t recommend this Halloween Jack Skellington Ricotta Olive Tarts Recipe enough. These tarts not only capture the eerie charm of Jack Skellington’s iconic face but also deliver a creamy, savory flavor that’s perfect for a fall gathering or a fun, themed appetizer. I absolutely love how this recipe combines ricotta tanginess with the salty hit of olives and a tender gluten-free crust. Keep reading—I promise this one is fan-freaking-tastic!
Why You’ll Love This Recipe
- Festive and Fun: The Jack Skellington design is perfect for Halloween parties and will wow your guests with how cute and clever it looks.
- Gluten-Free Crust: It’s a hearty, flaky crust you can feel good about—even if you’re avoiding gluten like I do sometimes!
- Rich Ricotta Filling: Creamy and savory with fresh herbs, it’s a comforting bite that pairs beautifully with the salty olives and sun-dried tomatoes.
- Showstopper Presentation: These tarts look difficult but are surprisingly simple to assemble, making them a hit with both novice and seasoned home cooks.

Ingredients You’ll Need
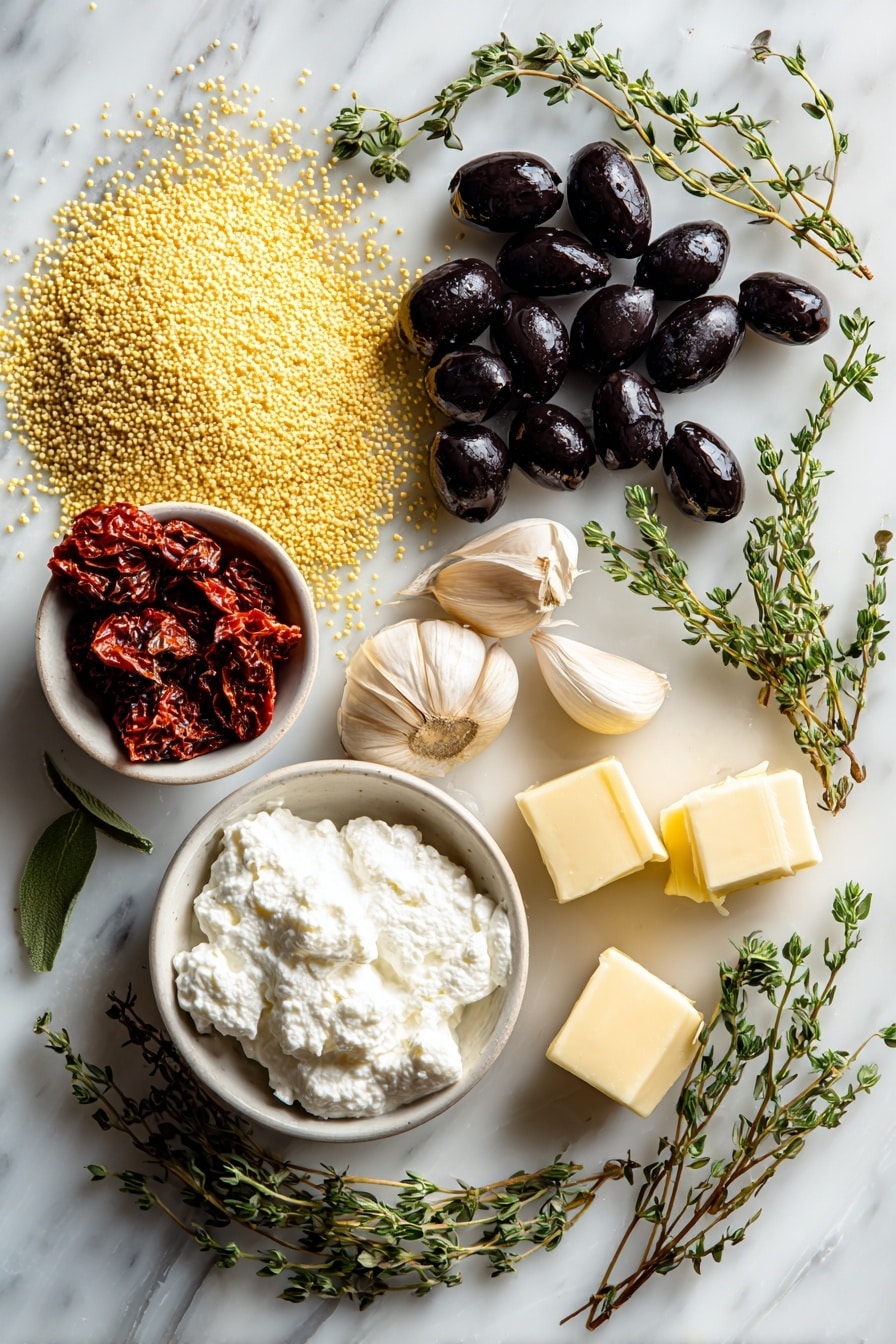
The ingredients for this Halloween Jack Skellington Ricotta Olive Tarts Recipe are easy to find and thoughtfully balanced. The gluten-free crust flirts with wholesome flours, and the filling features fresh ricotta that keeps everything smooth and light. When shopping, grab good-quality black olives and sun-dried tomatoes packed in oil—the flavor difference is worth it.
- Sweet rice flour: A sticky flour that helps bind the crust nicely without gluten.
- Millet flour: Adds a subtle nutty flavor and helps keep the crust tender.
- Gluten-free oat flour: I love making my own by grinding whole oats—it gives a fresh, wholesome taste.
- Tapioca flour (or corn starch): Provides a little stretch and crispness to the crust’s texture.
- Cold, unsalted butter: Essential for that flaky, melt-in-your-mouth crust.
- Ice water: Helps bring the dough together without warming the butter.
- Black olives: Both sliced and chopped for the charming face details and flavor bursts.
- Sun-dried tomatoes: Julienned for a tangy, colorful topping.
- Fresh thyme: Adds an earthy grace note that pairs beautifully with the cheese.
- Parmesan cheese: For a sprinkle of sharpness on top of the filling.
- Ricotta cheese: The starring creamy filling that’s mild and luscious.
- Greek yogurt: Balances the ricotta with a slight tang and richness.
- Egg whites: Help the filling set up perfectly without heaviness.
- Garlic: Minced for subtle savory depth.
- Kosher salt: To season both the crust and filling just right.
Variations
One of the best things about this Halloween Jack Skellington Ricotta Olive Tarts Recipe is how easily it can be tweaked to your taste or dietary needs. I love trying different herb combos or swapping olives for other veggies to mix it up—plus it’s great for experimenting!
- Herb Variation: Try substituting thyme with rosemary or fresh oregano to give the tart an earthier or more robust flavor—I personally had great success with rosemary once, and it smelled amazing while baking.
- Dairy-Free Option: You can swap ricotta and yogurt for coconut cream or cashew cheese if needed; just keep the seasoning bold so the flavors don’t get lost.
- Spicy Kick: Adding finely chopped roasted red pepper or a splash of chili flakes into the filling can add a surprising but delightful heat.
- Crust-Free Version: If you want a lighter option, bake the filling in small silicone muffin cups as mini crustless tarts—still fun, just less fiddly!
How to Make Halloween Jack Skellington Ricotta Olive Tarts Recipe
Step 1: Whip Up the Gluten-Free Tart Crust
Start by combining the sweet rice flour, millet flour, oat flour, tapioca starch, and salt in a large bowl. I always whisk these dry ingredients well—that way the flour blend is even throughout the crust. Then, add your cold butter chunks and mix using your fingers. Breaking the butter down until the biggest pieces are the size of peas is key because that creates the flaky layers we all love in a crust.
Next, drizzle in ice water tablespoon by tablespoon. I learned this trick to avoid a dough that’s either too wet or crumbly—add just enough so the dough barely sticks together when you pinch it. Then, divide into 6 to 8 pieces depending on your tart size, roll each into a ball, flatten into discs, and wrap them in plastic to chill for 30 minutes. This chilling helps the butter firm up again so your crust bakes beautifully without shrinking.
Step 2: Roll and Shape the Tart Shells
Preheat your oven to 400ºF. To roll out the dough, sprinkle millet flour between two sheets of parchment paper—this trick stops sticking without adding too much extra flour. Roll each disc into a circle about 1 inch larger than your tartlet pan all the way around. Peeling off one parchment and flipping the dough into the pan (parchment side up) makes transferring the dough much less stressful.
Peel off the top parchment paper carefully and press the dough gently into the pan with your fingers. If your tart pan only holds 4 like mine, don’t worry—work in batches. This method keeps your crusts even and neat so your tarts bake evenly.
Step 3: Prepare the Filling and Bake the Tart Shells
Slice 6 black olives thinly lengthwise to create delicate strips for Jack’s mouth later, and cut 12-14 small ovals for his nose. This step feels a bit fiddly at first, but I find using a sharp paring knife and moving slowly really helps with the precision. Set these aside carefully—they’re your decorating pieces!
Chop the remaining olives into small bits and sprinkle evenly into each tart shell. Then add 3 to 5 julienned sun-dried tomato strips on top of the olives, sprinkle fresh thyme leaves, and divide parmesan cheese among the tarts. Pop these into the oven and bake for about 12 minutes, just until the crust is lightly golden and firm enough to hold your ricotta filling.
Step 4: Mix the Ricotta Filling and Assemble Your Tarts
While the crusts bake, whisk together ricotta, Greek yogurt, egg whites, minced garlic, and salt in a bowl until smooth. This filling is creamy but light, with garlic adding a subtle savory kick.
Once the tart shells are out of the oven, immediately spoon the ricotta filling evenly into each one, filling them right to the top. Then carefully place two whole olives for eyes and two small olive ovals for a nose per tart. To create Jack’s signature criss-cross mouth, gently lay the ultra-thin olive strips in the pattern—using chopsticks here really saved me from smooshing the olives too much. This part takes a little attention, but the spooky face payoff is absolutely worth it!
Step 5: Final Bake and Serve Warm
Bake your assembled tarts for 20-25 minutes at 400ºF, checking as early as 15 minutes to ensure the filling is just set but not cracked or dry. Smaller tart pans bake faster, so keep your eye on them. When the filling is firm to the touch and lightly golden on top, they’re ready.
I usually serve these warm right from the oven because the aroma of garlic and thyme fills the kitchen and the texture is just perfect—warm and creamy inside with a crisp crust outside.
Pro Tips for Making Halloween Jack Skellington Ricotta Olive Tarts Recipe
- Keep Butter Cold: Cold butter is the secret to a flaky crust—handle it quickly and chill the dough well.
- Use Parchment Paper for Rolling: Rolling between parchment keeps dough from sticking and makes transfers super easy without breaking.
- Make Thin Olive Strips With Care: Use a very sharp knife and slowly slice olives on a steady surface to create the delicate mouth slices.
- Watch Filling Doneness: Ricotta sets firm but stays creamy—try jiggling the tart gently at 15 minutes to see if it bounces back, signaling it’s ready.
How to Serve Halloween Jack Skellington Ricotta Olive Tarts Recipe

Garnishes
I love finishing these tarts with a few fresh thyme leaves scattered on top just before serving—the pop of green is festive and fresh! A tiny drizzle of high-quality olive oil adds a little gloss and richness that complements the ricotta beautifully. For an extra spooky touch, serve with edible black sesame seeds or finely chopped chives sprinkled lightly around the plate.
Side Dishes
These tarts are an amazing appetizer alongside a crisp autumn salad—think arugula with roasted pumpkin seeds and a tangy vinaigrette. I also like pairing them with a warm, spiced butternut squash soup to keep the cozy fall theme going. For a party platter, add some roasted veggies and maybe a few slices of crusty baguette to round out the spread.
Creative Ways to Present
For Halloween parties, I’ve placed these tarts on black slate boards to make the white ricotta pop visually, adding edible flowers for a whimsical vibe. Another fun idea is serving them inside thinly hollowed mini pumpkins as bite-sized, spooky bites that are as cute as they are tasty. Kids especially love picking their own Jack Skellington faces when you let them decorate before baking!
Make Ahead and Storage
Storing Leftovers
I usually store leftover tarts in an airtight container in the fridge for up to 3 days. I’ve found keeping them cool preserves the ricotta filling’s creaminess, and the crust stays pleasantly tender without getting soggy.
Freezing
Freezing these tarts is definitely possible. After baking completely, let cool, then wrap each tart individually in plastic wrap and store in a freezer-safe container. When you’re craving one, thaw overnight in the fridge and reheat in a 400°F oven for just 7 minutes—this method revives their fresh-baked magic!
Reheating
Reheating is simple: I pop them in a preheated 400°F oven for about 7 minutes until warmed through and the crust crisps back up. I avoid microwaving because it can make the crust a bit chewy and the filling less creamy. This quick oven reheat keeps the texture and flavor spot on.
FAQs
-
Can I make this Halloween Jack Skellington Ricotta Olive Tarts Recipe dairy-free?
Absolutely! You can substitute the ricotta and Greek yogurt with dairy-free alternatives like cashew cheese or coconut cream. Just keep your seasonings strong enough since some dairy-free cheeses are milder in flavor.
-
What if I don’t have a mini tart pan?
If you don’t have mini tart pans, you can use a muffin tin instead—just adjust the dough size to fit each cup. Alternatively, make one large tart with the same ingredients but bake a little longer to ensure the filling sets properly.
-
How do I make sure the crust stays flaky and doesn’t get soggy?
Keeping your butter cold and chilling the dough before rolling helps keep the crust flaky. Also, prebaking the shells for 12 minutes before adding the filling acts as a barrier and prevents sogginess from the moist ricotta mixture.
-
Can I prepare these tarts ahead of time for a party?
Yes! You can prepare the crusts and filling ahead and assemble the tarts just before baking. Alternatively, fully bake them a day ahead and reheat in the oven when guests arrive—either way works well.
-
Why does the recipe use egg whites only?
Using only egg whites helps the ricotta filling set firmly without becoming overly dense or rich. Egg whites provide structure while keeping the filling light and creamy.
Final Thoughts
When I first made this Halloween Jack Skellington Ricotta Olive Tarts Recipe, I was thrilled at how perfectly it captured that spooky yet scrumptious vibe I was going for. It’s become a favorite in my family and has earned major compliments at every Halloween gathering. I love sharing it because it proves you don’t have to choose between being festive and eating well—you can totally have both. So grab your tart pans, get your hands floury, and create some magic this Halloween. Trust me, you’ll want to keep this recipe on speed dial for years to come!
Print
Halloween Jack Skellington Ricotta Olive Tarts Recipe
- Prep Time: 40 minutes
- Cook Time: 40 minutes
- Total Time: 1 hour 20 minutes
- Yield: 6-8 mini tarts (3-4 inch each)
- Category: Appetizer
- Method: Baking
- Cuisine: American
- Diet: Gluten Free
Description
These Halloween Jack Skellington Ricotta Olive Tarts are spooky, savory mini tartlets perfect for festive gatherings. Made with a gluten-free crust and creamy ricotta filling, they feature striking black olive decorations inspired by Jack Skellington’s iconic face. The tarts combine the earthiness of sun-dried tomatoes, fresh thyme, and parmesan cheese for a flavorful, seasonal appetizer that is both visually impressive and delicious.
Ingredients
Gluten-Free Tart Crust
- ½ cup sweet rice flour
- ¼ cup millet flour
- ⅓ cup gluten-free oat flour (made by grinding whole oats)
- 3 tablespoons Bob’s Red Mill tapioca flour or corn starch
- ¼ teaspoon kosher salt
- 8 tablespoons cold unsalted butter, cut into tablespoon-sized pieces
- 5-7 tablespoons ice water
Filling
- 1 can black olives
- 3-4 tablespoons julienned sun-dried tomatoes (from a jar packed in oil)
- 2-3 teaspoons fresh thyme leaves
- 3 tablespoons freshly grated parmesan cheese
- 1½ cups ricotta cheese
- ¼ cup + 2 tablespoons Greek yogurt
- 3 egg whites
- 3 cloves garlic, minced
- ½ teaspoon kosher salt
Instructions
- Prepare the Crust: In a large bowl, whisk together all the flours, tapioca starch, and kosher salt. Add cold butter pieces and mix with your hands, breaking butter down until pea-sized. Gradually add ice water, one tablespoon at a time, mixing until dough holds together when pinched.
- Chill the Dough: Divide the dough into 6-8 portions depending on tartlet size. Roll each into a ball, flatten into discs, wrap in plastic wrap, and refrigerate for 30 minutes.
- Preheat Oven: Set oven to 400ºF (204ºC).
- Roll Out Crusts: Roll each dough disc between two sheets of wax or parchment paper, dusted with millet flour, to a circle about 1 inch larger than tart pans.
- Fit Dough into Tart Pans: Peel off one parchment side and flip dough into tart pan with parchment up, then remove second parchment and gently press dough into pan. Repeat for all tartlets, working in batches if needed.
- Prepare Filling Garnishes: Thinly slice 6 black olives lengthwise into very thin strips for the mouth decorations. Cut 12-14 small olive ovals for the nose. Chop remaining olives.
- Assemble Tart Bases: Distribute chopped olives evenly over crusts. Place 3-5 strips of julienned sun-dried tomatoes on each tart, sprinkle with fresh thyme leaves and grated parmesan cheese.
- Par-Bake the Crusts: Bake tarts for 12 minutes until crusts are lightly cooked.
- Mix Ricotta Filling: Whisk together ricotta, Greek yogurt, egg whites, minced garlic, and salt until smooth.
- Add Filling to Tarts: Remove crusts from oven and fill each tart to the top with ricotta mixture.
- Decorate Tarts: Place two whole black olives as eyes and two small olive ovals as noses onto each tart. Use thin olive strips to create a criss-cross mouth pattern, using chopsticks for precise placement.
- Bake Filled Tarts: Bake at 400ºF for 20-25 minutes until ricotta filling is set. Start checking at 15 minutes depending on tart size.
- Serve and Reheat: Serve warm. To reheat, bake at 400ºF for 7 minutes.
Notes
- Use millet flour to dust parchment sheets to prevent sticking while rolling dough.
- Depending on your mini tart pan size, you may make between 6 to 8 tarts.
- Use chopsticks or small tweezers to delicately place olive decorations.
- To make gluten-free oat flour, grind whole oats in a food processor until fine.
- Reheat tarts gently to maintain crispness of crust and creamy texture of filling.
Nutrition
- Serving Size: 1 mini tart
- Calories: 180
- Sugar: 1.5g
- Sodium: 250mg
- Fat: 12g
- Saturated Fat: 7g
- Unsaturated Fat: 4g
- Trans Fat: 0g
- Carbohydrates: 12g
- Fiber: 2g
- Protein: 6g
- Cholesterol: 35mg

