
If you’re looking for a Halloween appetizer that’s fun, festive, and delicious, I’ve got a treat for you. This Spider Cheeseballs for Halloween Recipe has been a total hit every time I serve it, and I’m excited to share how easy it is to make these creepy, creamy little critters that everyone will love. Get ready to impress your guests with a spooky snack that’s just as tasty as it is adorable!
Why You’ll Love This Recipe
- Fun and Festive: Your guests won’t believe these spooky cheeseballs are actually this simple to make.
- Creamy and Flavorful: The combo of cream cheese and goat cheese makes each bite irresistibly smooth and tangy.
- Easy to Customize: You can tweak herbs and spices to suit your taste or dietary needs without losing the magic.
- Perfect for Parties: Bite-sized, portable, and paired perfectly with crunchy pretzels and crackers for easy snacking.

Ingredients You’ll Need
The ingredients here strike a great balance — creamy cheeses, fresh aromatics, and just the right herbs to give these spider cheeseballs that irresistible flavor. Plus, using black sesame seeds adds both texture and a perfectly eerie look.
- Cream Cheese: Softened cream cheese is the base, giving you that classic rich and creamy texture everyone loves.
- Extra Virgin Olive Oil: Adds smoothness and a little fruity flavor that blends the cheeses perfectly.
- Goat Cheese: Provides a tangy contrast to the cream cheese, elevating the taste.
- Green Onions: Fresh, chopped green onions give a mild sharpness and a bit of color inside the cheeseballs.
- Garlic Cloves: Minced garlic adds a punch of flavor without overpowering the mix.
- Dried Dill Weed: This herb brightens up the cheese mixture, adding subtle freshness.
- Dried Oregano: Offers earthiness and depth to the flavor profile.
- Kosher Salt: Enhances the overall taste, making the flavors pop.
- Black Pepper: Just enough to give some warmth and balance.
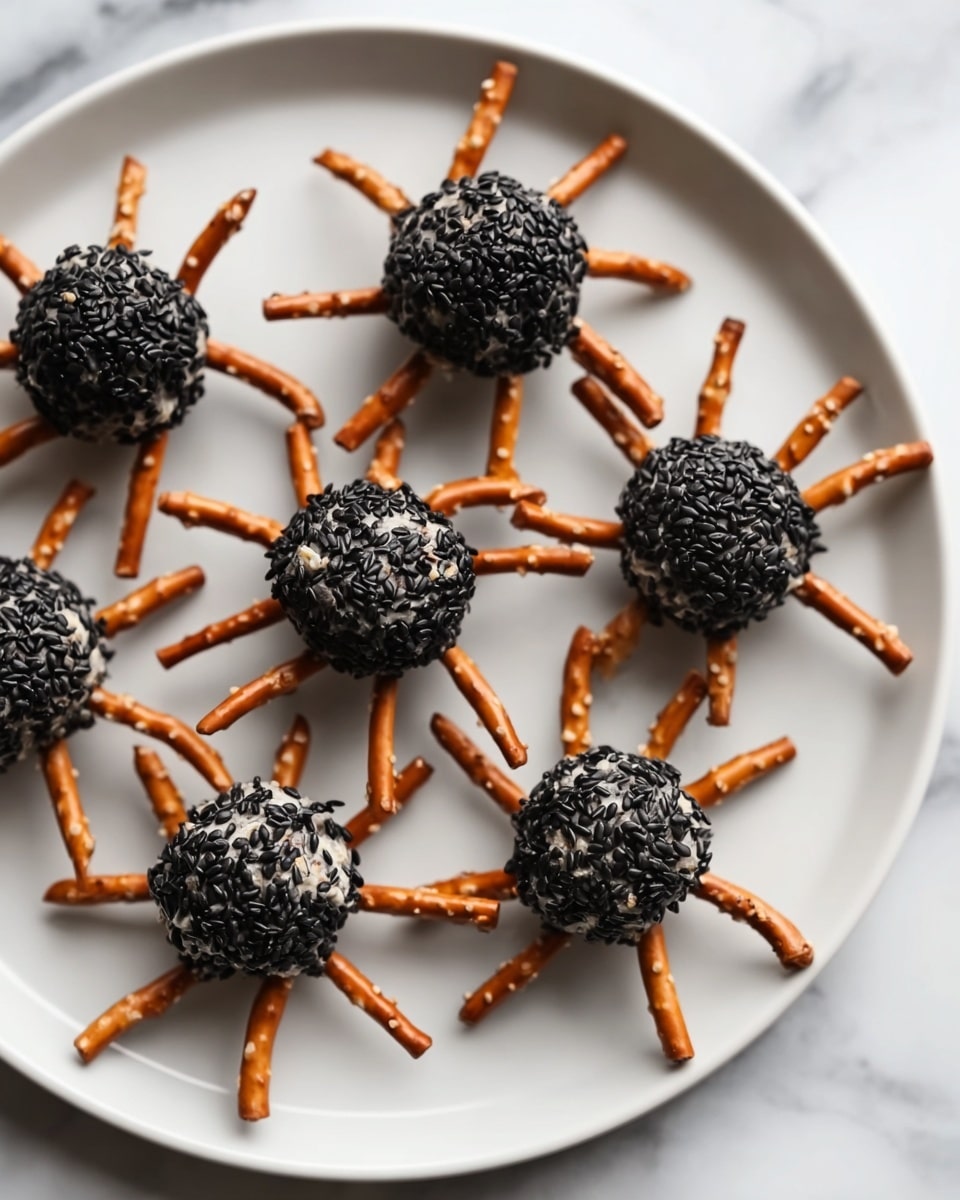
- Black Sesame Seeds: They coat the cheeseballs for a “spidery” black exterior that’s also packed with crunch.
- Pretzel Sticks: The perfect choice for “spider legs” — sturdy, salty, and visually perfect.
- Additional Pretzels and Crackers: For serving alongside, making these cheeseballs party-ready.
Variations
I love how flexible this Spider Cheeseballs for Halloween Recipe is — you can make it your own with just a few tweaks. Don’t be afraid to experiment with herbs, cheeses, or even how you shape your spiders!
- Mild or Spicy: I once added a pinch of cayenne to give it some heat, which my friends totally loved. You can skip or swap for paprika for milder warmth.
- Herb Swaps: Instead of dill and oregano, you could try chopped fresh basil or parsley for a brighter, herby twist.
- Cheese Choices: If goat cheese isn’t your thing, cream cheese mixed with feta or ricotta also works beautifully.
- Gluten-Free: Just swap out pretzel sticks for gluten-free crackers or veggie sticks for those with sensitivities.
How to Make Spider Cheeseballs for Halloween Recipe
Step 1: Whip Up Your Cheese Mixture
Start by beating the softened cream cheese with the olive oil until it’s smooth and silky — this is key to getting that perfect creamy texture. Then, add in the goat cheese, chopped green onions, minced garlic, dill, oregano, salt, and pepper. Give it a thorough mix until everything is well combined. I like to chill this mixture for 30 minutes — it makes rolling the cheeseballs so much easier and less messy!
Step 2: Shape and Coat Your Spiders
Grab handfuls of the chilled cheese mixture and roll them into balls — smaller balls for little spiders (about 1 1/2 inches) or bigger ones for dramatic effect (around 3 inches). Once shaped, gently roll each ball in black sesame seeds until it’s completely coated. The sesame seeds give these cheeseballs that perfect spider-like look and add a subtle crunch.
Step 3: Create the Spider Legs
For the small spiders, break four pretzel sticks in half to get eight legs, then carefully insert four sticks on each side of the cheeseball. For the larger spiders, just use eight whole pretzel sticks to make the legs. This step is super fun and the kids will definitely enjoy helping — just be gentle when pushing the pretzels so the legs stay put!
Step 4: Chill and Serve
Wrap your spider cheeseballs tightly in plastic wrap and refrigerate for at least 30 minutes before serving. This not only helps the flavors meld together but also firms up the texture so they hold their shape while everyone digs in. Serve alongside extra pretzels and crackers for easy snacking.
Pro Tips for Making Spider Cheeseballs for Halloween Recipe
- Chill the Cheese Mixture: I discovered this trick when I realized rolling cold cheese is so much easier—it keeps the balls neat and less sticky.
- Use Fresh Green Onions: Freshness makes a big difference in flavor, so chop them right before mixing in.
- Be Gentle with Pretzel Legs: Press the sticks gently but firmly to avoid breakage and keep those legs standing proud.
- Serve Chilled: I used to serve these straight away and found chilling enhances both texture and flavor—definitely don’t skip this step.
How to Serve Spider Cheeseballs for Halloween Recipe
Garnishes
I like to keep things simple with these — a sprinkle of extra black sesame seeds around the serving platter adds to the creepy vibe. Sometimes, I toss on a few edible candy eyes atop the cheeseballs for an ultra-spooky effect that’s super kid-friendly and fun.
Side Dishes
Serve with an assortment of crackers like wheat, multigrain, or buttery Ritz — anything with a nice crunch pairs perfectly. For a little color contrast, I’m fond of bright veggie sticks like carrot or cucumber on the side; they also add a refreshing bite.
Creative Ways to Present
Once, I arranged these spider cheeseballs on a large platter with spiderweb doilies underneath — it was such a hit at a Halloween party! Another time, I set them on mini “graves” made from crackers and cream cheese tombstones to amp up the eerie theme.
Make Ahead and Storage
Storing Leftovers
If you have leftovers (and I hope you do!), wrap each cheeseball tightly and store in an airtight container in the fridge. They keep beautifully for up to 3 days without drying out or losing any flavor.
Freezing
I’ve frozen the cheese mixture before rolling, which works well — just thaw overnight in the fridge and then roll and coat with sesame seeds when ready to serve. Finished cheeseballs don’t freeze as well due to the pretzel legs, so I avoid freezing after assembly.
Reheating
Since these are served cold or at room temperature, reheating isn’t necessary. Just let refrigerated cheeseballs sit out for 10-15 minutes before serving so the flavors soften up a bit — that always brings out the best taste and texture.
FAQs
-
Can I prepare spider cheeseballs ahead of time?
Absolutely! You can make the cheese mixture a day ahead and keep it refrigerated. The day of your party, just shape, coat, and add pretzel legs. Preparing ahead helps save time and improves flavor melding.
-
What if I don’t like goat cheese?
No worries! You can substitute goat cheese with cream cheese, feta, or ricotta. These swaps still provide great texture and taste with a bit less tang.
-
How can I make the spider legs more sturdy?
Using pretzel sticks is key since they’re firm and salty. Make sure the cheeseball is chilled and firm before inserting the legs, and press gently without breaking the pretzels for best results.
-
Is this recipe kid-friendly?
Definitely! Kids love the fun spider shape, and the flavors are mild enough for little palates. Plus, they’ll have fun helping with rolling and assembling.
-
Can I use other coatings besides black sesame seeds?
You can get creative and use finely ground black olives, crushed black pepper, or even a mix of herbs. But black sesame seeds give the best spider-like look and texture.
Final Thoughts
This Spider Cheeseballs for Halloween Recipe has become one of my all-time favorites for spooky season because it combines fun presentation with amazing flavor. I love how easy it is to make, but also how everyone gets excited to dig into these creepy-cute treats. If you want a unique appetizer that will wow your guests without a ton of fuss, give this one a try — I promise, your Halloween party won’t be complete without it!
Print
Spider Cheeseballs for Halloween Recipe
- Prep Time: 10 minutes
- Cook Time: 0 minutes
- Total Time: 40 minutes
- Yield: 8-10 cheese balls depending on size
- Category: Appetizer
- Method: No-Cook
- Cuisine: American
Description
Spider Cheeseballs are a spooky and delicious Halloween appetizer made from creamy cheeses mixed with herbs and spices, rolled into fun spider shapes coated with black sesame seeds and pretzel legs. Perfect for adding a festive touch to your party snack table, these no-bake cheeseballs delight guests with their creamy texture and crunchy exterior.
Ingredients
Cheese Mixture
- 2 packages (8 ounces each) cream cheese, softened
- 3 tablespoons extra virgin olive oil
- 4 ounces goat cheese
- 4 green onions, chopped
- 3 garlic cloves, minced
- 1 tablespoon dried dill weed
- 2 teaspoons dried oregano
- 1 teaspoon kosher salt
- 1/2 teaspoon black pepper
Coating and Legs
- 1/2 cup black sesame seeds
- 2 cups pretzel sticks
- Additional pretzels and crackers for serving
Instructions
- Prepare the cheese mixture: In a bowl, beat together the softened cream cheese and olive oil until smooth. Next, beat in the goat cheese, chopped green onions, minced garlic, dried dill weed, dried oregano, kosher salt, and black pepper until well combined. Chill the mixture for 30 minutes to firm up and enhance flavors.
- Form the spider bodies: Using your hands, roll the chilled cheese mixture into balls—1 1/2 inches in diameter for small spiders and 3 inches for large spiders. Ensure the balls are smooth and compact for easy handling.
- Coat with sesame seeds: Roll each cheese ball in the black sesame seeds, pressing gently so that they become evenly coated, creating a textured black exterior resembling a spider’s body.
- Attach pretzel legs: For small spiders, break 4 pretzel sticks in half to make 8 legs and carefully insert them on each side of the ball to mimic spider legs. For large spiders, use 8 whole pretzel sticks similarly for the legs, ensuring firmness so the legs stay in place.
- Chill before serving: Wrap the finished Spider Cheeseballs in plastic wrap and refrigerate for at least 30 minutes to allow flavors to meld and the structure to set. Serve chilled alongside crackers and extra pretzel sticks as desired for an inviting party platter.
Notes
- Use room temperature cream cheese to make mixing easier and achieve a smooth texture.
- Chilling the mixture before forming balls helps make rolling easier and prevents stickiness.
- Adjust herb quantities to taste if you prefer more or less seasoned cheese balls.
- Black sesame seeds give the spider a spooky black color; substitute with poppy seeds for a different texture if desired.
- Handle the pretzel legs gently to avoid breaking them when inserting into the cheese balls.
- These cheeseballs keep well covered in the refrigerator for up to 3 days.
Nutrition
- Serving Size: 1 spider cheeseball (approx. 100g)
- Calories: 220
- Sugar: 1g
- Sodium: 380mg
- Fat: 18g
- Saturated Fat: 7g
- Unsaturated Fat: 10g
- Trans Fat: 0g
- Carbohydrates: 8g
- Fiber: 1g
- Protein: 5g
- Cholesterol: 35mg


