
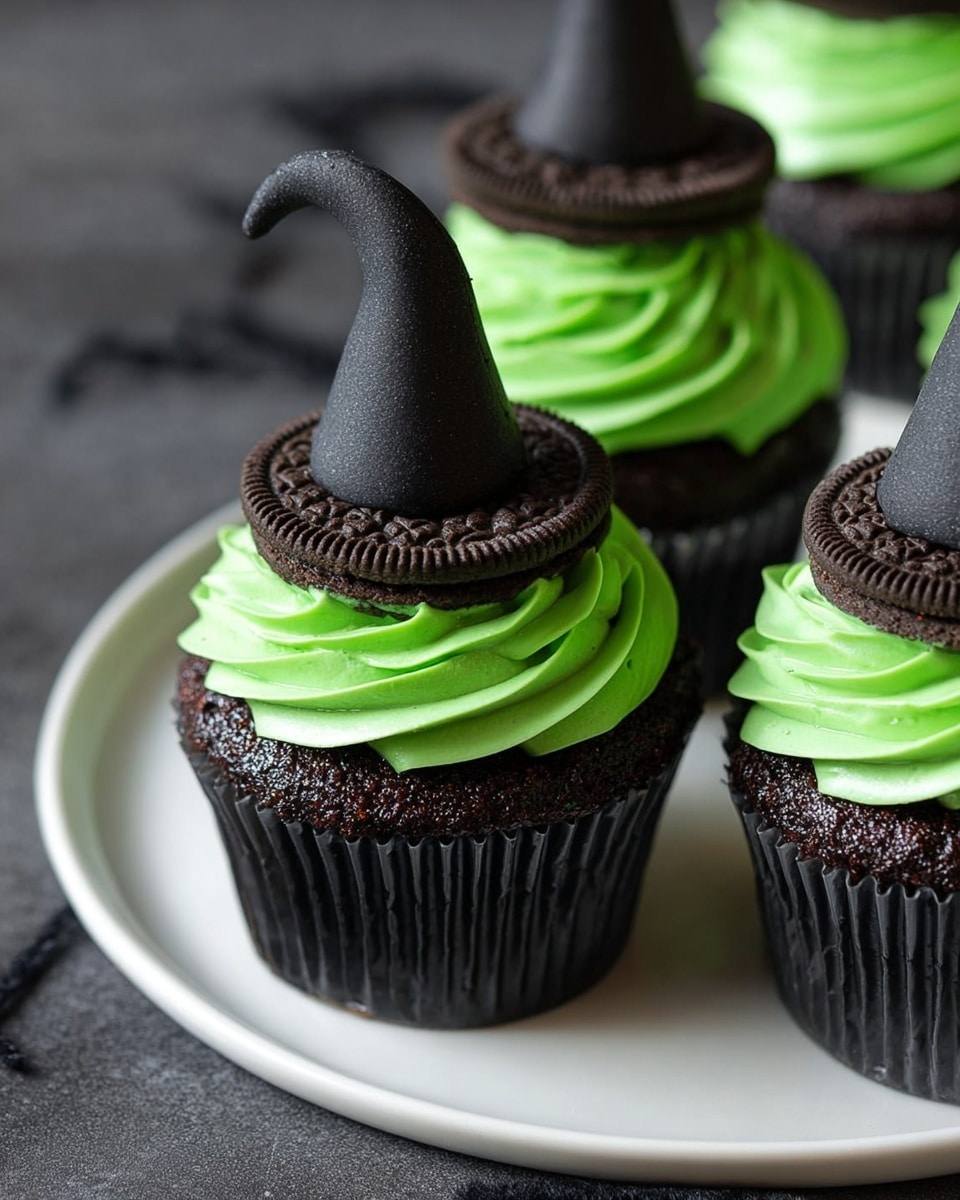
If you’re on the hunt for a fun, festive, and downright adorable Halloween treat, you’re in the right place. This Witches Hat Cupcakes Recipe has quickly become a favorite in my kitchen—and trust me, once you try it, you’ll see why. These cupcakes are beautifully spooky but not too sweet, perfect for sharing with friends or surprising the family at your next gathering. Plus, they’re decorated with these charming witches hat toppers that are surprisingly easy to make and make the whole thing look super professional. Grab your apron, and let me walk you through everything you need to know!
Why You’ll Love This Recipe
- Fun and Festive: These cupcakes bring a playful Halloween vibe that kids and adults alike adore.
- Easy to Make: Despite the fancy decorations, the batter and frosting come together quickly and smoothly.
- Customizable: You can tweak colors and decorations to suit your own style or party theme.
- Delicious Flavor: Chocolate chips baked right into the soft cupcake give it a delightfully rich taste.

Ingredients You’ll Need
The magic of this Witches Hat Cupcakes Recipe lies in how the flavors and colors come together. Each ingredient plays a role, whether it’s creating a fluffy texture or that perfect witchy black color. While some ingredients like the fondant might feel fancy, I promise they’re easier to work with than they seem.
- Unsalted Butter: Using room temperature butter ensures your batter and frosting whip up beautifully without lumps.
- Caster/White Sugar: The fine granules dissolve quickly, lending a light crumb to the cupcakes.
- Large Eggs: Eggs provide structure and a luscious moisture balance.
- Vanilla Extract: Adds warmth and richness beyond just sweetness.
- All-Purpose Flour: The backbone of any cupcake; make sure to sift or stir with leaveners for an even rise.
- Baking Powder: Ensures your cupcakes puff up just right.
- Salt: A pinch enhances all the other flavors in the batter.
- Milk Chocolate Chips: I love these little pockets of melty goodness hidden inside each cupcake.
- Milk: Adds the perfect amount of moisture without weighing down the batter.
- Black Food Coloring: Gel color is ideal since you need less and it won’t thin the batter.
- Icing/Powdered Sugar: For that smooth, sweet frosting everyone loves.
- Green Food Coloring: To dye the frosting that classic witchy green shade.
- Black and Green Fondant Icing: For making the adorable witches hat toppers.
- Oreo Cookies: Halved and with the filling scraped out—these form the hat bases!
- Edible Glue: Holds all those little fondant details together perfectly.
Variations
What I love most about this Witches Hat Cupcakes Recipe is how easy it is to make your own. Once you’ve made the base a couple times, don’t be afraid to make it your own — whether that means switching up the frosting colors or adding extra flavors to the batter.
- Chocolate Lover’s Version: Try swapping the milk chocolate chips for dark or white chocolate for a twist. I once added chopped nuts too, and it was a hit at a halloween party!
- Dairy-Free Option: Substitute dairy ingredients with plant-based alternatives like coconut milk and vegan butter—just watch your frosting consistency and adjust as needed.
- Spiced Pumpkin Batter: Adding a teaspoon of pumpkin pie spice to the dry ingredients brings that fall kitchen warmth. Perfect if you like pumpkin but still want the witchy look.
- Gluten-Free: Use a 1:1 gluten-free baking blend. I tested this once with almond flour and had to tweak baking times, so start checking a little early.
How to Make Witches Hat Cupcakes Recipe
Step 1: Whip Up the Batter
Start by preheating your oven to 180°C (350°F) and lining your cupcake tin with paper liners—that makes clean-up way easier, trust me! Then cream the butter and sugar together until the mixture looks light and fluffy, about 2 minutes on medium-high speed with a mixer. I find scraping down the sides halfway through helps everything blend evenly. Next, mix in the eggs one at a time with vanilla extract, again scraping as needed, for a smooth, incorporated batter.
Step 2: Combine Dry Ingredients and Add Color
In a separate bowl, toss the flour, baking powder, salt, and chocolate chips together so the chips get coated—this is a neat trick that stops them from sinking to the bottom. Pour this into your wet mix and stir gently while adding the milk. Now comes the fun part: add black food coloring little by little until you get a deep, even shade of black batter. I used a gel from Wilton, so I only needed about a quarter of the container. You want the batter smooth with no streaks.
Step 3: Bake the Cupcakes
Divide the batter evenly between the cupcake liners—you can use a cookie scoop to keep sizes uniform, which I learned really helps with presentation. Fill each about 2/3 full. Bake in your preheated oven for 18 to 22 minutes, or until a skewer inserted comes out clean. Take care not to overbake; your cupcakes should be tender and springy. Once out, transfer them immediately to a wire rack, because letting them cool in the tin can sometimes cause liners to peel away.
Step 4: Craft the Witches Hat Decorations
While the cupcakes cool, set up your decorating station. Lay out Oreo halves (without filling) on a silicone mat or parchment paper. Roll the black fondant into small sausage shapes, about the size of three peas, then shape them into cones—standing them upright helps the point stay sharp. Use edible glue on the base to stick each cone firmly in the center of an Oreo half. Then wrap a thin strip of green fondant around the base of the cone to create the witch’s hat band, again securing with a bit of edible glue. This step might seem fiddly, but once you get the rhythm, they’re super quick to assemble.
Step 5: Make the Frosting and Decorate
Beat your butter and powdered sugar first on low speed to avoid a sugar cloud, then turn it up a notch until it starts to come together. Add a touch of milk and green food coloring in small increments until your frosting is a lovely, light, and fluffy green that holds its shape well. I LOVE piping the frosting with an open star tip because it adds texture and makes this cupcake look extra special. Pipe a swirl onto each cupcake, then carefully top with a witches hat—either straight or tilted for a playful effect.
Pro Tips for Making Witches Hat Cupcakes Recipe
- Even Batter Distribution: Using a cookie scoop keeps your cupcakes the same size so they bake evenly and look neat.
- Fondant Handling: Warm your hands slightly before rolling fondant to make it pliable and easier to shape without cracking.
- Food Coloring Caution: Add coloring gradually; too much at once can ruin texture or make batter too runny.
- Cooling Cupcakes Properly: Move cupcakes to a wire rack right away to prevent liners from sticking or tearing as they cool.
How to Serve Witches Hat Cupcakes Recipe
Garnishes
I like to keep it simple with these cupcakes, letting their charming hats shine. Sometimes I’ll add a few edible glitter sprinkles or a small candy spider to the frosting base to amp up the spooky vibes without overwhelming the look. Using edible glue prevents any fondant toppers from sliding off too!
Side Dishes
These cupcakes go perfectly with a warm cup of spiced cider or a bold black coffee to balance the sweet richness. For a full Halloween spread, pair them with some salty popcorn or caramel-covered nuts to cut through the sweetness and keep guests coming back for more.
Creative Ways to Present
I once set these up on a “cauldron” cake stand surrounded by dry ice for a smoky effect that wowed everyone. Another time, I displayed them on tiered trays draped with faux cobwebs and little plastic spiders—instant Halloween centerpiece! Don’t be afraid to get creative with presentation; it really enhances the festive spirit.
Make Ahead and Storage
Storing Leftovers
I usually keep any leftover cupcakes in an airtight container in the fridge. The cupcakes themselves hold up nicely for about 3 days, though the fondant on the hats can soften after a day or so. To keep the hats looking fresh, it’s best to add them just before serving if possible.
Freezing
If you want to freeze these cupcakes, I recommend freezing them without the frosting and decorations. Wrap each cupcake tightly in plastic wrap and place in a freezer-safe container. When you’re ready, thaw overnight in the fridge and then frost and decorate fresh.
Reheating
To enjoy the cupcakes at their best after chilling, bring them to room temperature before serving, about 15-20 minutes out of the fridge. If they’ve been frozen and thawed, I find a few seconds in the microwave (about 10 seconds) can refresh the softness—but skip this if fondant decorations are already added, as heat may distort them.
FAQs
-
What type of food coloring works best for Witches Hat Cupcakes Recipe?
I highly recommend gel food coloring for this recipe because it provides vibrant colors without thinning your batter or frosting. Liquid food coloring can make the frosting runny, so use gels if you can find them!
-
Can I make the witches hat decorations in advance?
Yes! You can prepare the fondant hats a day ahead and store them in an airtight container at room temperature. This actually helps them firm up nicely and speeds up your cupcake assembly on the big day.
-
How do I prevent the cupcake liners from peeling off?
Remove cupcakes from the oven as soon as they’re done and transfer them immediately to a wire rack to cool. Cooling in the tin can cause liners to stick and peel away. Also, filling liners about 2/3 full helps them bake better and less likely to stick.
-
What can I substitute for Oreo cookies for the hat bases?
If Oreo’s aren’t your thing, try using thin chocolate wafer cookies or even chocolate-covered pretzel rings. Just make sure whatever you pick is sturdy enough to hold the fondant hat in place.
-
Any tips for piping perfect frosting swirls?
Fill your piping bag only halfway to maintain control, and steady your hand by resting your elbow on the table. Practice on a piece of parchment before decorating the cupcakes. Also, chilling your frosting if it’s too soft can help it hold shape better.
Final Thoughts
This Witches Hat Cupcakes Recipe is one of those joyful kitchen projects that really brings people together. I absolutely love how these cupcakes look on a Halloween table—they’re cute, festive, and deliciously indulgent. Whether it’s for a kids’ party, a spooky gathering, or just because you’re craving a fun bake, these cupcakes hit the spot every time. Give them a shot—once you master this recipe, I promise you’ll find yourself making them year after year.
Print
Witches Hat Cupcakes Recipe
- Prep Time: 45 minutes
- Cook Time: 20 minutes
- Total Time: 1 hour 5 minutes
- Yield: 12 cupcakes
- Category: Dessert
- Method: Baking
- Cuisine: American
Description
These Witches Hat Cupcakes are a spooky and delightful treat perfect for Halloween parties. Featuring rich black cupcakes filled with chocolate chips, topped with luscious green buttercream frosting, and decorated with handcrafted witches hats made from black and green fondant over Oreo cookies, these cupcakes combine delicious flavors with charming presentation.
Ingredients
For the Cupcakes:
- 1 stick (113g) unsalted butter, at room temperature
- 1 cup (200g) caster/white sugar
- 2 large eggs
- 2 tsp vanilla extract
- 1 1/2 cups (210g) plain/all-purpose flour
- 2 tsp baking powder
- Pinch of salt
- 1 cup (175g) milk chocolate chips
- 1/3 cup + 2 tbsp (100ml) milk
- Black food colouring (Wilton gel recommended, quantity as needed to achieve desired color, approx. 1/4 of gel pot)
For the Frosting:
- 2 sticks (226g) unsalted butter, at room temperature
- 2 1/2 cups (300g) icing/powdered sugar
- 1-2 tbsp milk, as needed for consistency
- Green food colouring (Wilton gel recommended, quantity as needed to achieve desired color)
For the Witches Hat Decorations:
- 6 oz (175g) black fondant icing
- 6 Oreo cookies, halved and with filling scraped out
- 1.5 oz (42g) green fondant icing
- Edible glue
Instructions
- Preheat and Prepare: Preheat oven to 180°C (350°F) and line a 12-hole cupcake tray with liners to prepare for baking.
- Make Cupcake Batter: In a large bowl or stand mixer, beat the butter and sugar on medium-high speed until light and fluffy, about 2 minutes. Add eggs and vanilla extract, scraping sides as needed, and mix for 1 minute until combined.
- Combine Dry Ingredients: In a medium bowl, stir together flour, baking powder, salt, and milk chocolate chips until the chips are coated with flour to prevent sinking.
- Mix Batter: Add the dry flour mixture into the wet mixture and mix on low speed. Then pour in the milk and continue mixing until fully combined.
- Add Coloring: Add black food colouring gradually, mixing until the batter is evenly black and smooth. Approximately 1/4 of the Wilton gel pot will be needed.
- Fill Cupcake Liners: Divide the batter evenly among the cupcake liners, filling each about two-thirds full, using a 2-tablespoon cookie scoop for uniformity.
- Bake: Place tray in the oven and bake for 18-22 minutes until cupcakes are risen and a skewer inserted into the center comes out clean. Immediately transfer to a wire rack to cool to prevent liners peeling from cupcakes.
- Prepare Witches Hats: On a flat surface or silicone pastry mat, place Oreo halves text side up. Divide black fondant into 12 portions (about 3 pea-sized amounts each). Roll each into a sausage shape and then taper one end to create a cone. Stand upright on the thicker end and shape the base to about 1/2 inch diameter.
- Attach Hats to Oreos: Brush edible glue on the base of each cone and stick it to the center of each Oreo half.
- Add Green Bands: Cut green fondant into strips about 5mm thick and long enough to wrap around the base of each cone. Brush edible glue around the cone base and adhere the green strip, pinching gently to secure. Let set for 30 minutes.
- Make Frosting: In a large bowl or stand mixer, mix butter and powdered sugar on low speed until just combined, then increase to medium and beat until frothy. Add 1/2 tablespoon milk, then green food coloring gradually until desired shade is reached. Add more milk in 1/2 tablespoon increments if needed to achieve a light, fluffy, pipeable consistency.
- Pipe Frosting: Fill a piping bag fitted with an open star nozzle halfway and pipe a swirl of green frosting atop each cooled cupcake.
- Assemble Cupcakes: Place a prepared witches hat decoration on top of each frosting swirl, either straight up or angled as preferred.
- Serve or Store: Serve immediately or store in an airtight container in the refrigerator for up to 1 day. Cupcakes can keep chilled for 3 days; however, Oreos will soften over time.
Notes
- Use a 2-tablespoon cookie scoop to ensure even cupcake sizes for uniform baking.
- If using gel food coloring, less is needed compared to liquid coloring; add gradually to avoid oversaturation.
- Allow the fondant witches hats to set for at least 30 minutes for sturdiness before placing on frosting.
- Store cupcakes refrigerated in an airtight container to maintain freshness. Oreos will soften after a day but cupcakes remain moist for up to three days chilled.
- These cupcakes can be made a few hours ahead of a party but are best served fresh.
Nutrition
- Serving Size: 1 cupcake
- Calories: 350 kcal
- Sugar: 32 g
- Sodium: 120 mg
- Fat: 20 g
- Saturated Fat: 12 g
- Unsaturated Fat: 6 g
- Trans Fat: 0.2 g
- Carbohydrates: 38 g
- Fiber: 1 g
- Protein: 3 g
- Cholesterol: 55 mg


