
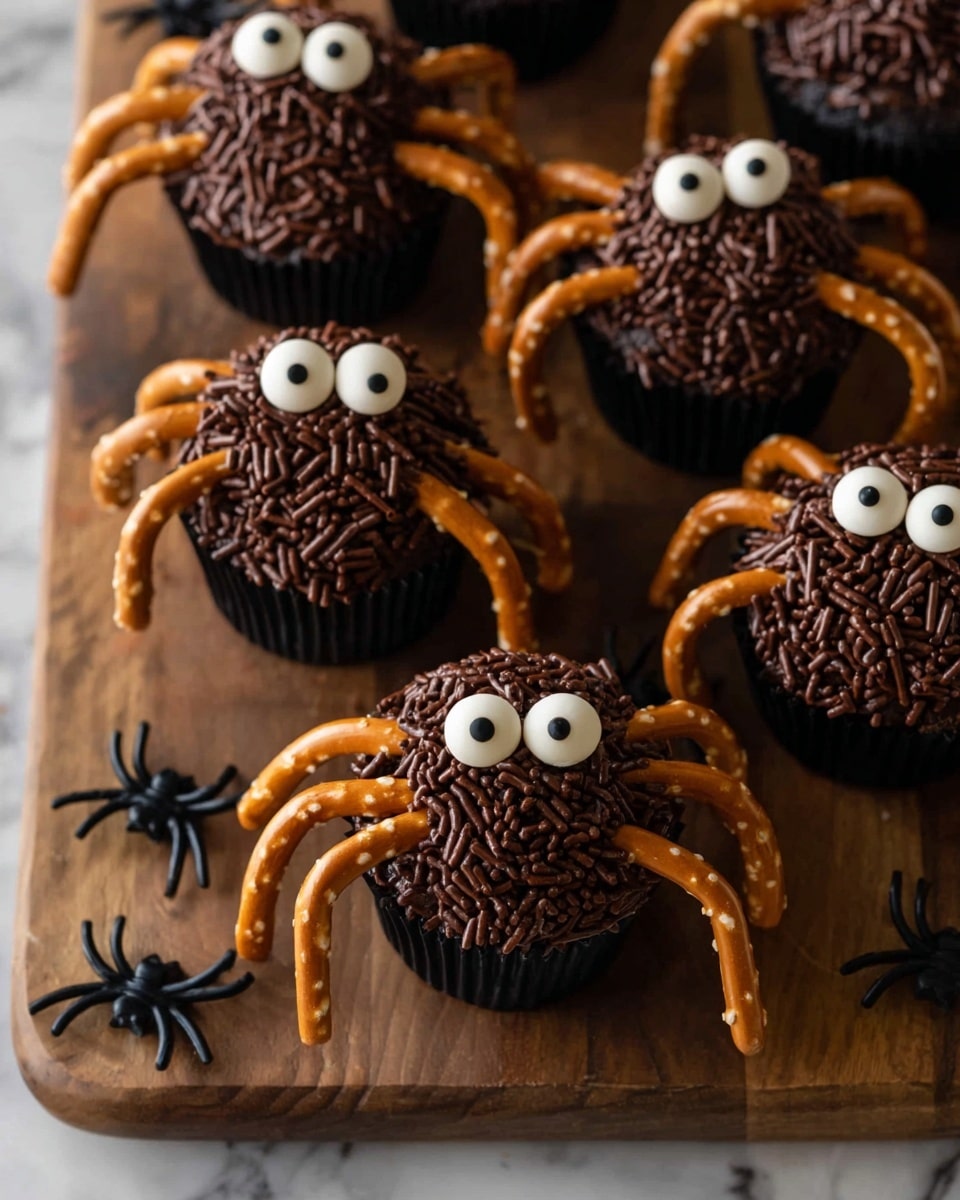
If you’re looking for a festive treat that’s sure to delight both kids and adults alike, this Spider Cupcakes Recipe is going to be your new go-to. I absolutely love how these spooky little cupcakes turn out – they’re decadent, moist, and that chocolate frosting? It’s dreamy! Plus, the fun spider design made from pretzels and candy eyes adds such a playful touch that my family goes crazy for them every Halloween (or anytime we want a fun chocolatey snack). Stick with me and I’ll share all my favorite tips so you can nail this spooky treat on your first try.
Why You’ll Love This Recipe
- Deliciously Moist Cupcakes: The combination of melted bittersweet chocolate and buttermilk ensures every bite is rich and tender.
- Fun and Easy Decorating: Using pretzels for spider legs and candy eyeballs makes this recipe playful without needing fancy skills.
- Make-Ahead Friendly: You can bake and frost ahead of time, making party prep a breeze.
- Perfect for All Skill Levels: Whether you’re a baking newbie or a pro, the steps are straightforward and foolproof.

Ingredients You’ll Need
The magic in this Spider Cupcakes Recipe starts with classic baking pantry staples plus a few fun extras to bring the spider theme to life. I always recommend using high-quality cocoa powder and real butter – it makes a noticeable difference in flavor and texture, and trust me, these cupcakes deserve it!
- All-purpose flour: The base for tender but sturdy cupcakes that hold up well to the rich cocoa.
- Natural unsweetened cocoa powder: Gives that deep chocolate flavor without added sugar; I like natural for its sharp, fresh cocoa taste.
- Baking soda and baking powder: These leavening agents make sure your cupcakes rise just right and stay fluffy.
- Salt: Enhances all those chocolate notes — don’t skip it!
- Unsalted butter: Using room temperature butter helps get that perfect fluffy batter and frosting.
- Granulated sugar: Sweetens and creates moisture; I prefer using regular white sugar for that classic crumb.
- Bittersweet chocolate baking bar: Melting bittersweet chocolate adds a wonderful richness that you really notice in the finished cupcake.
- Eggs: They bind everything together and boost structure.
- Buttermilk: It adds tang and tenderness while reacting with the leaveners for great rise.
- Hot tap water: Helps bloom the cocoa and makes the batter smooth.
- Powdered sugar: Essential for a smooth, fluffy, and sweet chocolate frosting.
- Heavy whipping cream: Adds silkiness and adjusts frosting consistency perfectly.
- Vanilla extract: Brings warmth and depth to the frosting flavor.
- Brown jimmie sprinkles: Adds fun texture and a little crunch to mimic a spider’s fuzzy body.
- Pretzels (Thin Twists): I love these for legs because they’re bigger and break easily into spider leg shapes.
- Candy eyeballs: The spooky finishing touch – grab fun sizes to fit your cupcake scale.
Variations
I love tweaking this Spider Cupcakes Recipe depending on the occasion and who I’m baking for. It’s so versatile that you can play with different licks (or colors!) to make it your own.
- Halloween Rainbow Variation: For a twist, I once swapped in orange and black sprinkles on half the cupcakes and they disappeared even faster!
- Gluten-free option: I experimented with a cup-for-cup gluten-free flour blend and it worked pretty well, just watch the baking time carefully.
- Nut allergy friendly: This recipe is naturally nut-free, which is perfect if you’re baking for little ones with allergies.
- Spiced-Up Flavor: Adding a pinch of cinnamon or chili powder to the batter gives these cupcakes an unexpected but delightful warmth.
How to Make Spider Cupcakes Recipe
Step 1: Melt the Chocolate and Prep Dry Ingredients
First things first, chop your bittersweet chocolate into small chunks. Place it in a microwave-safe bowl and microwave on 50% power in 2-minute bursts, stirring in between, until melted smooth. Let it cool while you mix your dry ingredients—flour, cocoa powder, baking soda, baking powder, and salt—in a separate bowl. This keeps things organized and ensures those raising agents are evenly distributed, which helps the cupcakes rise beautifully.
Step 2: Cream Butter and Sugar, Add Eggs and Chocolate
Using an electric mixer, beat the softened butter and sugar for about 2 minutes until the mixture turns pale and fluffy—that little bit of air you incorporate here is key for light cupcakes. Then add your eggs one at a time, mixing well after each addition. Finally, beat in the cooled melted chocolate just for 30 seconds to blend everything smoothly. You’ll start to smell that rich chocolate aroma that makes this recipe so irresistible!
Step 3: Alternate Buttermilk and Dry Ingredients
Next, add half the buttermilk and beat for about 20 seconds, then add half the dry ingredients and mix gently. Follow that with the remaining buttermilk and hot tap water—hot water helps intensify the cocoa flavor—and then the remaining dry ingredients. Keep your mixer on low at this stage to avoid overmixing, which can make cupcakes tough. The batter should be smooth and pourable but thick enough to hold its shape.
Step 4: Bake and Cool Your Cupcakes
Fill your lined muffin tin halfway with batter to give the cupcakes room to rise without spilling over. Bake at 350ºF for 17-19 minutes. You’ll know they’re done when a toothpick inserted in the center comes out with just a few moist crumbs attached. Overbaking leads to dryness—something I learned the hard way—so keep an eye on them starting at 17 minutes. Once baked, cool them completely before frosting to prevent melty, runny frosting.
Step 5: Make the Luscious Chocolate Frosting
Beat the room temperature butter on high for 3 minutes until it’s incredibly creamy and fluffy—this makes the frosting feel light, not heavy. Then sift in your cocoa powder and 3 cups of powdered sugar to avoid lumps and create smoothness. Mix on low until thick and combined. Add heavy cream, vanilla, and salt next, which really brings the frosting’s flavor to life. If it’s too thick, beat in an extra tablespoon of cream—I like to keep it spreadable but still hold its shape for decoration.
Step 6: Decorate Like a Pro with Spooky Spider Legs
Spread a good dollop of frosting over each cupcake using a spatula. Then, to get those textured spider bodies, dump brown jimmie sprinkles into a small bowl and gently press the creme-topped cupcake upside down into the sprinkles—this trick makes the legs stick so much better. Break pretzels into leg-sized pieces and insert 4 on each side for a total of 8 legs. Use a tiny blob of frosting to glue on your candy eyeballs, and voilà: instant creepy-crawly cupcakes that will charm every guest.
Pro Tips for Making Spider Cupcakes Recipe
- Melting Chocolate Gently: I discovered that melting your chocolate slowly at 50% power prevents it from seizing up—patience here is key for that silky bite.
- Avoid Overmixing Batter: Mixing the dry ingredients at low speed keeps cupcakes tender, and helps you avoid dense, flat results.
- Use Room Temperature Butter: For both batter and frosting, it whips better and creates a smooth texture that’s so satisfying.
- Let Cupcakes Cool Completely: Frosting melts off warm cupcakes, so cooling fully keeps your decorations looking sharp and fresh.
How to Serve Spider Cupcakes Recipe
Garnishes
I always stick with the brown jimmie sprinkles to give the cupcakes that webby, textured look that little fingers love to poke at. The pretzel legs are my favorite because they add a subtle salty crunch that contrasts beautifully with the sweet frosting. And the candy eyeballs? They’re just too fun not to use — the bigger, the better in my opinion!
Side Dishes
These cupcakes shine best when paired with simple sides like cold milk, a creamy hot chocolate, or even a scoop of vanilla ice cream for dessert parties. If you’re serving at a Halloween bash, salty snacks like popcorn or pumpkin seeds complement the rich chocolate wonderfully and balance the sweetness.
Creative Ways to Present
For a Halloween party, I like stacking the spider cupcakes on a black cake stand with fake cobwebs draped around, adding little plastic spiders nestled between them. Another fun idea I’ve tried is placing each cupcake in a mini spider web cupcake wrapper and topping with edible glitter for a spooky sparkle effect—kids (and adults!) totally adore the theatrical vibe.
Make Ahead and Storage
Storing Leftovers
Once decorated, I store leftover Spider Cupcakes in an airtight container in the fridge to keep the frosting fresh and the pretzel legs crisp. I learned the hard way that leaving them out too long can cause the sprinkles and frosting to get a bit soggy.
Freezing
I usually freeze the cupcakes unfrosted in a single layer on a baking sheet until solid, then transfer them to a sealed freezer bag. When you’re ready to enjoy, thaw them overnight in the fridge, then frost and decorate fresh. This way, they taste just as delicious as on day one.
Reheating
If you want to enjoy your cupcakes slightly warm, I suggest warming just the cupcake base for about 10 seconds in the microwave and refraining from heating once frosted – warming the frosting can make it melt and lose shape. Trust me, this little tip keeps your spiders looking spooky and neat!
FAQs
-
Can I make the Spider Cupcakes Recipe vegan or dairy-free?
Absolutely! You can substitute plant-based butter and use a dairy-free milk (like almond or oat) mixed with a tablespoon of vinegar to mimic buttermilk. Use a vegan egg replacer such as flaxseed meal mixed with water. For frosting, opt for vegan butter and coconut cream for a stunning result.
-
How long do Spider Cupcakes last?
In an airtight container stored at room temperature, these cupcakes keep well for about 2 days. If refrigerated, they stay fresh for up to 5 days. For longer storage, freezing unfrosted cupcakes extends their life for up to 3 months.
-
Can I use regular pretzels instead of Thin Twists for the legs?
Yes, but Thin Twists are ideal because they’re larger and easier to break into uniform spider legs. If you only have regular mini pretzels, you might need to use more pieces or glue them carefully for sturdiness.
-
What if I don’t have candy eyeballs?
No worries! You can easily make your own eyes using small dots of white frosting with a black edible marker or melted chocolate dots. It’s a fun little DIY twist that kids often enjoy helping with.
Final Thoughts
Honestly, this Spider Cupcakes Recipe has become a staple in my kitchen every spooky season because it combines classic chocolatey goodness with a playful, creative twist. It’s one of those recipes that brings out the kid in all of us, and the best part? Everyone wants to get in on the decorating action. If you’ve been on the fence about trying something fun and festive that’s easy but still impressive, give these cupcakes a whirl. I promise you’ll be so glad you did – and your guests will be asking for the secret recipe!
Print
Spider Cupcakes Recipe
- Prep Time: 25 minutes
- Cook Time: 19 minutes
- Total Time: 44 minutes
- Yield: 24 cupcakes
- Category: Dessert
- Method: Baking
- Cuisine: American
Description
Spider Cupcakes are a fun and spooky treat perfect for Halloween parties or any festive occasion. These moist chocolate cupcakes are topped with rich cocoa frosting, decorated with brown jimmie sprinkles, pretzel legs, and candy eyeballs to create an adorable spider effect.
Ingredients
Cupcakes
- 2 ½ cups (300g) all purpose flour
- ⅓ cup (28g) natural unsweetened cocoa powder
- ½ tsp baking soda
- 1 tsp baking powder
- 1 tsp salt
- 1 stick unsalted butter, room temperature (½ cup)
- 1 ½ cups (297g) granulated sugar
- 3 oz bittersweet chocolate baking bar, melted & cooled
- 2 large eggs
- 1 cup (236ml) buttermilk
- ½ cup (118ml) hot tap water
Chocolate Frosting
- 2 cups (452g) unsalted butter, 4 sticks, room temperature
- 1 cup (84g) natural unsweetened cocoa powder
- 4-5 cups (454-567g) powdered sugar
- 3-4 Tbsp heavy whipping cream
- 1 tsp vanilla extract
- ½ tsp salt
Decorations
- Brown jimmie sprinkles
- Pretzels (Thin Twists preferred)
- Candy eyeballs
Instructions
- Preheat and Prepare: Preheat the oven to 350º F. Line a muffin pan with muffin liners to prepare for baking.
- Melt Chocolate: Roughly chop the bittersweet chocolate baking bar into smaller pieces, place in a microwave-safe bowl and microwave for 2 minutes on 50% power. Stir and repeat until completely melted. Set aside to cool.
- Mix Dry Ingredients: In a mixing bowl, combine the all-purpose flour, natural unsweetened cocoa powder, baking soda, baking powder, and salt. Set aside.
- Cream Butter and Sugar: In a separate bowl, beat the butter and granulated sugar with an electric mixer for 2 minutes until pale and fluffy. Add the eggs and the cooled melted chocolate and beat again for 30 seconds.
- Add Liquids and Dry Ingredients: Add half of the buttermilk to the butter mixture and beat for about 20 seconds. Add half of the dry ingredients and mix. Then add the remaining buttermilk plus the hot water and mix until just combined. Finally, add the remaining dry ingredients and beat on low speed until fully combined.
- Fill and Bake: Fill the muffin liners halfway full with batter. Bake for 17-19 minutes at 350º F or until a toothpick inserted into the center comes out with moist crumbs. Let the cupcakes cool completely before frosting.
- Prepare Frosting: Beat the butter on high for 3 minutes until creamy. Sift in the cocoa powder and 3 cups of powdered sugar. Beat on low speed until combined and thick. Mix in 3 tablespoons of heavy cream, vanilla extract, and salt. Add additional powdered sugar (1-2 cups) as needed, mixing on low. If frosting is too thick, add an extra tablespoon of heavy cream.
- Assemble Spider Cupcakes: Spread a dollop of frosting on each cupcake and smooth with a spatula. Place brown jimmie sprinkles in a bowl, turn the cupcake upside down and lightly press the frosting into the sprinkles to adhere. Break pretzels into pieces and press 4 legs into each side of the cupcake for 8 legs total. Attach candy eyeballs using a small amount of frosting.
Notes
- Use room temperature butter for better mixing and fluffier cupcakes and frosting.
- Ensure the melted chocolate for the batter is cooled to avoid cooking the eggs when added.
- Frosting consistency can be adjusted with more powdered sugar or heavy cream for spreading or piping.
- Thin Twists pretzels work best for spider legs due to their size.
- Make sure cupcakes are completely cool before frosting to prevent melting the frosting.
Nutrition
- Serving Size: 1 cupcake
- Calories: 350
- Sugar: 33g
- Sodium: 210mg
- Fat: 22g
- Saturated Fat: 13g
- Unsaturated Fat: 7g
- Trans Fat: 0.3g
- Carbohydrates: 38g
- Fiber: 3g
- Protein: 4g
- Cholesterol: 55mg


