
If you’re looking for the perfect festive treat this season, I absolutely have to share my Halloween Sugar Cookies Recipe with you. These cookies are more than just fun shapes and vibrant colors—they have that perfect soft-yet-crisp texture that your family and guests will rave about. Trust me, when I first tried this recipe, I was hooked instantly, and every Halloween since, it’s become my go-to cookie to bake and decorate. Stick around, and I’ll walk you through everything you need to know to get fantastic results (plus some tricks I’ve picked up along the way!).
Why You’ll Love This Recipe
- Soft yet sturdy texture: These cookies hold their shape beautifully for cutting fun Halloween figures without compromising on softness.
- Deliciously flavored dough: A hint of almond extract and vanilla gives a subtle depth that you don’t usually find in sugar cookies.
- Simple, creamy frosting: The buttercream is easy to customize with colors and flavors, making decorating a blast.
- Family-approved: My crew goes wild for these cookies every Halloween—it’s always a hit for all ages!

Ingredients You’ll Need
The ingredients for this Halloween Sugar Cookies Recipe come together to create a dough that’s flavorful, pliable, and perfect for decorating. I find using real butter (not margarine) and room temperature eggs really makes a difference in texture.
- Butter: Use unsalted and bring it to room temperature for easier mixing and better texture.
- Granulated sugar: Gives that classic sweetness and helps with texture in the crumb.
- Eggs: Room temperature eggs help the dough bind smoothly and hold moisture.
- Vanilla extract: Pure vanilla works best to give a warm aroma.
- Almond extract: Just a tiny bit enhances the flavor without overpowering—it’s my secret touch!
- Sour cream: This might surprise you, but it adds moisture and tenderness, resulting in perfect cookies.
- All-purpose flour: The base of the dough, providing structure.
- Baking soda and baking powder: These leavening agents create a light texture and help with rise.
- Fine sea salt: Balances the sweetness and enhances flavors.
- Butter (for frosting): Softened, so it whips up creamy.
- Powdered sugar: The key to silky smooth frosting.
- Heavy cream: Use this to thin the frosting to your desired spreadability.
Variations
One of the reasons I keep coming back to this Halloween Sugar Cookies Recipe is how easy it is to personalize. Whether you want to play with flavors, adjust for dietary needs, or get creative with decorations, this base recipe is super adaptable.
- Gluten-Free Twist: I substituted a gluten-free flour blend once, and while the texture was slightly different, the cookies still baked up nicely with a bit more chilling time.
- Flavor Boost: Adding a teaspoon of pumpkin pie spice to the dough added a cozy fall vibe that my family adored.
- Vegan Adaptation: I experimented replacing butter with coconut oil and eggs with flax eggs; they turned out a little denser but still tasty for non-dairy friends.
- Decorating Themes: Beyond Halloween, you can easily swap out cookie cutters and frosting colors to fit any season or party.
How to Make Halloween Sugar Cookies Recipe
Step 1: Cream Butter and Sugar
Start by beating your room temperature butter and sugar together in a large bowl until the mixture gets creamy and smooth. This step is crucial because properly creamed butter and sugar help give your cookies that tender crumb. Don’t rush—take at least 3-4 minutes with an electric mixer on medium speed.
Step 2: Add Eggs, Extracts, and Sour Cream
Mix in the eggs one at a time, followed by the vanilla, almond extract, and sour cream. The sour cream is a game-changer—it adds moisture and richness without making the dough too sticky. Make sure everything is well combined but avoid overmixing here.
Step 3: Mix Dry Ingredients & Combine
In a separate bowl, whisk the flour, baking soda, baking powder, and fine sea salt. Gradually add these dry ingredients into your wet mixture. Mix just until combined; once you see no pockets of flour, you’re good. Overmixing here can toughen the cookies, so be gentle.
Step 4: Chill the Dough
Divide the dough in half and wrap each in plastic wrap. Refrigerate for 1-2 hours. This chill time firms up the dough making it easier to roll out and helps prevent spreading during baking. I usually prep this step the night before if I can—it saves time on the big baking day.
Step 5: Roll and Cut Out Shapes
Preheat your oven to 350°F (175°C). Roll out the chilled dough onto a baker’s mat or parchment paper. If it feels sticky, sprinkle just a bit of flour (a quarter to half a cup) while rolling. Use floured Halloween-themed cookie cutters and carefully lift the shapes onto baking sheets lined with parchment. This is when decorating fun really starts!
Step 6: Bake to Perfection
Bake for 8-9 minutes or until the bottoms are just starting to turn a very light golden brown. Be super careful here—overbaking will make them too crispy and dry. A little softness when you take them out is perfect because they’ll continue to firm as they cool.
Step 7: Make Frosting and Decorate
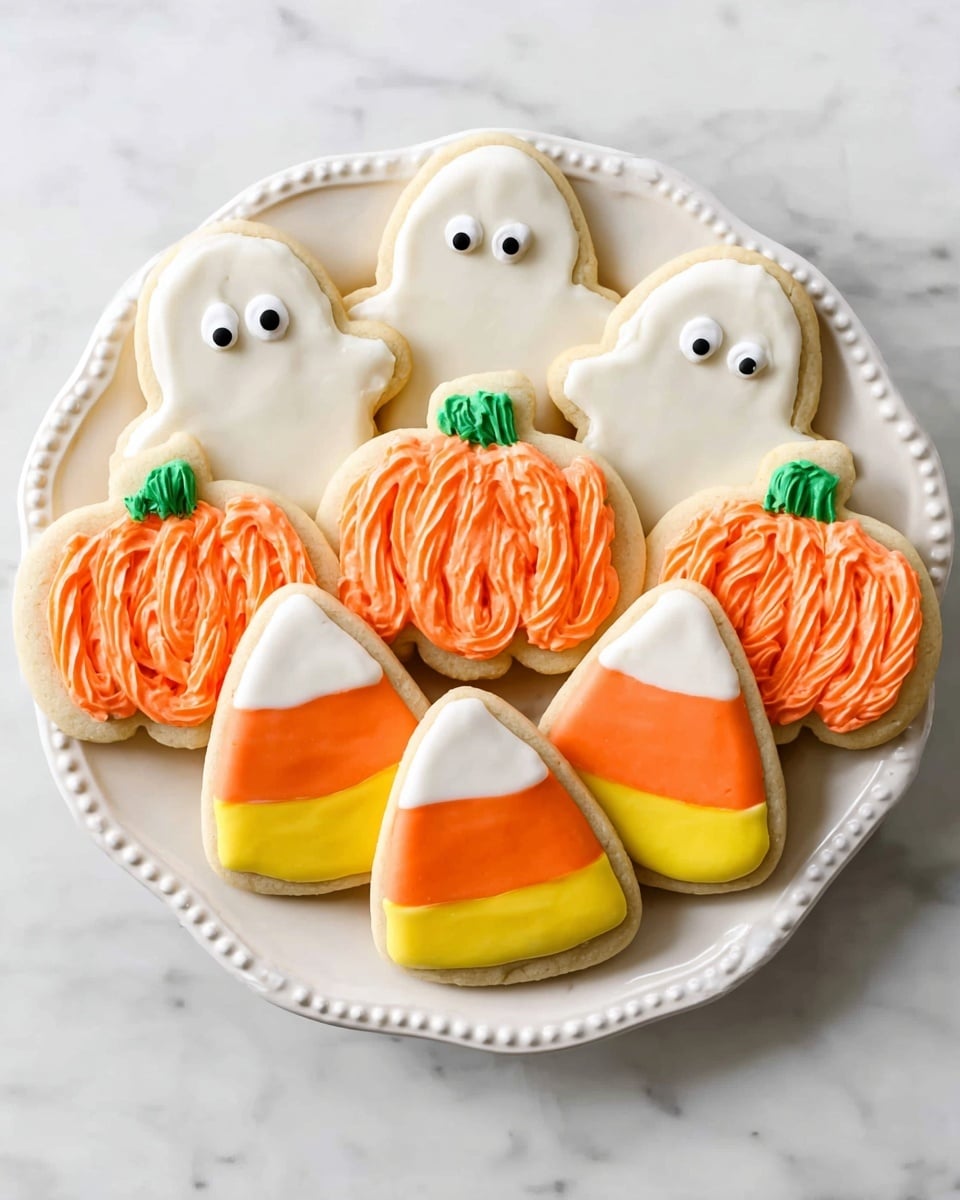
Whip together softened butter, powdered sugar, heavy cream, and vanilla extract until smooth and fluffy. Divide the frosting into different bowls if you want to get colorful—orange is a must for jack-o’-lanterns, white for ghosts, and yellow can be added if you’re making candy corn designs. Spread the frosting generously on cooled cookies, then add candy eyes or other details for that extra Halloween magic.
Pro Tips for Making Halloween Sugar Cookies Recipe
- Chill the dough well: This prevents spreading and keeps your cookie shapes crisp and defined.
- Don’t overbake: I learned the hard way that even 1 minute too long makes cookies hard instead of tender—watch carefully in the last few minutes.
- Use parchment or silicone mats: They make rolling and cleanup a breeze, plus prevent sticking.
- Frost when cookies are completely cool: Warm cookies melt the frosting and create a mess, so patience here pays off.
How to Serve Halloween Sugar Cookies Recipe
Garnishes
I love adding candy eyes to ghost cookies—it’s such a simple touch that really brings them to life. Sprinkles in funky Halloween colors like black, orange, and purple add just the right festive crunch. Sometimes, I use edible glitter for a little sparkle that kids adore.
Side Dishes
Pair these cookies with a warm cup of spiced apple cider or a glass of cold milk for the perfect autumn snack. I’ve also served them alongside pumpkin soup at Halloween parties; the sweet and savory combo always surprises and delights guests.
Creative Ways to Present
For parties, I like arranging these cookies on tiered serving trays mixed with mini pumpkins and fall leaves. Wrapping a few in cellophane with orange ribbon makes adorable party favors. Another fun idea is to create a cookie decorating station where guests can personalize their own sugar cookies—guaranteed entertainment!
Make Ahead and Storage
Storing Leftovers
Once frosted, keep your cookies in an airtight container at room temperature. They stay fresh for about 3-4 days, but honestly, mine rarely last that long because they’re too tempting! If you need to stack them, separate layers with parchment paper to avoid smudging your decorating work.
Freezing
You can freeze the dough wrapped tightly in plastic for up to 3 months—just thaw in the fridge before rolling and cutting. I also freeze baked, unfrosted cookies in a single layer on a tray, then transfer them to freezer bags. When ready, thaw completely before frosting for the best results.
Reheating
If you prefer warm cookies, I pop them in the microwave for about 10 seconds—but only unfrosted cookies. For frosted ones, let them come to room temperature naturally so the frosting doesn’t melt. Just a quick tip to keep your cookies looking and tasting perfect!
FAQs
-
Can I use store-bought frosting instead of making my own?
Absolutely! Store-bought frosting works fine if you’re short on time or prefer convenience. I recommend choosing a creamy buttercream-style frosting and tinting it yourself with gel food coloring to get bright Halloween hues.
-
How do I prevent my sugar cookies from spreading too much?
Chilling the dough for at least an hour is key to stopping the cookies from spreading. Also, avoid over-softening your butter or adding too much flour when rolling out dough—it’s a balance to keep it pliable but not sticky.
-
Can I double this Halloween Sugar Cookies Recipe?
Yes, this recipe scales well. Just be sure to chill the dough in batches if your fridge space is limited, and extend baking times slightly if your cookies are larger.
-
What’s the best way to store decorated sugar cookies?
Store them in an airtight container at room temperature, with parchment paper between layers to prevent sticking. Avoid refrigeration as it can dry them out or cause frosting to sweat.
Final Thoughts
This Halloween Sugar Cookies Recipe has become such a charming tradition in my home. From mixing the dough to decorating with the kids, it’s moments like these that make the whole experience so special. I hope you give this recipe a try and enjoy every sweet bite and spooky shape as much as I do. Have fun baking and don’t forget—the best cookies are made with a pinch of love (and a lot of laughter!).
Print
Halloween Sugar Cookies Recipe
- Prep Time: 20 minutes
- Cook Time: 8 minutes
- Total Time: 1 hour 28 minutes
- Yield: About 30 cookies
- Category: Dessert
- Method: Baking
- Cuisine: American
Description
These Halloween Sugar Cookies are soft, buttery, and festive treats perfect for spooky celebrations. The dough is enriched with sour cream for extra tenderness and shaped using Halloween-themed cutters. Topped with creamy buttercream frosting in vibrant colors, these cookies bring a delightful mix of flavor and fun to your holiday parties.
Ingredients
Cookie Dough
- 1 cup butter, at room temperature
- 1 ¾ cups granulated sugar
- 2 eggs, at room temperature
- 1 teaspoon vanilla extract
- ¼ teaspoon almond extract
- 1 cup sour cream
- 5 ½ cups all-purpose flour
- 1 ½ teaspoons baking soda
- 1 teaspoon baking powder
- ½ teaspoon fine sea salt
Frosting
- ¾ cup butter
- 3 ½ cups powdered sugar
- 3-4 tablespoons heavy cream
- 1 teaspoon vanilla extract
Instructions
- Prepare the dough: In a large bowl, cream together the butter and granulated sugar until light and fluffy. Beat in the eggs, vanilla extract, almond extract, and sour cream until fully combined.
- Combine dry ingredients: In a separate bowl, whisk together the all-purpose flour, baking soda, baking powder, and fine sea salt.
- Mix dough: Gradually add the dry ingredients to the wet mixture, mixing just until all ingredients are incorporated to avoid overworking the dough.
- Chill dough: Divide the dough into two equal parts, wrap each in plastic wrap, and refrigerate for 1 to 2 hours to firm up.
- Preheat oven and roll dough: Once chilled, preheat your oven to 350°F (177°C). Roll out the dough on a baker’s mat or parchment paper, sprinkling an additional ¼ to ½ cup of flour if the dough is sticky to make it easier to handle.
- Cut shapes and bake: Use floured Halloween-themed cookie cutters to cut shapes from the dough. Place them on a baking sheet and bake for 8 to 9 minutes, or until the bottoms are just turning golden. Avoid overbaking.
- Cool cookies: Remove cookies from the oven and allow them to cool on the baking sheet for 2 minutes before transferring to a cooling rack to cool completely.
- Make frosting: In a medium bowl, combine butter, powdered sugar, heavy cream, and vanilla extract. Beat with an electric mixer until smooth and creamy.
- Color frosting: Divide the frosting into 2-3 bowls. Leave one bowl white for ghost cookies, tint one bowl orange for pumpkin cookies, and if making candy corn cookies, divide into three bowls adding yellow to one for the candy corn effect.
- Decorate cookies: Once the cookies have cooled, frost pumpkin-shaped cookies with orange frosting. Frost ghost-shaped cookies with white frosting and add candy eyes. For candy corn cookies, frost the tip with white, the middle with orange, and the top with yellow frosting to mimic candy corn colors.
Notes
- Ensure butter and eggs are at room temperature for easier mixing and better texture.
- Do not overmix the dough once dry ingredients are added to keep cookies tender.
- Refrigerating the dough is important to make rolling and cutting easier and helps cookies hold their shape.
- Watch baking time closely; overbaking will dry out the cookies.
- Use gel food coloring for vibrant frosting colors that won’t affect frosting consistency.
- These cookies keep well in an airtight container for up to 3 days.
Nutrition
- Serving Size: 1 cookie
- Calories: 180
- Sugar: 16g
- Sodium: 90mg
- Fat: 9g
- Saturated Fat: 5g
- Unsaturated Fat: 3g
- Trans Fat: 0g
- Carbohydrates: 24g
- Fiber: 0.5g
- Protein: 2g
- Cholesterol: 30mg


