
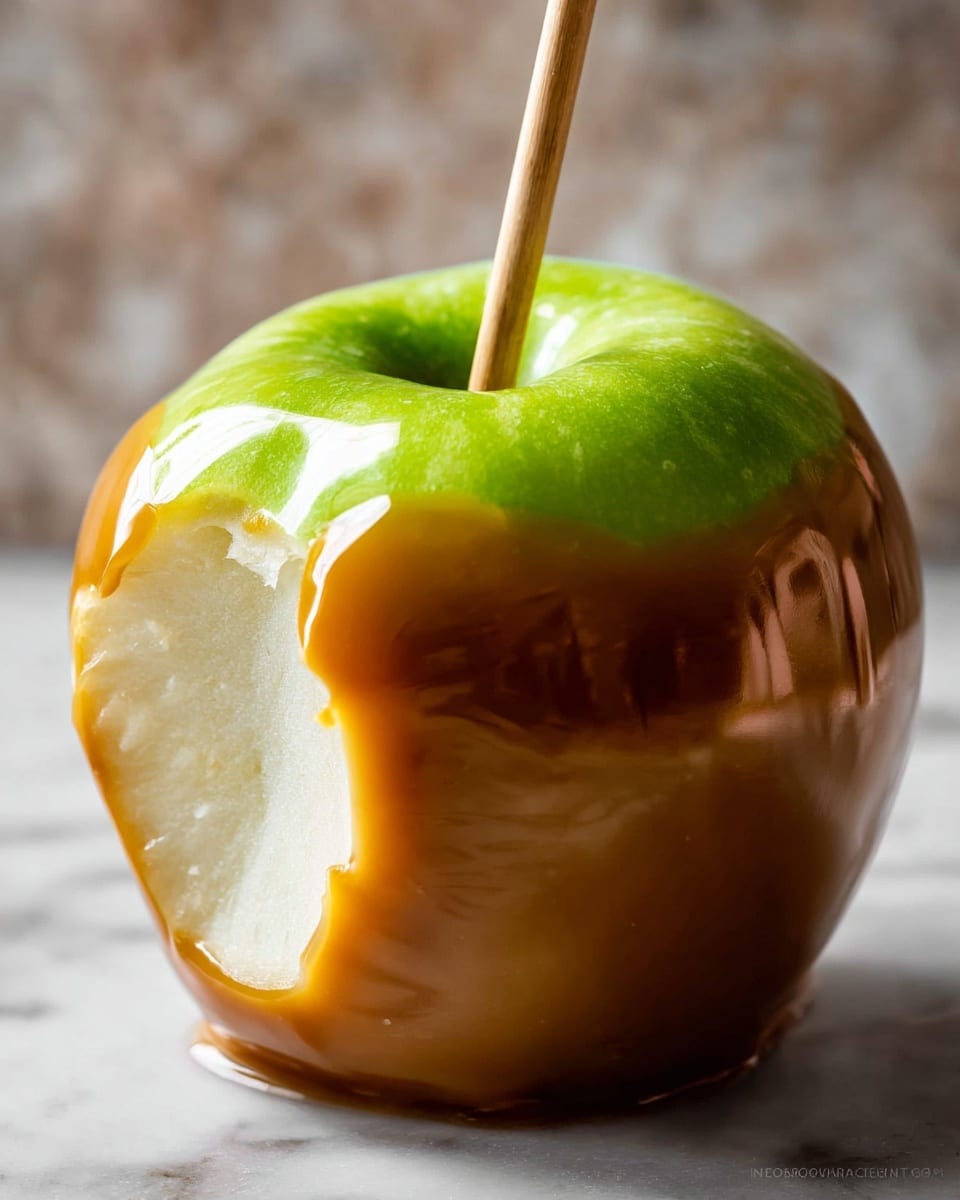
If you love festive treats that feel a bit nostalgic but with a homemade touch, you’re in the right place. This Homemade Caramel Apples Recipe is one of those special goodies that bring back memories of fairs and fall afternoons—and I absolutely love how these turn out every single time. You’ll find that making caramel apples at home is not only doable, but it’s also incredibly rewarding. Plus, your friends and family will go crazy for these sweet, sticky delights with that perfect balance of tart apple and rich caramel. Ready to dive in? Let’s make some magic happen in the kitchen!
Why You’ll Love This Recipe
- Authentic, Handmade Caramel: The caramel is made from scratch right on your stove, giving you incredible flavor and control over sweetness.
- Perfectly Balanced Sweet & Tart: The apples bring that crisp tartness, pairing beautifully with the buttery caramel coating.
- Customizable Toppings: Whether you want nuts, sprinkles, or even chocolate drizzle, this recipe invites your creativity.
- Fun & Festive for Every Occasion: Great for holidays, parties, or just because—you’ll actually enjoy making these!

Ingredients You’ll Need
Choosing the right ingredients is key to nailing that rich, gooey caramel that clings perfectly to your apples. I always pick a mix of brown sugar and butter for depth, and fresh, crisp apples for the best bite. Here’s what you’ll want on hand before starting:
- Apples: I prefer cold, firm apples like Granny Smith—they provide the best tart contrast and help the caramel stick better.
- Heavy cream: This adds creaminess and richness to the caramel—don’t substitute with milk, or it won’t thicken right.
- Light corn syrup: It keeps the caramel smooth and prevents crystallization, which means silky caramel every time.
- Brown sugar: I use light brown sugar for a subtle molasses flavor, but dark brown can add extra depth.
- Unsalted butter: Room temperature butter blends super smoothly into the caramel and controls saltiness.
- Salt: Just a pinch enhances the caramel’s complexity without making it salty.
- Vanilla extract: Adds that warm aroma that makes homemade caramel taste so comforting.
Variations
I love playing around with this recipe because it’s so adaptable. After making it a few times, I discovered little tweaks and different toppings that make each batch feel fresh and exciting. Feel free to personalize your caramel apples—you might find your absolute favorite combination!
- Salted Caramel Caramel Apples: Sprinkle flaky sea salt over the caramel right after dipping for a sweet-salty kick—my family can’t get enough of this twist.
- Chocolate Drizzle: After the caramel sets, drizzle melted semi-sweet or white chocolate over the apples for extra decadence.
- Nuts & Toppings: Roll the freshly dipped apples in chopped pecans, crushed toffee, or colorful sprinkles for added crunch and visual appeal.
- Dietary modification: For a dairy-free option, try coconut cream and dairy-free butter substitutes, though do note the caramel texture varies slightly.
How to Make Homemade Caramel Apples Recipe
Step 1: Prep Your Apples for Success
This step is crucial to help the caramel stick and get that flawless coat. Start by rinsing your apples well under cold water, then make sure to dry them really thoroughly—any moisture can cause the caramel to slide off. I like to remove the stems and insert a sturdy caramel apple stick about three-quarters of the way into the apple. This gives you a good handle for dipping and eating later.
Step 2: Make the Dreamy Caramel
This is where the magic happens. Combine heavy cream, light corn syrup, brown sugar, butter, and salt in a heavy-duty saucepan over medium heat. Stir often at first to melt the butter and sugar together, then use a water-moistened pastry brush to wipe down sugar crystals on the sides of the pan—that keeps your caramel silky smooth. Attach a candy thermometer (make sure the bulb isn’t touching the pan’s bottom for an accurate read) and let the mixture bubble away without stirring.
Patience here is key. You want to reach between 235°F and 240°F, what’s known as the soft-ball stage. It might take 15-20 minutes depending on your stove, but trust your thermometer over timing. Once it hits the right temp, take the caramel off the heat and stir in the vanilla—just enough to mix, no air bubbles please. Let the caramel cool and thicken slightly for 10-15 minutes; this helps it cling to your apples perfectly when dipping.
Step 3: Dip Your Apples and Add Toppings
Holding the stick, dip each apple into the thickened caramel. I like to tilt the pot so I can coat every side evenly, then lift and swirl a bit or gently tap the apple against the pot’s edge to let excess caramel drip off. Place the coated apple on a prepared silicone mat or greased baking sheet—you’ll thank me later because parchment paper tends to be sticky here. If you want to get fancy with toppings like nuts or sprinkles, roll or sprinkle them on immediately before the caramel sets.
Let the caramel set for 45 to 60 minutes before handling. If you’re planning to wrap them for gifts or travel, wait until the caramel is fully firm so it doesn’t stick to the cellophane bags. These treats are fantastic to enjoy right away or can be stored for later snacking.
Pro Tips for Making Homemade Caramel Apples Recipe
- Use a Candy Thermometer: I can’t stress this enough—temperature is everything with caramel; eyeballing simply won’t cut it.
- Dry Apples Thoroughly: Removing the apple’s wax coating by washing and drying ensures your caramel sticks like a dream.
- Let Caramel Cool Before Dipping: If it’s too hot, the caramel will be too runny and slide right off; wait until it thickens slightly for the best coat.
- Prep Your Workspace: Line your pans with silicone mats or grease well—caramel is sticky and can be a pain to clean up otherwise.
How to Serve Homemade Caramel Apples Recipe
Garnishes
I’m a sucker for classic chopped pecans or walnuts—they add that lovely crunch and toasty flavor that offsets the caramel’s sweetness. Sprinkles and mini candies also make these apples festive for parties, especially with kids around. For a grown-up twist, drizzle a bit of melted dark chocolate over the caramel once it’s set for a double-decadence effect.
Side Dishes
When serving homemade caramel apples, I like to keep the sides simple—think warm apple cider or a vanilla latte to complement the rich caramel. For a party, mini cupcakes or soft cookies alongside the apples round out a sweet dessert spread without competing with the apple’s flavors.
Creative Ways to Present
I once arranged a batch on a rustic wooden board lined with parchment paper and sprinkled edible gold dust for a fancy Halloween party—it was a huge hit! Wrapping each apple in a clear cellophane bag tied with a seasonal ribbon makes for adorable gifts or party favors. You can even use small wooden crates filled with autumn leaves for a charming display at gatherings.
Make Ahead and Storage
Storing Leftovers
Once your caramel apples have fully set, store them loosely covered in the fridge to keep them fresh for up to a week. I like to place them on a tray lined with wax paper because even after setting, caramel can sometimes stick to plastic wrap or containers.
Freezing
Freezing caramel apples isn’t something I do often, but it’s possible if you wrap each one tightly in plastic wrap, then foil. When thawed, the texture changes a bit—the caramel softens and the apple can get a little watery—so I recommend enjoying these fresh when possible.
Reheating
If the caramel hardens too much in the fridge, wrap the apple in a damp paper towel and microwave it in short bursts of 10 seconds until it’s pliable again. Just be careful not to overheat and melt the caramel off entirely. I’ve found this trick keeps that irresistible chewy texture intact.
FAQs
-
Can I use any kind of apple for caramel apples?
While you can technically use any apple, firmer and tarter varieties like Granny Smith, Honeycrisp, or Fuji work best. They hold up well under the caramel’s weight and their tartness balances the sweetness beautifully. Softer apples may get mushy or lose their crunch after dipping.
-
How do I prevent the caramel from sliding off the apples?
Removing the apple’s wax coating by washing with warm water and drying completely is essential. Also, letting the caramel cool and thicken slightly before dipping helps it stick better. Finally, keeping your apples cold and dry before coating improves adhesion.
-
What should I do if my caramel crystallizes and becomes grainy?
Crystallization happens when sugar isn’t dissolved properly or too much stirring happens at the wrong time. To avoid this, brush down sugar crystals from the pan sides with a wet pastry brush while cooking, and avoid stirring once the mixture starts boiling. If crystallization occurs, start fresh as it’s tough to fix once grainy.
-
Can I make the caramel ahead of time?
Yes, you can make the caramel ahead and gently warm it before dipping the apples. Just be sure to cool it down completely and then reheat slowly over low heat while stirring to restore its dipping consistency.
-
What are some creative toppings to try?
Beyond classic nuts and sprinkles, try crushed pretzels for a salty crunch, mini candies for color, shredded coconut for texture, or drizzle white chocolate for a fancy look. Even crushed peppermint can be fun for holiday-themed apples.
Final Thoughts
This Homemade Caramel Apples Recipe has become one of my go-to festive classics because it’s such a satisfying mix of texture, flavor, and fun. Whether you’re making these with kids, prepping party treats, or just indulging in a comforting fall snack, I promise these caramel apples will delight. The best part is how approachable they are—you don’t need fancy equipment, just a bit of patience and love. Give this recipe a try and watch those sticky, shiny caramel-coated apples become the stars of your kitchen and your next gathering!
Print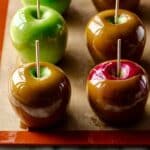
Homemade Caramel Apples Recipe
- Prep Time: 10 minutes
- Cook Time: 15 minutes
- Total Time: 1 hour, 15 minutes
- Yield: 8-9 caramel apples
- Category: Dessert
- Method: Stovetop
- Cuisine: American
Description
This Homemade Caramel Apples recipe offers a classic fall treat made with crisp, cold apples dipped in a rich, creamy homemade caramel. Perfect for autumn gatherings, holidays, or gifting, these caramel apples combine the sweet, buttery flavor of homemade caramel with the fresh crunch of apples. Optional toppings like nuts, toffee, or sprinkles add a fun and personalized touch.
Ingredients
Apples
- 8-9 cold apples
Caramel
- 1 and 3/4 cups (420ml) heavy cream
- 1 cup (240ml) light corn syrup
- 2 cups (400g) packed light or dark brown sugar
- 1/4 cup (4 Tbsp; 56g) unsalted butter, at room temperature
- 1/2 teaspoon salt
- 1/2 teaspoon pure vanilla extract
Instructions
- Prep the apples: Rinse the apples thoroughly with water and dry completely to remove the waxy coating that can prevent caramel from sticking properly. Remove the stems and firmly insert a caramel apple stick about three-quarters of the way into each apple for easy dipping and handling.
- Prepare the baking sheet: Line a large baking sheet with a silicone baking mat or grease it lightly with butter to prevent the caramel apples from sticking after dipping. Avoid parchment or wax paper, as caramel tends to stick to these surfaces.
- Make the caramel: In a heavy-duty 3-quart saucepan, combine the heavy cream, corn syrup, brown sugar, butter, and salt over medium heat. Stir constantly with a wooden spoon until the butter melts. Brush down the sides of the pan with a moistened pastry brush to prevent crystallization, then attach a candy thermometer ensuring the bulb doesn’t touch the pan’s bottom. Without stirring, allow the caramel mixture to bubble and cook until it reaches 235°F to 240°F (113°C to 116°C), approximately 15-20 minutes. Remove from heat and stir in the vanilla extract gently to avoid air bubbles. Let the caramel cool and thicken for 10-15 minutes; if too thin, cool longer for 5-10 minutes more.
- Dip the apples: Hold each apple by the stick and dip into the warm caramel, tilting the pot for full coverage. Lift and swirl the apple or gently tap off excess caramel to prevent drips. Place the dipped apple on the prepared baking sheet. Repeat until all apples are coated. Allow caramel to set for 45-60 minutes before serving or wrapping.
- Add toppings (optional): Immediately after dipping and before the caramel sets, roll the apples in desired toppings such as finely chopped nuts, toffee bits, mini M&Ms, sprinkles, or shredded coconut. Alternatively, drizzle with melted chocolate or white chocolate for extra flavor.
- Serve and store: Place set apples on wax paper or a nonstick surface for display or serving, as caramel can be sticky. To eat, bite directly or slice around the stick after removing it. Store leftover coated apples loosely covered in the refrigerator for up to one week.
Notes
- Use cold apples and remove their wax coating to help caramel adhere better.
- Maintain medium heat while cooking caramel to avoid burning or crystallization.
- Monitor temperature carefully with a candy thermometer for perfect caramel consistency.
- Avoid stirring caramel after it reaches temperature to prevent air bubbles and grainy texture.
- If caramel is too runny, allow extra cooling time before dipping.
- Use a silicone baking mat or butter-greased baking sheet to prevent sticking.
- Wrap caramel apples only after caramel has fully set to avoid sticking to packaging.
Nutrition
- Serving Size: 1 caramel apple
- Calories: 320
- Sugar: 45g
- Sodium: 110mg
- Fat: 12g
- Saturated Fat: 7g
- Unsaturated Fat: 4g
- Trans Fat: 0g
- Carbohydrates: 52g
- Fiber: 3g
- Protein: 1g
- Cholesterol: 30mg


