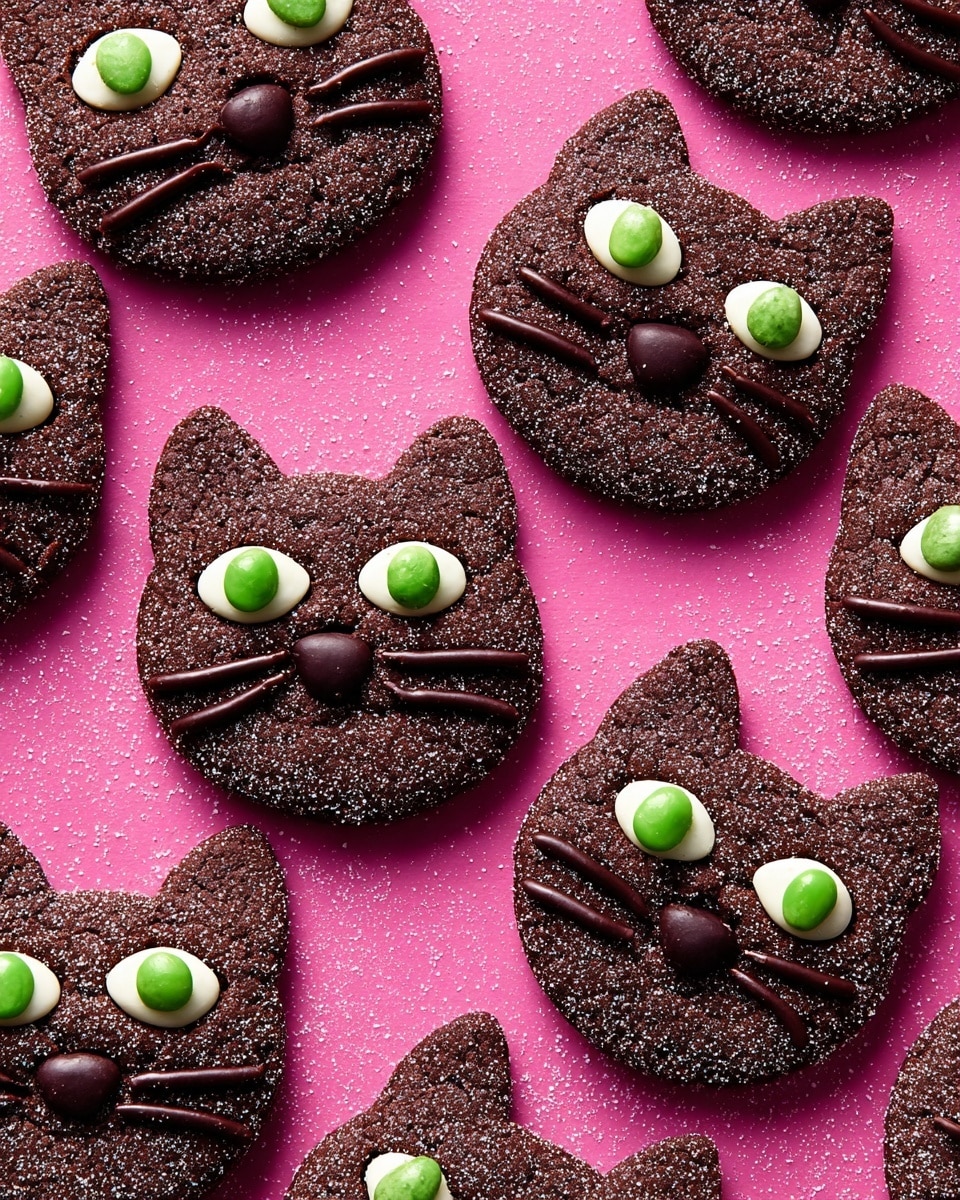
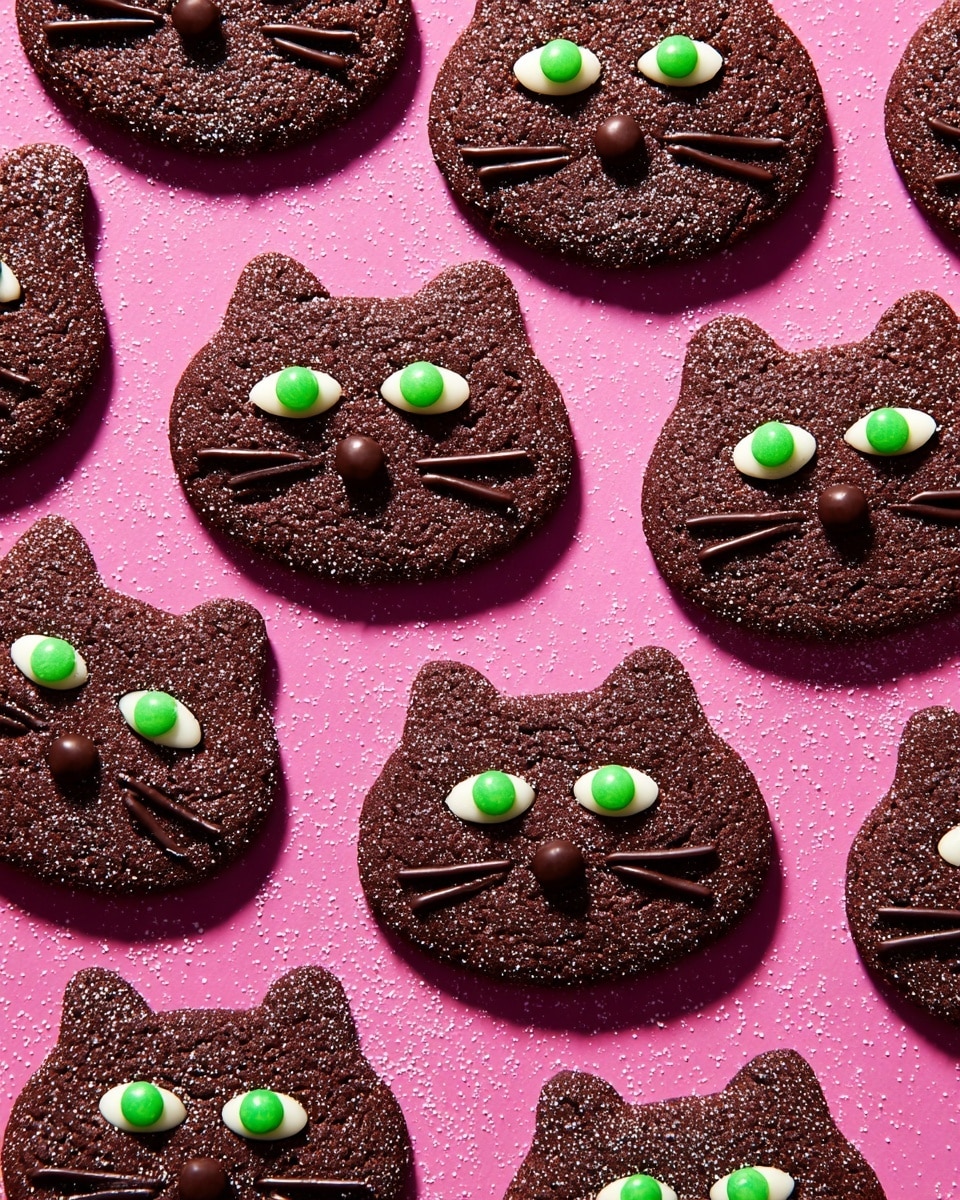
If you’re a fan of Halloween vibes and deliciously fun treats, I’ve got a real gem for you: the Hocus Pocus Binx Cookies Recipe. These charming black cat cookies capture the playful spirit of the holiday, and I absolutely love how they turn out—crispy edges with a soft, cocoa-rich center, topped with cute almond eyes and candy details that make every bite magical. Stick with me because I’ll walk you through everything you need to know so you’ll nail this recipe like a pro.
Why You’ll Love This Recipe
- Adorable Design: These cookies look just like Binx, the black cat from Hocus Pocus, so they’re fun to make and serve.
- Rich, Dark Flavor: The black cocoa powder gives them a deeply chocolatey taste that isn’t bitter, perfect for chocolate lovers.
- Make-Ahead Friendly: You can prep dough ahead or bake the cookies in advance, making your holiday stress-free.

Ingredients You’ll Need
This list is thoughtfully designed for balance—cocoa powder for a deep chocolate taste, and the perfect combo of sugars and butter for just the right sweetness and texture. A quick heads-up: black cocoa powder is the dark secret here, so don’t swap it for regular cocoa if you want that authentic look and flavor.
- All-purpose flour: Provides the structure, so sift if you can to avoid lumps.
- Black cocoa powder: The star ingredient that makes these cookies dark and beautiful. Look for it in gourmet baking aisles or online.
- Baking soda: Helps the cookies spread just enough for a tender bite.
- Kosher salt: Balances sweetness and enhances flavor.
- Granulated sugar: Creates that crisp texture on the cookie surface when rolled in sanding sugar.
- Unsalted butter: Use room temperature butter for easy mixing and a smooth dough.
- Light brown sugar: Adds moisture and a hint of caramel flavor.
- Large egg: Binds everything and gives richness.
- Pure vanilla extract: A splash adds warmth and depth to the cocoa.
- Sanding sugar: For rolling cookies pre-bake; gives a pretty sparkle and crunch.
- Sliced raw almonds: These become the cat’s eyes—place them carefully for that authentic Binx stare.
- Semisweet chocolate chips: Melted for piping whiskers and sticking candies.
- Mini green M&M’s: Create the pupils—those Halloween green eyes are unforgettable!
- Mini brown M&M’s: Perfect for the nose detail.
Variations
I love encouraging a bit of creativity with the Hocus Pocus Binx Cookies Recipe—you can customize to your heart’s content depending on what flavors or textures you want to highlight. I’ve played around a bit with different toppings and mix-ins over the years, and each twist brings something new to the party.
- Nut-Free Option: Swap sliced almonds for thinly sliced strawberries or edible candy eyes if you need to keep allergies in check.
- Spicy Twist: Add a pinch of cinnamon or pumpkin pie spice for a warm fall flavor that pairs beautifully with chocolate.
- Chocolate Intensity: For extra richness, sprinkle a few mini dark chocolate chips on top before baking.
- Colorful Eyes: Change up the mini M&M colors to match your theme—orange works great for Halloween, too!
How to Make Hocus Pocus Binx Cookies Recipe
Step 1: Mix the Magic Base
Start by whisking together the dry ingredients—flour, black cocoa powder, baking soda, and salt—in a medium bowl. This step ensures even distribution, which means every cookie bakes with that perfect cocoa hit. Then, in a large bowl, beat the granulated sugar, softened butter, and brown sugar until creamy and fluffy—this usually takes about 3-5 minutes. I discovered that beating these really well makes the texture so much better! Next, mix in the egg and vanilla until everything is incorporated. Finally, add the dry ingredients and beat just until combined—don’t overmix or your cookies might turn out tough. Pop the dough in the fridge for at least 30 minutes to firm up; chilling helps prevent the cookies from spreading too much while baking.
Step 2: Shape Your Binx Cookies
Preheat your oven to 350°F and line two baking sheets with parchment paper. Using a 1 1/2-tablespoon cookie scoop, portion out 24 dough balls and save the leftover dough separately for the ears. Roll the big dough balls into 1″ spheres and then coat each in a generous layer of sanding sugar. This extra sugar gives these cookies their sparkle and crunch—don’t skip it! Arrange the balls 2″ apart and gently flatten each into a 2″ circle for the cat’s face.
Step 3: Craft the Ears and Eyes
Using the reserved dough, scoop tiny 1/4-tablespoon balls, roll them into 1/2″ balls, and again roll in sanding sugar. Place two of these smaller balls at the top edges of each flattened circle to form ears, then pinch the dough slightly at the tops to shape those signature cat ears. Press two sliced almonds into the dough where the eyes should be, with the thinner almond tips facing each other in the center. This almond shape gives that hauntingly sly Binx gaze we’ve come to love.
Step 4: Bake and Cool
Bake your cookies for about 8 to 10 minutes until the edges are just set but the centers still look soft—this timing keeps the cookies chewy rather than dry. I always let them cool on the baking sheets for 5 minutes first; it helps them hold their shape without breaking. Then transfer to a wire rack to cool completely before decorating.
Step 5: Decorate with Personality
Microwave the chocolate chips in short 10-second bursts, stirring after each, until smooth. Pour the melted chocolate into a piping bag with a tiny round tip or just snip a zip-top bag corner for control. Pipe a dot of chocolate in the center of each almond slice, then gently press a green mini M&M on top—these become Binx’s piercing green eyes. Next, pipe a chocolate dot below the eyes and add a brown mini M&M for the nose. Finally, draw two whiskers on each side with the melted chocolate. Let everything set fully before serving—this step makes the cookies look so professional and fun!
Pro Tips for Making Hocus Pocus Binx Cookies Recipe
- Chill the Dough: I’ve learned chilling the dough for at least 30 minutes makes it easier to shape and helps the cookies maintain their cute forms in the oven.
- Roll in Sanding Sugar: This simple trick adds a beautiful sparkle to the cookies and a subtle crunch that your guests will notice without you saying a word.
- Use a Small Scoop for Ears: Using a smaller scoop or spoon for the ears creates perfect proportions that keep your Binx cats looking adorable.
- Handle Decorations Gently: Press almonds and candies gently but firmly—too hard and the dough might crack; too loose and decorations may fall off during baking.
How to Serve Hocus Pocus Binx Cookies Recipe
Garnishes
I usually sprinkle a tiny dusting of edible glitter or extra sanding sugar just before serving to add a little extra enchantment. A little contrast of orange or purple Halloween sprinkles works beautifully around a platter of these cookies, making them pop visually—and that’s always a hit with the kids!
Side Dishes
These cookies go great with a warm, creamy beverage—think spiced hot chocolate or a pumpkin spice latte. I’ve also served them alongside simple vanilla or cinnamon ice cream for an indulgent treat that balances the rich chocolate flavor.
Creative Ways to Present
For Halloween parties, I’ve lined these Binx cookies up on a tray decorated with faux autumn leaves and miniature pumpkins to really set the mood. Another fun idea is to present them in little black gift boxes as spooky party favors—guests absolutely loved this last year!
Make Ahead and Storage
Storing Leftovers
If you have any leftovers (which you might not, because my family goes crazy for these), store them in an airtight container at room temperature. I find they stay fresh and chewy for up to three days, but really, they rarely last that long in my kitchen!
Freezing
I’ve frozen the dough successfully by shaping the dough balls, freezing them on a tray first, then transferring to a freezer bag. When you’re ready to bake, just thaw overnight in the fridge and proceed with baking and decorating. This trick saved me during busy holiday weeks!
Reheating
To bring these cookies back to life, pop them in the microwave for about 10 seconds or heat briefly in the oven at 300°F for 5 minutes. This refreshes the softness without melting the decorations.
FAQs
-
Can I substitute regular cocoa powder for black cocoa powder in this recipe?
You can substitute regular cocoa powder, but keep in mind that black cocoa powder gives these cookies their signature dark color and slightly different flavor profile. Regular cocoa will result in a lighter color and a less intense chocolate taste, so the final look and flavor might differ from the classic Binx cookie.
-
How do I prevent the almonds from falling off during baking?
Gently press the sliced almonds into the dough so they’re snug but not pushing through. Chilling the dough before baking helps the dough hold its shape and attachment better, reducing the chance of almonds falling off in the oven.
-
Can I make these cookies gluten-free?
Yes! Try using a gluten-free all-purpose flour blend with xanthan gum for structure. Be sure to check that your cocoa powder and other ingredients are gluten-free too. The texture may vary slightly but the result will still be delicious and festive.
-
What’s the best way to store leftover Hocus Pocus Binx Cookies?
Store leftovers in an airtight container at room temperature for up to three days. If you want to keep them longer, freezing the baked cookies in a sealed container can extend freshness for up to a month.
Final Thoughts
When I first tried the Hocus Pocus Binx Cookies Recipe, I was instantly hooked—not just by the cute factor but by how addictively good they taste. Baking these has become my go-to fall tradition, one that never fails to impress guests and delight family members alike. I truly believe you’ll enjoy making and sharing these whimsical treats just as much as I do. So go ahead, grab your ingredients, and embrace the magic of Binx in your kitchen this season—you won’t regret it!
Print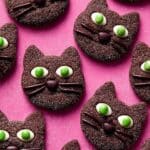
Hocus Pocus Binx Cookies Recipe
- Prep Time: 10 mins
- Cook Time: 10 mins
- Total Time: 1 hr 45 mins
- Yield: 24 cookies
- Category: Dessert, Cookies
- Method: Baking
- Cuisine: American
Description
Hocus Pocus Binx Cookies are adorable, Halloween-themed chocolate cookies inspired by the black cat Binx from the movie Hocus Pocus. These cookies are rich with black cocoa powder, decorated with almonds and colorful M&Ms to create a fun and spooky look perfect for holiday parties or festive treats.
Ingredients
Dry Ingredients
- 1 1/2 cups (180 g) all-purpose flour
- 1/4 cup (20 g) black cocoa powder
- 1/2 tsp baking soda
- 1/4 tsp kosher salt
Wet Ingredients
- 3/4 cup (150 g) granulated sugar
- 1/2 cup (1 stick) unsalted butter, softened
- 1/2 cup (105 g) packed light brown sugar
- 1 large egg
- 1 tsp pure vanilla extract
Decorations
- Sanding sugar, for rolling
- 48 sliced raw almonds
- 1/4 cup semisweet chocolate chips
- 48 mini green M&M’s
- 24 mini brown M&M’s
Instructions
- Mix Dry Ingredients: In a medium bowl, whisk together the all-purpose flour, black cocoa powder, baking soda, and kosher salt to evenly combine the dry components of the cookie dough.
- Cream Sugars and Butter: In a large bowl, use an electric mixer on medium-high speed to beat the granulated sugar, softened butter, and light brown sugar until the mixture is creamy and fluffy, about 2-3 minutes.
- Add Egg and Vanilla: Beat in the large egg until fully incorporated, then blend in the pure vanilla extract for flavor.
- Combine Wet and Dry Ingredients: Gradually add the dry ingredient mixture to the wet mixture and beat on low speed just until combined. Avoid overmixing to keep cookies tender.
- Chill Dough: Cover the bowl with plastic wrap and refrigerate the dough for at least 30 minutes or up to 2 days to firm up the dough for easier handling.
- Preheat Oven and Prepare Baking Sheets: Preheat your oven to 350°F (175°C). Line two baking sheets with parchment paper to prevent sticking.
- Form Cookie Bases: Using a medium 1 1/2-tablespoon cookie scoop, portion out 24 balls of dough. Roll each into a 1-inch ball, then coat them in sanding sugar. Arrange the balls about 2 inches apart on the baking sheets and flatten each ball into a 2-inch circle.
- Form Ears: Use the remaining dough to scoop smaller 1/4-teaspoon portions, roll into 1/2-inch balls, and coat them with sanding sugar. Place two smaller balls on the outer top edge of each flattened cookie circle to form the cat ears. Pinch the tops slightly to shape the ears into small triangles.
- Add Almond Eyes: Position two sliced almonds on each flattened cookie as eyes, placing them so the skinnier points face toward the center of each cookie face.
- Bake: Bake the cookies for 8 to 10 minutes, or until the edges are set but the centers remain slightly soft. Allow the cookies to cool on the baking sheets for 5 minutes before transferring to wire racks to cool completely.
- Melt Chocolate and Decorate: In a small heatproof bowl, microwave the semisweet chocolate chips in 10-second increments, stirring between each, until smooth and fully melted. Transfer the chocolate to a piping bag with a very small round tip or a zip-top bag with a small corner cut off.
- Apply Chocolate Details: Pipe a small dot of chocolate in the center of each almond eye and immediately place a green mini M&M on top. Pipe another chocolate dot below the eyes and place a brown mini M&M for the cat’s nose. Finally, pipe two whiskers on each side of the face using the melted chocolate. Let the chocolate decorations set before serving.
- Storage: Cookies can be made up to three days in advance. Store them in an airtight container at room temperature to maintain freshness.
Notes
- Chilling the dough is essential for shaping the cookies properly and helps prevent spreading during baking.
- Use black cocoa powder rather than regular cocoa for the rich, dark color reminiscent of Binx the black cat.
- Make sure the butter is softened, not melted, to achieve the right cookie texture.
- For best results with the chocolate melting and piping, use a microwave-safe bowl and stir frequently to avoid burning the chocolate.
- If you don’t have mini M&M’s, you can substitute with small candies or colored chocolate chips.
- Cookies keep well at room temperature for up to three days; for longer storage, freeze the baked and cooled cookies in an airtight container.
Nutrition
- Serving Size: 1 cookie
- Calories: 120
- Sugar: 12g
- Sodium: 70mg
- Fat: 6g
- Saturated Fat: 3.5g
- Unsaturated Fat: 2g
- Trans Fat: 0g
- Carbohydrates: 18g
- Fiber: 1g
- Protein: 2g
- Cholesterol: 20mg


