
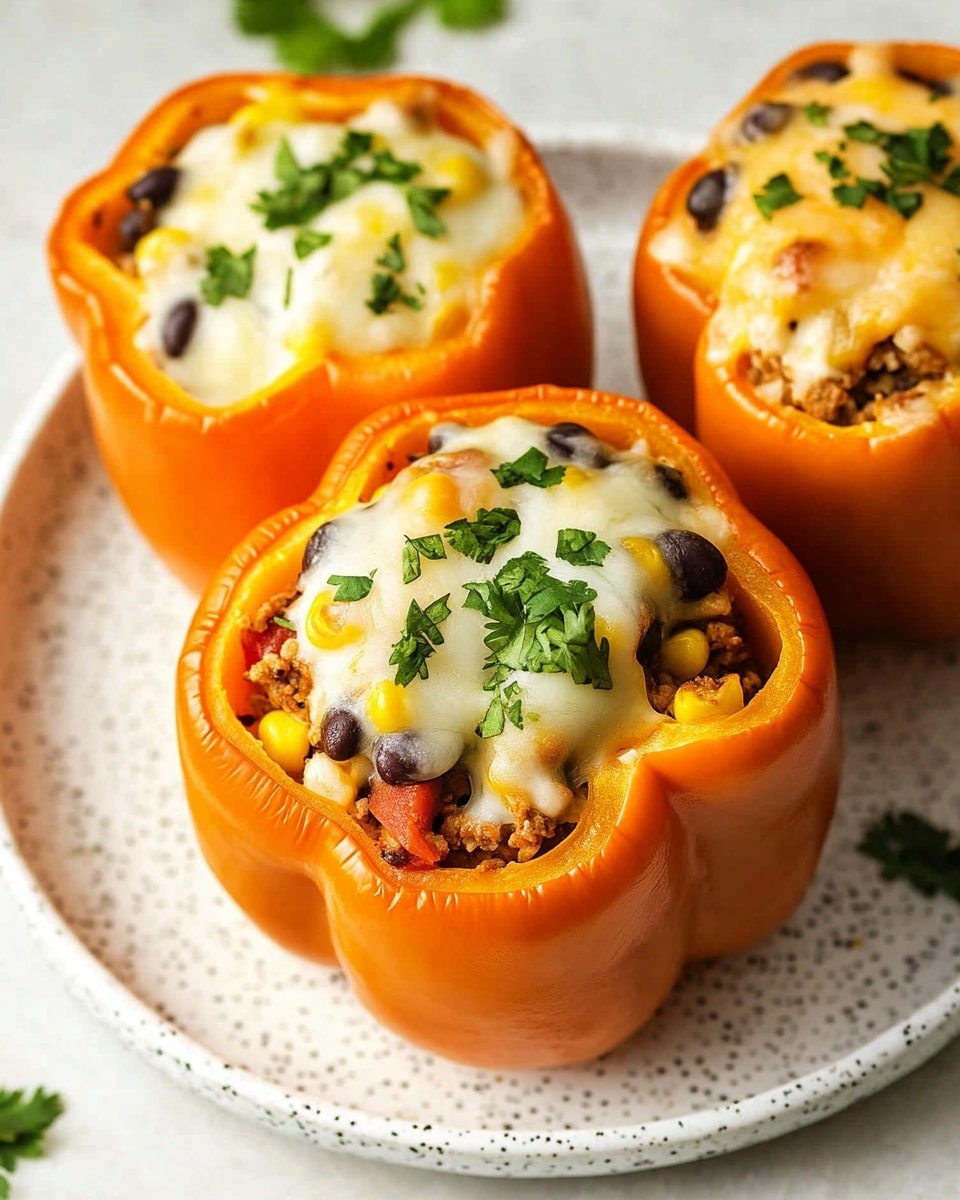
I absolutely love this Enchilada Stuffed Bell Peppers Recipe because it’s like all the best Mexican flavors wrapped up inside a pretty pepper cup. When I first tried this, I couldn’t believe how easy it was to get those enchilada vibes without rolling tortillas or dealing with messy layers. It’s perfect for family dinners or when you need a hearty, colorful meal that feels special but actually comes together pretty quickly.
You’ll find that these peppers are incredibly forgiving and versatile—they work wonderfully for weeknights when you want something satisfying, and also impress guests at your next get-together. The blend of seasoned ground beef, beans, rice, and cheese all nestled inside slightly roasted peppers just hits the comfort food spot in the best way. Once you make this Enchilada Stuffed Bell Peppers Recipe, it’ll probably become one of your go-to dinners too!
Why You’ll Love This Recipe
- All-in-One Meal: A perfect balance of protein, veggies, and grains all stuffed into colorful bell peppers.
- Easy Prep & Cooking: Simple steps with straightforward ingredients make it beginner-friendly and quick.
- Family Favorite: My kids and friends can’t get enough of the cheesy, saucy goodness inside each pepper.
- Flexible & Customizable: You can tweak the fillings and spices to suit any diet or taste preference.

Ingredients You’ll Need
The magic here comes from combining savory seasoned beef, beans, and rice with classic enchilada sauce and melty cheese. Picking fresh, firm bell peppers is key because they’ll hold up beautifully through baking while adding a sweet crunch.
- Bell Peppers: Choose any color you like—red, yellow, orange, or green—to brighten your plate.
- Olive Oil: For roasting the peppers and sautéing the beef mixture.
- Lean Ground Beef: I prefer lean for less grease, but you can use ground turkey or plant-based crumbles too.
- Onion: Diced finely so it cooks down and blends into the filling nicely.
- Garlic: Minced fresh garlic gives that essential aromatic kick.
- Chili Powder: This is where that classic enchilada flavor begins.
- Ground Cumin: Adds earthiness that pairs perfectly with chili powder.
- Onion Powder: Enhances the savoriness without extra bulk.
- Kosher Salt and Black Pepper: Essential seasonings to bring everything together.
- Enchilada Sauce: Use your favorite homemade or store-bought sauce for maximum flavor.
- Black Beans: Rinsed and drained, they add fiber and a creamy texture.
- Mexicorn or Regular Corn: I like Mexicorn for a bit of a Southwest flair, but regular corn works just fine.
- Cooked Rice: Brown or white rice—either works beautifully here as a hearty filler.
- Shredded Mexican Cheese Blend: For that melty, cheesy topping that pulls this whole dish together.
Variations
I like to mix things up depending on what’s in my fridge or who I’m feeding. This Enchilada Stuffed Bell Peppers Recipe is super adaptable, so I encourage you to make it your own!
- Vegetarian Version: Swap the ground beef for extra beans, lentils, or a tasty plant-based protein—I’ve found adding sautéed mushrooms works wonders too.
- Spice it Up: Add diced jalapeños or a dash of cayenne if you like a little heat; personally, I add mild chili powder and let people add hot sauce at the table.
- Cheese Variations: Try pepper jack for a spicy kick or a mix of cheddar and Monterey Jack; I once used queso fresco for a creamy tang and loved it.
- Grain Swap: Quinoa or cauliflower rice can be great alternatives if you’re watching carbs or want extra protein.
How to Make Enchilada Stuffed Bell Peppers Recipe
Step 1: Prep Those Peppers Like a Pro
Start by carefully slicing the tops off each bell pepper—think of this as creating a little edible bowl. Then, use a spoon to scoop out the seeds and membranes inside. I like to rub a little olive oil on the outside to help them roast beautifully and keep them from drying out.
Step 2: Par-Cook to Perfect Softness
Pop the peppers into a casserole dish and bake them at 350°F for 15 to 20 minutes. You want them slightly softened but still holding their shape, which makes stuffing easier and results in that perfect tender-crisp bite later. This step really helps prevent soggy peppers.
Step 3: Cook Your Rice
While the peppers bake, get your rice going. I usually use my Instant Pot for perfectly cooked rice without fuss, but stove-top works just as well. Having fluffy rice ready to go is key because it forms the base of the filling.
Step 4: Brown That Beef with Flavor
Heat olive oil in a skillet on medium-high, then add diced onions and lean ground beef along with chili powder, cumin, onion powder, salt, and pepper. Cook until the beef is fully browned and the onions have softened, about 7-8 minutes. Then stir in minced garlic and cook for just about a minute; be careful not to burn it—it gets bitter quickly!
Step 5: Create the Flavorful Filling
To the cooked beef mixture, add the cooked rice, rinsed black beans, corn, and most of the shredded cheese (save some for topping). Stir it all up so the flavors meld together wonderfully.
Step 6: Stir In Enchilada Sauce and Simmer
Pour your enchilada sauce into the skillet and stir gently, then let it simmer for a few minutes to heat everything through and marry the flavors. You’ll see the mixture thicken slightly—perfect consistency for stuffing the peppers.
Step 7: Stuff the Peppers and Top with Cheese
Fill each softened bell pepper generously with the hearty mixture. Then, sprinkle the reserved cheese on top so it melts beautifully while baking. Don’t be shy with stuffing—you want these packed full for the best taste in every bite!
Step 8: Final Bake for Melty Perfection
Place the stuffed peppers back into the oven at 350°F for about 15 more minutes. Look for bubbly sauce and melted cheese on top—this is when the magic happens, and the filling warms through evenly. Keep an eye so the cheese browns just right without burning.
Step 9: Serve and Enjoy!
Scoop the peppers onto plates and garnish with fresh cilantro and a dollop of sour cream or avocado crema if you’re feeling fancy. I love how the creamy garnishes cut through the spices and keep every bite balanced and fresh.
Pro Tips for Making Enchilada Stuffed Bell Peppers Recipe
- Pepper Prep: Use a sharp knife and steady hands to slice pepper tops so they fit back like lids after stuffing.
- Avoid Soggy Peppers: Par-bake peppers just until slightly softened; too soft and they won’t hold the filling well.
- Season Generously: Don’t be shy with chili powder and cumin—they bring that authentic enchilada flavor punch every time.
- Cheese Matters: Adding cheese into the filling and on top ensures gooey goodness in each bite and a satisfying crust on top.
How to Serve Enchilada Stuffed Bell Peppers Recipe
Garnishes
I usually crown these stuffed peppers with fresh cilantro for a pop of color and brightness. A generous dollop of sour cream or creamy avocado crema adds a cool counterpoint to the rich, spicy filling, making every bite more luscious and balanced.
Side Dishes
Because the peppers are already packed with hearty goodness, I like to keep sides simple and fresh—think a crisp green salad, Mexican street corn salad, or even some quick guacamole and tortilla chips on the side. Simple black beans or Spanish rice also work nicely if you want more carbs or protein on the plate.
Creative Ways to Present
For parties or a casual dinner, I’ve lined these Enchilada Stuffed Bell Peppers in a colorful baking dish and brought them straight to the table for a rustic family-style presentation. Another fun idea is to serve small versions in mini bell peppers as bite-sized appetizers—guaranteed crowd-pleaser!
Make Ahead and Storage
Storing Leftovers
Leftover stuffed peppers keep really well in an airtight container in the fridge for up to 3 days. I like to store them without garnishes and add fresh cilantro or sour cream just before reheating to keep everything fresh and tasty.
Freezing
I’ve frozen these before by wrapping each pepper tightly in foil or plastic wrap then placing them in freezer bags. When you’re ready, thaw overnight in the fridge and bake as usual for a quick meal that tastes almost as good as fresh.
Reheating
Reheat leftovers covered in a 350°F oven for about 15-20 minutes until warmed through, which helps keep the peppers tender but intact. Alternatively, a microwave works for convenience, though the texture isn’t quite as good. I always add fresh toppings after reheating to brighten up the flavors.
FAQs
-
Can I make Enchilada Stuffed Bell Peppers Recipe vegetarian?
Absolutely! Just skip the ground beef and add extra black beans, lentils, or your favorite plant-based protein instead. You can also include sautéed veggies like mushrooms or zucchini to bulk up the filling.
-
What type of cheese should I use?
I recommend a Mexican cheese blend for melting, like cheddar, Monterey Jack, or pepper jack if you want a little spice. Feel free to experiment with queso fresco or cotija on top for a tangy twist.
-
Can I prepare these peppers ahead of time?
Yes! You can prep the filling and stuff the peppers a day ahead, then cover and refrigerate. When ready to serve, just bake them as directed until hot and bubbly.
-
Can I use frozen bell peppers?
It’s best to use fresh peppers because they hold their shape better and don’t get too watery. Frozen peppers tend to release moisture, which can make the dish soggy.
Final Thoughts
This Enchilada Stuffed Bell Peppers Recipe has become a family staple for me, partly because it’s just plain delicious and partly because it’s so easy to make look like a dinner party winner. I love sharing it with friends who are surprised at how full of flavor and satisfying it is. Trust me, once you try it, you’ll want to keep some peppers on hand just to whip this up whenever the craving hits!
Print
Enchilada Stuffed Bell Peppers Recipe
- Prep Time: 40 minutes
- Cook Time: 30 minutes
- Total Time: 70 minutes
- Yield: 7 servings
- Category: Main Dish
- Method: Baking
- Cuisine: Mexican
Description
This Enchilada Stuffed Bell Peppers recipe combines colorful bell peppers with a flavorful blend of ground beef, rice, black beans, corn, and enchilada sauce, all topped with melted Mexican cheese. Baked to perfection, these stuffed peppers make a hearty and delicious meal perfect for family dinners or gatherings.
Ingredients
Bell Peppers
- 7 bell peppers – any color
- 1 Tablespoon olive oil (for rubbing on peppers)
Beef and Seasonings
- 1 pound lean ground beef
- 1 cup onion – diced
- 3 cloves garlic – minced
- 1 Tablespoon chili powder
- 2 teaspoons ground cumin
- 1 teaspoon onion powder
- Kosher salt and freshly ground black pepper – to taste
- 1 Tablespoon olive oil (for cooking beef and onions)
Other Ingredients
- 14 oz. enchilada sauce – homemade or store-bought
- 15 oz. black beans – rinsed and drained
- 11 oz. Mexicorn (or regular corn) – drained
- 2 cups cooked rice – any kind (brown or white)
- 8 oz. shredded Mexican cheese – or any combination, divided
Instructions
- Prep the bell peppers: Use a sharp knife to carefully slice the tops off the bell peppers. Remove the seeds and membranes with a spoon. Rub the outsides of the peppers lightly with olive oil to prepare them for baking.
- Par-cook the peppers: Preheat your oven to 350°F (175°C). Place the prepared bell peppers upright in a casserole dish and bake them for 15-20 minutes until they start to soften but still hold their shape.
- Cook the rice: While the peppers are baking, cook the rice according to package directions. This can be done in an Instant Pot or on the stovetop.
- Brown the meat: Heat a large skillet over medium-high heat. Add the olive oil, diced onions, ground beef, chili powder, cumin, onion powder, salt, and pepper. Cook until the meat is browned and fully cooked. Stir in the minced garlic and cook for another minute until fragrant.
- Add ingredients: To the skillet, stir in the cooked rice, black beans, corn, and most of the shredded cheese, reserving some cheese for topping. Mix everything until well combined.
- Add enchilada sauce: Pour the enchilada sauce into the skillet and stir to combine. Let the mixture simmer for a few minutes to heat through and meld the flavors.
- Stuff the peppers: Fill each partially baked bell pepper generously with the meat and rice mixture. Top each stuffed pepper with the remaining shredded cheese.
- Bake: Return the stuffed peppers to the oven and bake for an additional 15 minutes, or until the cheese is melted, bubbly, and the stuffing is heated through.
- Serve: Serve the baked stuffed peppers hot, optionally garnished with a sprinkle of fresh cilantro, a dollop of sour cream, avocado crema, or your favorite side dishes.
Notes
- Any color bell peppers can be used depending on your preference or availability.
- For a vegetarian version, substitute ground beef with cooked lentils or plant-based crumbles.
- If you prefer spicier peppers, add diced jalapeños or red pepper flakes to the meat mixture.
- Leftover stuffed peppers keep well in the refrigerator for up to 3 days and reheat nicely in the oven or microwave.
- Using pre-cooked rice saves time and helps ensure even cooking in the peppers.
- Feel free to customize the cheese blend with Monterey Jack, cheddar, or a Mexican blend for richer flavor.
Nutrition
- Serving Size: 1 stuffed pepper
- Calories: 380
- Sugar: 6g
- Sodium: 550mg
- Fat: 15g
- Saturated Fat: 6g
- Unsaturated Fat: 7g
- Trans Fat: 0g
- Carbohydrates: 35g
- Fiber: 8g
- Protein: 28g
- Cholesterol: 65mg


